
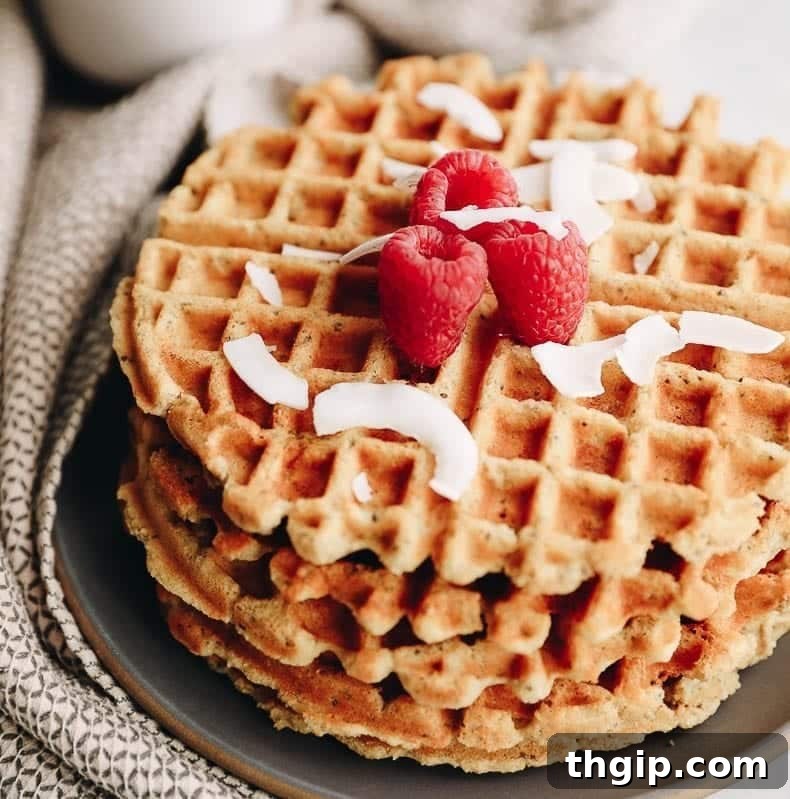
Experience the ultimate healthy breakfast with these incredible coconut waffles. Crafted with nutrient-dense coconut flour and innovative chia seeds, this recipe offers a delightful, satisfying meal that caters to everyone. Completely free of dairy and eggs, these waffles are a truly vegan and gluten-free indulgence.
Delicious & Healthy Vegan Gluten-Free Coconut Waffles
Imagine waking up to the aroma of freshly made waffles, a breakfast that transports you straight to a tropical paradise. Our vegan and gluten-free coconut waffles promise just that – a taste of the tropics with every crispy, fluffy bite. The journey to creating these came naturally, a simple Sunday morning decision: “Sweet or savory?”…”Sweet.” “Pancakes or waffles?”…”Waffles.” “Chocolate, coconut, or carrot?”…”Coconut!” It was a clear path, and I embraced the challenge to make them both gluten-free and vegan, ensuring that as many people as possible could savor this exquisite treat.
These aren’t just “good”; they’re SERIOUSLY good. Imagine them piled high, adorned with sweet banana slices, a dollop of rich almond coconut butter, and a sprinkle of delicate coconut flakes. Each mouthful evokes the feeling of a luxurious Hawaiian breakfast. If you’re a devout coconut enthusiast, or simply yearning for an escape to a sun-kissed island, then these easy-to-make Coconut Waffles are an absolute must-try. They are designed not only for their incredible flavor but also for their wholesome ingredients, making them a perfect guilt-free start to your day.
Why Choose Vegan & Gluten-Free Coconut Waffles?
In today’s health-conscious world, finding breakfast recipes that are both indulgent and align with dietary preferences can be a challenge. These coconut waffles tick all the boxes. They’re a fantastic option for those with gluten sensitivities or allergies, as well as anyone following a vegan or dairy-free lifestyle. But beyond dietary needs, these waffles offer a unique flavor profile and a wealth of nutritional benefits.
- Unforgettable Tropical Flavor: The combination of coconut flour, coconut flakes, and lite coconut milk infuses every bite with a rich, aromatic coconut essence, transporting your taste buds to a serene beach.
- Incredibly Healthy: Unlike traditional waffle recipes, ours is packed with wholesome ingredients. Coconut flour is low in carbs and high in fiber, while chia seeds add essential omega-3 fatty acids and protein. This makes for a breakfast that keeps you full and energized without the sugar crash.
- Dietary Inclusive: Whether you’re plant-based, gluten-free, or simply looking for a lighter, more nutritious alternative, this recipe is incredibly versatile and accommodating, ensuring everyone can enjoy a delicious breakfast together.
- Simple to Make: Despite their gourmet taste, these waffles are surprisingly easy to prepare. With straightforward steps and readily available ingredients, you’ll have a batch of warm, crispy waffles ready in no time.
Essential Ingredients for Your Coconut Waffles
Crafting the perfect vegan and gluten-free coconut waffle begins with a careful selection of ingredients. Each component plays a vital role in achieving that ideal texture and irresistible tropical flavor. Here’s a closer look at what you’ll need:
- Chia Seeds: These tiny powerhouses are essential for creating our “chia egg,” a brilliant vegan alternative to traditional eggs. When mixed with warm water, chia seeds absorb the liquid and form a gel-like consistency, acting as a natural binder that helps hold the waffles together and provides a desirable crispness.
- Coconut Flour: The star of the show! Coconut flour is not only gluten-free but also infuses the waffles with a subtle, naturally sweet coconut flavor. It’s highly absorbent, which means a little goes a long way, contributing to the unique texture of these waffles.
- Oat Flour: A fantastic gluten-free flour option that adds a hearty, wholesome element to the batter. You can easily make your own by grinding rolled oats in a blender or food processor, or opt for store-bought oat flour for convenience. If oat flour isn’t available, a good quality gluten-free all-purpose flour blend can be used as a substitute, though it might slightly alter the texture.
- Unsweetened Coconut Flakes: To truly amplify that signature coconut taste, we incorporate unsweetened coconut flakes directly into the batter. Be sure to choose unsweetened varieties to control the overall sweetness of your waffles.
- Baking Powder: This crucial leavening agent is responsible for the delightful rise and fluffy texture of your waffles, ensuring they’re light and airy, not dense.
- Cinnamon: The warm, inviting spice of cinnamon pairs beautifully with coconut, adding depth and a comforting aroma to the overall flavor profile.
- Vanilla Extract: A classic flavor enhancer, vanilla brings out the natural sweetness of the other ingredients and adds a touch of gourmet sophistication.
- Maple Syrup: Used to provide a hint of natural sweetness to the waffle batter itself. We love maple syrup for its rich, caramelized notes and its status as a natural, unrefined sweetener. Of course, it’s also the perfect topping!
- Coconut Oil: This versatile oil serves a dual purpose. A portion is melted and mixed into the batter to add moisture and a delicate coconut aroma, while the rest is used to grease your waffle iron, ensuring a non-stick surface and a perfectly golden exterior.
- Lite Coconut Milk: The primary liquid component, lite coconut milk contributes to the creamy texture and reinforces the coconut flavor without making the batter too heavy. Its lighter consistency is ideal for waffles, but any dairy-free milk like almond or soy milk would also work well here.
- Pinch of Salt: A small amount of salt is vital for balancing and enhancing all the flavors in the recipe, ensuring every ingredient shines through harmoniously.
Mastering the Chia Egg for Vegan Baking
One of the brilliant vegan innovations in this recipe is the use of a “chia egg.” This simple, plant-based alternative replaces traditional eggs, making these waffles accessible to those avoiding animal products. Chia seeds are renowned for their ability to form a gel-like consistency when combined with liquid, making them an excellent binding agent in baking. This gel helps to hold the vegan coconut waffles together, ensuring they maintain their shape and achieve the same crispiness and structure as waffles made with eggs.
To prepare a chia egg, you’ll combine 1 part chia seeds with 3 parts warm water. For this specific waffle recipe, that translates to 2 tablespoons of chia seeds mixed with 6 tablespoons of warm water. It’s crucial to let this mixture sit undisturbed in a small bowl for 5-10 minutes. During this time, the chia seeds will absorb the water, swelling and forming a thick, gelatinous mixture. Once it’s visibly gel-like and cohesive, your chia egg is perfectly ready to be incorporated into the waffle batter, providing the necessary binding power without any dairy or egg.
Simple Steps to Fluffy Coconut Waffles
Making these delightful vegan and gluten-free coconut waffles is a straightforward process. Follow these easy steps to create a batch of perfectly crispy and tender waffles:
- Prepare the Chia Egg: Begin by whisking together the chia seeds and warm water in a small bowl. Set this mixture aside for 5-10 minutes to allow the chia seeds to gelatinize and form a thick, binding “egg.” While it sets, preheat your waffle iron.
- Combine Dry Ingredients: In a large mixing bowl, thoroughly whisk together all the dry ingredients: coconut flour, oat flour, unsweetened coconut flakes, baking powder, cinnamon, and a pinch of salt. Ensuring they are well combined prevents pockets of unmixed ingredients in your final batter.
- Mix Wet Ingredients: In a separate bowl, melt the coconut oil. Then, combine it with the vanilla extract, maple syrup, and lite coconut milk. Once your chia egg is ready, stir it into this wet ingredient mixture.
- Form the Batter: Pour the combined wet ingredients into the bowl with the dry ingredients. Mix thoroughly until just combined. Be careful not to overmix. The batter will be noticeably thick—this is normal for coconut flour-based recipes and helps create substantial waffles.
- Cook the Waffles: Lightly spray your preheated waffle iron with non-stick spray or brush it with additional melted coconut oil. Spoon the thick batter onto the hot waffle iron. Close the lid and cook according to your waffle iron’s instructions, typically until the steam stops and the waffles are golden brown and crispy.
Serving Suggestions for Your Tropical Waffles
The beauty of these coconut waffles lies not only in their intrinsic flavor but also in their versatility when it comes to toppings. Elevate your breakfast experience with these delicious ideas:
- Fresh Fruit Medley: Top with vibrant, fresh berries like strawberries, blueberries, or raspberries for a burst of antioxidants and natural sweetness. Sliced bananas or tropical fruits like mango and pineapple also pair beautifully with the coconut flavor.
- Nut & Seed Butters: A generous dollop of almond butter, cashew butter, or even a homemade coconut butter adds healthy fats and a creamy texture.
- Golden Maple Syrup: A classic for a reason! A drizzle of pure maple syrup enhances the sweetness and provides that quintessential waffle experience.
- Extra Coconut Delight: Sprinkle additional shredded coconut or toasted coconut flakes for an extra layer of texture and intensified coconut flavor.
- Whipped Cream: For an extra indulgent treat, add a dollop of vegan whipped cream (made from coconut milk!) for a light and airy contrast.
- Chocolate Chips: Stir some vegan chocolate chips into the batter before cooking, or sprinkle them on top for a delightful chocolatey twist.
Storage & Reheating Tips for Freshness
These vegan gluten-free coconut waffles are so delicious, you might find yourself making a double batch! Luckily, they store and reheat beautifully, making them perfect for meal prep throughout the week.
- Cool Completely: Before storing, ensure your waffles have cooled completely on a wire rack. This prevents condensation, which can lead to soggy waffles.
- Airtight Container in the Fridge: Place cooled waffles in an airtight container or a resealable bag and store them in the refrigerator for up to 3-4 days.
- Freezing for Longer: For longer storage, flash freeze the cooled waffles in a single layer on a baking sheet until firm (about 30 minutes to an hour). Then, transfer them to a freezer-safe bag or container, separating layers with parchment paper to prevent sticking. They can be frozen for up to 2-3 months.
- Reheating:
- Toaster or Toaster Oven: For the crispiest results, reheat frozen or refrigerated waffles in a toaster or toaster oven until warmed through and crispy. This is the best method to revive their freshly made texture.
- Oven: Preheat your oven to 350°F (175°C). Place waffles directly on an oven rack and bake for 5-10 minutes, or until heated through and crisp.
- Microwave (Not Recommended for Crispness): While you can microwave them, this method often results in softer, less crispy waffles. Use it only if you’re in a pinch and prioritize speed over texture.
Frequently Asked Questions (FAQ)
- Can I use a different type of flour?
- Coconut flour is quite unique in its absorbency and structure, so it’s not easily substituted 1:1. However, if you cannot use oat flour, a good quality gluten-free all-purpose flour blend can replace the oat flour portion. Do not replace the coconut flour directly with other flours without significant recipe adjustments, as it requires much less liquid than other flours.
- My batter seems too thick, is that normal?
- Yes, it’s completely normal for this batter to be quite thick! Coconut flour absorbs a lot of liquid, which contributes to the thick consistency. This thickness is what gives the waffles their robust structure and helps them crisp up beautifully in the waffle iron. Resist the urge to add more liquid unless the batter is unmanageably dry.
- Can I make these waffles ahead of time?
- Absolutely! You can prepare the waffle batter the night before and store it in an airtight container in the refrigerator. In the morning, give it a good stir before cooking. Cooked waffles also store well and can be reheated as described in the storage section.
- What if I don’t have a waffle iron?
- While this recipe is specifically designed for waffles, you could adapt the batter to make pancakes on a griddle. Keep in mind the texture might be slightly different, but the flavor will still be fantastic!
- Can I add other mix-ins to the batter?
- Definitely! Feel free to customize your waffles. Stir in vegan chocolate chips, shredded carrots for a carrot cake twist, or a handful of chopped nuts for added crunch. Just be mindful not to overcrowd the batter.
Coconut Waffles – Vegan and Gluten-Free Recipe
4.2 from 5 reviews
- Author: Davida Lederle
- Prep Time: 15 minutes
- Cook Time: 15 minutes
- Total Time: 30 minutes
- Yield: 5 large waffles
Ingredients
- 2 tbsp chia seeds (mixed with 6 tbsp warm water to make 1 chia egg)
- 1/4 cup + 1 tbsp of coconut flour
- 1 cup of oat flour (finely ground oats) – gluten-free all-purpose flour also works
- 1/2 cup of unsweetened coconut flakes
- 1 1/2 tsp baking powder
- 1/2 tsp cinnamon
- 1 tsp vanilla extract
- 2 tbsp maple syrup (plus more for serving)
- 1/4 cup coconut oil, melted (plus extra for greasing the waffle iron)
- 1 1/2 cups lite coconut milk (or other dairy-free milk)
- Pinch of salt
Instructions
- Preheat your waffle iron according to manufacturer instructions.
- Prepare the chia egg: In a small bowl, whisk together the chia seeds and warm water. Set aside for 5-10 minutes until it forms a gel.
- In a large bowl, combine all the dry ingredients: coconut flour, oat flour, unsweetened coconut flakes, baking powder, cinnamon, and salt. Whisk well to ensure even distribution.
- In a separate medium bowl, combine the melted coconut oil, vanilla extract, maple syrup, and coconut milk. Stir in the prepared chia egg.
- Pour the wet ingredients into the dry ingredients. Mix thoroughly with a spoon or spatula until just combined. The batter will be thick, which is normal for this recipe.
- Lightly grease the preheated waffle iron with non-stick spray or a brush of melted coconut oil.
- Spoon the waffle batter onto the hot iron, spreading it gently to cover the surface. Close the lid and cook for the recommended time for your waffle iron, usually until the waffle is golden brown and crispy, and steam ceases to escape.
- Carefully remove the cooked waffle and repeat with the remaining batter. Serve immediately with your favorite toppings.
Loved this recipe? Explore more healthy and delicious options:
Healthy Carrot Cake Waffles
Sweet Potato Blueberry Waffles
Oatmeal Chocolate Chip Waffles