
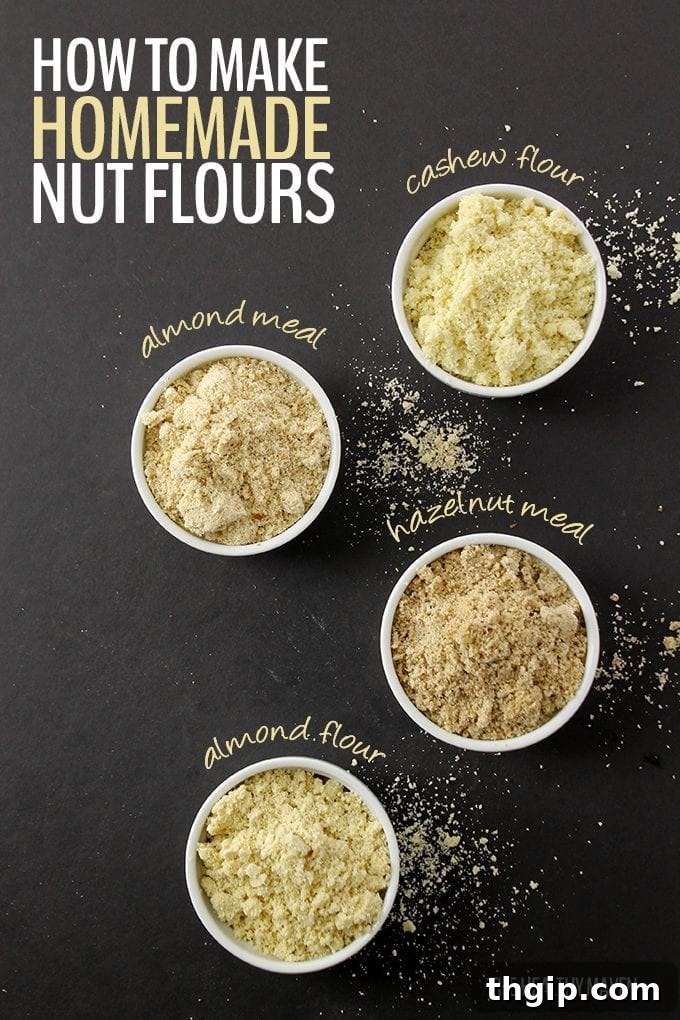
Unlock the secret to healthier, more affordable baking by learning how to craft your own homemade nut flours! From versatile almond flour to rich hazelnut meal and creamy cashew flour, this comprehensive guide will walk you through every step. Say goodbye to overpriced store-bought varieties and hello to fresh, custom-ground nut flours made right in your kitchen.
For those of us who prioritize health and deliciousness in our kitchens, nut flours have become indispensable. They are a staple in grain-free, gluten-free, low-carb, and paleo diets, offering a fantastic alternative to traditional wheat flours. If you’re a regular follower, you know my affinity for these versatile ingredients, and it seems many of you share that enthusiasm! When asked about desired tutorials, a resounding call for DIY nut flours emerged. This isn’t surprising, given that store-bought nut flours can be prohibitively expensive, making homemade versions an incredibly smart and economical choice for healthy baking and cooking.
Today, I’m thrilled to guide you through the remarkably simple process of making various nut flours right in your own home using a high-speed blender or food processor. It’s a quick task, often taking mere seconds, and while the raw nuts themselves aren’t free, the savings compared to pre-packaged nut flours are substantial. Beyond the cost benefits, making your own ensures ultimate freshness and control over ingredients. Let’s delve into the world of nut flours and discover how easy it is to make them yourself.
What Exactly is Nut Flour?
At its core, nut flour is simply finely ground nuts that serve as an excellent substitute for wheat flour or other gluten-free flours in a wide array of recipes. While sometimes it can be a 1-to-1 replacement, often less nut flour is required due to its inherent density and higher fat content. Beyond its structural properties, nut flour imparts a distinct, often sweeter and earthier flavor profile than its grain-based counterparts, adding depth and richness to your culinary creations.
Understanding the distinction between “nut meal” and “nut flour” is key to achieving optimal results. Technically, if the skin remains on the nut during grinding, the product is referred to as a “meal.” A prime example is almond meal, which is made from whole, unblanched almonds. For a true “flour,” like almond flour, the skins are typically removed, resulting in a finer, lighter texture and a paler color. A clever kitchen hack to easily make almond flour without the tedious process of blanching almonds yourself is to simply purchase pre-blanched slivered or sliced almonds and grind those. This not only saves time but is often much more cost-effective than buying pre-made almond flour.
The world of nut flours extends far beyond just almonds. You can transform virtually any nut into a versatile meal or flour. In this guide, we’ll specifically explore how to make cashew meal and hazelnut meal, both of which are exceptional low-carb and grain-free alternatives to standard grain flours. What makes nut flours even more appealing is their typically higher protein content, healthy fats, and rich nutrient profiles compared to many traditional grain-based flours, contributing to more wholesome and satisfying dishes.
Why Make Your Own Nut Flour? The Benefits
Beyond the simple satisfaction of DIY, there are several compelling reasons to embrace homemade nut flours:
- Significant Cost Savings: This is arguably the biggest motivator for many. Pre-packaged nut flours often come with a hefty premium. By purchasing whole nuts in bulk and grinding them yourself, you can dramatically cut down on your grocery bill. The upfront cost of raw nuts is almost always less than the equivalent amount of processed flour.
- Unmatched Freshness and Quality Control: When you grind your own nuts, you ensure that you’re working with the freshest possible ingredients. You control the origin and quality of the nuts, and there are no hidden additives, preservatives, or anti-caking agents often found in commercial flours. This freshness translates directly into superior flavor in your baked goods and dishes.
- Customizable Texture: Do you need a super-fine, airy flour for delicate macarons or a coarser meal for crispy breading? Making it yourself allows you to achieve the exact consistency required for your recipe. A quick pulse delivers a meal, while slightly longer processing yields a finer flour.
- Ready Availability: While specific nut flours might not always be stocked at your local grocery store, whole nuts are generally much easier to find. This means you can whip up any nut flour you need on demand, without having to search multiple stores or wait for online orders.
- Dietary Purity: For those with strict dietary needs, making your own nut flours guarantees that there’s no cross-contamination with gluten-containing grains or other allergens often found in facilities that process various flours.
Essential Equipment for Homemade Nut Flour
The process of transforming whole nuts into flour is surprisingly simple, requiring minimal specialized equipment. Here’s what you’ll need:
- Nuts: Choose fresh, raw, and unsalted nuts of your preference (almonds, hazelnuts, cashews, walnuts, pecans, etc.). For “flour” rather than “meal,” you’ll need blanched nuts.
- High-Speed Blender or Food Processor: This is the most crucial tool. A high-speed blender (like a Vitamix or Blendtec) typically yields the finest and most consistent flour quickly. A powerful food processor can also do an excellent job, though it might take a bit longer to achieve a very fine texture. Ensure your appliance is clean and completely dry before use.
- Airtight Containers/Glass Jars: Essential for proper storage to maintain freshness and prevent rancidity.
- Fine-Mesh Sieve (Optional but Recommended): For those who desire an extra-fine, uniform flour, sifting after grinding can remove any larger pieces, which can then be re-ground or used for other purposes (like toppings).
The Art of Making Homemade Nut Flour: A Step-by-Step Guide
The core technique for making nut flour is straightforward, but success hinges on one critical factor: preventing over-processing. Nuts contain natural oils, and if blended for too long, they will release these oils and transform into a creamy nut butter rather than a dry flour. The goal is to grind them just enough to achieve the desired flour consistency.
- Start with Cold, Dry Nuts: For best results, use nuts that have been stored in the refrigerator or freezer. Cold nuts are less likely to release their oils quickly, reducing the risk of making butter. Ensure they are completely dry, as any moisture can lead to clumping.
- Portion Control is Key: Do not overload your blender or food processor. For most home appliances, processing about 1 to 2 cups of nuts at a time is ideal. This allows for even grinding and prevents the nuts from compacting at the bottom.
- Use the Pulse Function: Instead of continuous blending, use short, quick pulses. This gives you greater control over the consistency and allows you to observe the nuts’ transformation. Pulse for 5-10 seconds, then stop, shake the container (if using a blender) or stir the nuts (if using a food processor), and repeat.
- Monitor Consistency Closely: Watch the nuts carefully. They will quickly break down from whole nuts to coarse crumbs, then to a finer meal, and finally, to a powdery flour. Stop as soon as you reach your desired texture. This usually takes between 8 to 20 seconds of total pulsing time, depending on the nut and your machine.
- Sifting (Optional): For an exceptionally fine flour, pour the ground nuts through a fine-mesh sieve. Any larger pieces can be returned to the blender for another quick pulse.
Remember, the biggest pitfall is over-processing. If you blend for even a few seconds too long, the nuts will start to clump and eventually turn into butter. A few extra pulses are better than one continuous blend.
Crafting Specific Nut Flours: Detailed Instructions
While the general method remains consistent, specific nuts might require slightly different considerations or blending times to achieve their ideal texture.
To Make Almond Meal:
Almond meal, made from unblanched raw almonds with their skins on, has a coarser texture and rustic flavor, perfect for hearty baked goods, breading, and toppings. Place 2 cups of raw, whole almonds in your high-speed blender or food processor. Pulse on high for approximately 10-15 seconds, or just until the almonds are broken into a coarse, mealy texture. Stop immediately once this consistency is reached to prevent them from becoming butter-like. The skins will be visible as flecks in the meal.
To Make Almond Flour:
Almond flour, made from blanched almonds, is finer and lighter, ideal for delicate pastries, cakes, and gluten-free baking where a smoother texture is desired. For the easiest method, purchase pre-blanched almonds (whole, slivered, or sliced). Place 2 cups of blanched almonds in your blender. Blend on high with short pulses for about 10-15 seconds, stopping frequently to check the consistency. Aim for a fine, powdery flour. Again, be vigilant to avoid over-processing into almond butter.
To Make Cashew Flour (or Meal):
Cashew flour offers a slightly sweeter and creamier profile, working wonderfully in both sweet and savory applications, especially for crusts and thickeners. Place 2 cups of raw cashews in your blender. Cashews are softer than almonds, so they require less blending time. Pulse on high for around 8-10 seconds, checking frequently. The goal is a fine, uniform flour or meal. Their softer texture makes them more prone to turning into butter, so be extra cautious with short pulses.
To Make Hazelnut Meal:
Hazelnut meal, with its distinctive earthy and slightly sweet flavor, is fantastic in rich desserts like tortes, cookies, and even savory dishes. Place 2 cups of raw hazelnuts (skins on) in your blender. Pulse on high for approximately 12-15 seconds. Hazelnuts are similar to almonds in firmness, so similar pulsing times apply. For hazelnut flour, you’ll need to remove the skins first, which can be done by toasting them lightly in the oven and then rubbing them in a clean towel.
NOTE: You can also make walnut flour and pecan flour, but both nuts have a higher oil content and are very soft, meaning they break down extremely quickly. To avoid instantly making walnut or pecan butter, I highly recommend pulsing for just 1 second at a time, stopping to stir and check, until your desired consistency is reached. They require extra vigilance!
Storing Your Homemade Nut Flours for Maximum Freshness
Proper storage is paramount for preserving the quality and extending the shelf life of your homemade nut flours. Due to their high fat content, nut flours are susceptible to rancidity if not stored correctly. Rancid nuts or flours will have an off, bitter taste and an unpleasant odor, which can ruin your recipes.
- Airtight is Key: Always store your nut flours in completely airtight containers or glass jars. This minimizes exposure to air, which is a primary contributor to oxidation and rancidity.
- Refrigerate for Freshness: The refrigerator is your best friend for storing nut flours. In a sealed container, nut flours can last for several months in the fridge. The cool temperatures slow down the oil degradation process.
- Freeze for Extended Shelf Life: For longer storage, consider freezing your nut flours. Stored in an airtight freezer-safe bag or container, they can remain fresh for up to a year. You can typically use frozen nut flour directly in recipes without thawing, as it thaws very quickly.
- Check for Spoilage: Before using, always give your nut flour a quick sniff and taste. If it smells like old crayons, bitter, or stale, it’s likely rancid and should be discarded.
Troubleshooting: What to Do If Things Go Wrong
Even with careful pulsing, sometimes you might encounter minor hiccups. Here are some common issues and how to resolve them:
- “My Nuts Turned into Butter!”: This is the most common issue, and it means you over-processed them. Unfortunately, once they’ve turned into butter, you can’t reverse it back to flour. However, don’t despair! You now have delicious homemade nut butter. Just scrape it out and enjoy it on toast, in smoothies, or by the spoonful. Learn from the experience and use shorter, more frequent pulses next time.
- “My Flour Isn’t Fine Enough”: If your flour is still too coarse, simply give it a few more short pulses. For an extra-fine texture, consider sifting it through a fine-mesh sieve and re-processing the larger pieces. Ensure your blender or food processor is powerful enough.
- “My Flour is Clumpy/Sticky”: This can happen if the nuts were not completely dry, if there’s too much humidity in the air, or if you’re approaching the “butter” stage. Try spreading the flour out on a baking sheet for a short period to air dry (if moisture is the issue) or chill the nuts thoroughly before processing next time.
Delicious Ways to Use Your Homemade Nut Flours
Now that you’ve mastered the art of making your own nut flours, it’s time to put them to good use! Nut flours open up a world of possibilities for gluten-free, low-carb, and delicious cooking and baking. Here are some inspiring recipes from The Healthy Maven to get you started:
- Grain-Free Chocolate Zucchini Muffins (perfect with almond meal for a hearty texture)
- Cashew Crusted Chicken Fingers (cashew meal makes an irresistible savory coating)
- The Ultimate Grain-Free Brownies (almond flour creates a fudgy, rich brownie)
- Broccoli Cheddar Fritters (almond meal adds structure and flavor to savory fritters)
- Blueberry Hazelnut Crumb Bars (hazelnut flour brings an incredible depth to crumb toppings)
- The Best Grain-Free Chocolate Chip Cookies (almond meal creates chewy, satisfying cookies)
- Paleo Mexican Hot Chocolate Pancakes (almond meal makes for a fluffy, grain-free pancake)
- Almond Flour Banana Bread (a classic made healthier and gluten-free with almond flour)
How To Make Nut Flour
No reviews yet
Ever wondered how to make homemade nut flours? From almond meal to almond flour, hazelnut meal and even cashew meal, this step-by-step tutorial will teach you how! Stop paying for overpriced almond meal, almond flour and other nut flours make cheap almond flour and the likes at home!
- Author: Davida Lederle
- Prep Time: 0 minutes
- Cook Time: 2 minutes
- Total Time: 2 minutes
- Yield: 2 cups nut flour
Ingredients
For Almond Meal:
- 2 cups raw almonds
For Almond Flour:
- 2 cups blanched almonds (whole, slivered or sliced)
For Cashew Flour:
- 2 cups raw cashews
For Hazelnut Meal:
- 2 cups raw hazelnuts
Instructions
For Almond Meal:
- Place raw almonds in a high-speed blender and blend on high for 10-15 seconds, or just until the almonds are broken up into a coarse, meal-like consistency. Do not blend for long enough that they begin to form a “butter-like” consistency.
For Almond Flour:
- Place blanched almonds (whole, slivered, or sliced) in a high-speed blender and blend on high for 10-15 seconds, or just until the almonds are broken up into a fine, powdery flour. Ensure they do not blend for long enough to become “butter-like.”
For Cashew Flour:
- Place raw cashews in a high-speed blender and blend on high for 8-10 seconds, or just until the cashews are broken up into a fine flour. Cashews are softer and require less time; stop before they become “butter-like.”
For Hazelnut Meal:
- Place raw hazelnuts (with skins) in a high-speed blender and blend on high for 12-15 seconds, or just until the hazelnuts are broken up into a coarse meal. Do not blend for long enough that they become “butter-like” consistency. (For hazelnut flour, skins must be removed prior to blending.)
*Blending times will vary depending on your specific blender or food processor. High-speed blenders generally yield a finer texture more quickly. If using a food processor, you may need to process for slightly longer and scrape down the sides more often to achieve the desired consistency.