
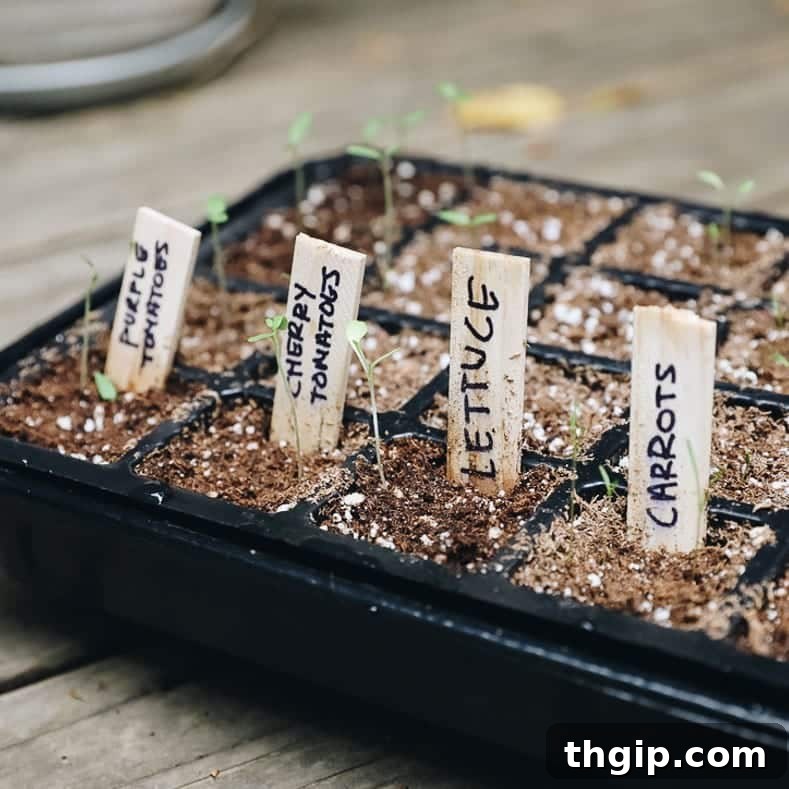
The journey from city life to the quiet embrace of suburbia often brings with it new aspirations, and for me, it was the long-held dream of cultivating my own food. For three decades, my life unfolded amidst the vibrant, bustling streets of global metropolises like Toronto, Montreal, New York City, and San Francisco. In such urban landscapes, the simple pleasure of gardening remained an elusive fantasy. While my heart always yearned for the earth and green growing things, the concrete jungle offered no practical canvas for such an endeavor. However, a significant shift occurred in January when we traded our San Francisco apartment for a house just outside the city, marking my official entry into suburban living. This move immediately sparked a flurry of plans for what would become our very first attempt at home gardening.
We had initially decided to embark on our gardening adventure once the rainy season concluded and after our scheduled trip to New Zealand in March. (If you’re curious about how that international escapade unfolded, let me know in the comments!) As fate would have it, late-season rains lingered through the end of March, and with the added context of current global events encouraging more time spent at home, the timing felt undeniably right to finally break ground. The desire to grow our own produce felt more pressing and rewarding than ever before.
The Allure of Home Gardening: A Beginner’s Perspective
Let me preface this by stating unequivocally that I am by no means a seasoned horticulturalist or a professional gardener. My experience until now has been limited to an enduring fascination with the concept and offering a helping hand to friends tending their plots. When it comes to my own garden, I am starting from absolute zero. To navigate this entirely new world, I’ve delved into numerous resources – a list of which I’ll gladly share below. However, what I truly craved was guidance from someone who shared my novice status, someone willing to openly discuss their missteps and learning curves. My initial observations about gardening confirm that it is an inherently iterative process, demanding patience, observation, and a willingness to learn through trial and error. My hope is that my inevitable blunders and successes will serve as a helpful, relatable guide for others just starting out.
With that spirit of shared discovery, I plan to meticulously chronicle my gardening experiences here, step by step, as they unfold. If you’re contemplating your own foray into the world of growing, I wholeheartedly invite you to join me on this journey. Perhaps my experiences will inspire your own green-thumb pursuits, or at the very least, provide a source of lighthearted amusement. So, let’s rewind to the genesis of it all: starting from humble seeds.
Embarking on the Seed-Starting Journey
A more experienced gardener might gently advise a beginner like myself to bypass the initial stages and simply purchase young seedlings ready for transplanting into garden beds or containers. (We’ll delve into the specifics of raised beds in an upcoming post!) However, I often find myself drawn to learning through direct experience, embracing the process from the ground up. This inclination led us to bypass the convenience of garden store seedlings and instead, commit to the more foundational, yet deeply rewarding, practice of starting our plants directly from seeds.
Seeds vs. Seedlings: Understanding Your Starting Options
For those new to gardening terminology, it’s helpful to clarify the distinction. While most are familiar with what seeds are – the embryonic plant enclosed in a protective outer covering – seedlings represent the next developmental stage. A seedling is a young plant that has successfully germinated from a seed and begun to grow its first true leaves. These are plants that have been carefully cultivated over a period of weeks to months, reaching a size and resilience suitable for direct planting into your outdoor garden space.
Our decision to start from seeds rather than seedlings was driven by several compelling factors, offering a richer and more comprehensive introduction to the world of gardening:
- **A Living Science Experiment:** The entire process felt like an engaging, hands-on science experiment. From observing tiny specks transform into vibrant green life to understanding the precise conditions required for growth, it offered an unparalleled learning experience. This approach fosters a deeper connection to the entire life cycle of a plant.
- **Economical Cultivation:** Financially, purchasing packets of seeds is significantly more cost-effective than buying trays of pre-grown seedlings. This allows for experimenting with a wider variety of plants without a substantial initial investment.
- **Heirloom Variety Access:** Serendipitously, I attended an heirloom seed festival in Sonoma last year, where I acquired a treasure trove of unique seed packets. These often represent older, open-pollinated varieties that are not always available as seedlings in conventional nurseries, offering a chance to grow something truly special.
- **Embracing Available Time:** With a newfound flexibility in my schedule, dedicating time to nurturing seeds felt like a productive and fulfilling endeavor, transforming idle hours into a rewarding pursuit.
Essential Equipment for Indoor Seed Starting
Through my preliminary research, I quickly learned that not all vegetables are created equal when it comes to germination. Some plant varieties exhibit a preference for controlled indoor environments during their initial growth stages, thriving when started from seed indoors rather than being directly sown outdoors. These “temperamental” plants benefit from the predictable conditions of indoor cultivation, especially when they are vulnerable young sprouts. Conversely, other, more robust plants are quite hardy and can be confidently planted directly into the garden. Fortunately, most seed packets provide clear guidance on the optimal growing conditions for that specific variety. For my initial experimental foray, I decided to plant a diverse selection of seeds indoors, simply to observe their growth patterns and understand the nuances of indoor propagation. However, before any planting could commence, it was crucial to establish the ideal environment.
Creating the Optimal Environment: Light, Heat, and Humidity
Successfully transforming seeds into thriving seedlings indoors demands a significant amount of light exposure daily. Most horticultural recommendations suggest a minimum of 12 to 16 hours of intense light per day. Furthermore, germinating seeds and young seedlings prefer ambient temperatures consistently above 70 degrees Fahrenheit (approximately 21 degrees Celsius). Unfortunately, our Californian home, while pleasant, doesn’t naturally offer any indoor location that receives such prolonged, intense natural light, nor does it typically maintain temperatures above 65 degrees Fahrenheit (around 18 degrees Celsius) for extended periods. To overcome these environmental limitations and provide our budding plants with the best possible start, we realized an investment in specialized equipment was necessary:
- Seed Starting Trays: These compartmentalized trays provide individual cells for each seed, making it easier to manage growth, water efficiently, and transplant later.
- Heating Mat: Essential for maintaining consistent soil temperatures, ideally between 70-80°F (21-27°C), which significantly aids in germination, especially for heat-loving plants. This is crucial unless your home naturally maintains these warmer temperatures.
- Plastic Dome: These covers fit over the seed trays, creating a miniature greenhouse effect by trapping humidity and heat, which are vital for seed germination and early seedling development.
- Grow Lights: Since natural light indoors is often insufficient, specialized grow lights provide the full spectrum and intensity of light that seedlings require for healthy, robust growth, preventing them from becoming leggy and weak.
- Seed Starting Soil: A specialized, finely textured, sterile mix designed to provide the perfect environment for delicate seeds to sprout, offering excellent drainage and moisture retention without heavy nutrients that can overwhelm young plants.
- **Seeds:** Of course, the stars of the show! Choose whatever fruits, vegetables, or herbs you aspire to grow.
While you certainly have the option to purchase each of these items individually on Amazon (I’ve included direct links for your convenience), I opted for a more streamlined approach. I purchased a comprehensive seed starting kit (though my specific kit is currently sold out, this similar one is available) and supplemented it with a separate set of grow lights. I highly recommend investing in a kit, especially for beginners, as they are often thoughtfully designed for ease of use. As for the seed starting soil, you can readily find this essential component at most hardware stores, dedicated garden centers, or even via delivery services from larger retailers like Home Depot.
Admittedly, with the array of specialized equipment now set up in our home, our indoor gardening station bears a striking, albeit humorous, resemblance to a small-scale “grow-op.”
Step-by-Step Guide: Planting Your First Seeds
With all your essential equipment gathered and ready, the exciting moment has arrived: it’s time to plant your seeds! This is where careful attention to detail will pay off. Once again, refer back to your individual seed packets, as they contain crucial information tailored to each specific plant variety. These instructions will guide you on the ideal planting depth and the recommended spacing between seeds. While it might be tempting to simply scatter all your seeds into a tray and hope for the best, there’s a well-established technique that significantly increases your chances of success. Typically, you’ll plant two seeds per cell, ensuring they are separated by the distance indicated on the packet. This seemingly counterintuitive practice of planting duplicates is a common expert recommendation because, ultimately, you will select and “thin out” the weaker of the two sprouts, allowing the stronger, healthier seedling to thrive without competition.
Preparing Your Seed Trays
The foundation of successful seed starting lies in proper preparation. Begin by filling your seed trays with the specialized seed starting soil. This isn’t your average potting mix; seed starting soil is lighter, finer, and sterile, designed to provide the perfect environment for delicate seeds to germinate. Gently compact the soil in each cell, but avoid packing it too tightly, as roots need air to grow.
The Art of Planting: Depth and Spacing
Once your trays are prepared, consult your seed packets for precise instructions. The depth at which you plant your seeds is critical; too shallow, and they might dry out or be disturbed; too deep, and they might struggle to reach the surface. Using a pencil or a finger, create a small indentation for each seed according to the specified depth. As mentioned, plant two seeds per spot. This ‘insurance policy’ ensures that even if one seed fails to germinate, you still have a viable backup. When both germinate, you’ll later choose the strongest to keep.
Watering for Success
After planting, gently cover the seeds with the amount of soil indicated on the packet. Now comes a crucial step: watering. For seed starting, the recommended method is “bottom watering.” Instead of pouring water directly onto the delicate seeds, which can displace them or compact the soil, place your seed trays into a larger container or shallow tub filled with water. Allow the trays to sit for about 10-15 minutes, or until you see the top layer of soil begin to darken, indicating it has absorbed moisture from below. This method encourages roots to grow downwards in search of water and helps maintain consistent moisture levels. During the germination period, you’ll need to keep the soil consistently moist, typically by misting with a spray bottle every day or two, checking dryness with a fingertip.
Setting Up the Growth Station
With your seeds planted and watered, it’s time to set up their optimal growing environment. Place your seed trays directly onto the heating mat and turn it on. This provides the consistent warmth that many seeds need to break dormancy and germinate efficiently. Next, cover the trays with the plastic dome. This creates a humid microclimate, replicating the warmth and moisture of an ideal germination chamber. Finally, position your grow lights approximately 2-4 inches above the dome. Turn on your grow lights for 14-16 hours each day, mimicking the intense sunlight of a long growing season. It is equally important to turn off the grow lights at night, allowing the plants a period of darkness for rest and essential physiological processes.
The Waiting Game: From Germination to Seedlings
Now, the most challenging part: patience! When you initially plant those tiny seeds, it can feel almost unbelievable that anything will actually emerge. It’s a leap of faith, a hopeful casting of caution to the wind. This makes the moment your first tiny seedling courageously pokes through the soil all the more exhilarating and rewarding. Germination times vary greatly; some seeds will sprout within a mere two days, while others may take several weeks. Your seed packet will provide an estimated germination window, helping you manage expectations.
During this waiting period, diligently keep the soil moist using a spray bottle. Every morning, my partner C and I would eagerly lift the plastic dome to check on our burgeoning garden. Each new sprout brought a fresh wave of amazement at the incredible intelligence and resilience encapsulated within those minuscule seeds. Once seedlings have emerged and are establishing their first true leaves, it’s time to remove the plastic dome. This reduces the risk of fungal diseases and helps the seedlings acclimate to slightly lower humidity, preparing them for the next stage of growth.
At this early stage, the ultimate success of our seedlings once they are transplanted into the garden beds remains an unknown. We have yet to face the challenges of hardening off, transplant shock, and outdoor environmental factors. However, merely witnessing these tiny seedlings unfurl their leaves and grow a little taller each day is a profound source of encouragement and optimism. While I fully acknowledge that starting plants from seeds might not appeal to everyone, I wholeheartedly recommend experiencing it at least once. It is a truly fascinating and deeply cool process to observe firsthand. My greatest hope is that our vibrant little vegetables will survive and thrive, as the thought of eventually harvesting and eating our homegrown produce is an incredibly inspiring prospect.
For now, our seedlings are content and flourishing within their cozy indoor setup. In approximately one to two weeks, we’ll begin the process of thinning them out, selecting the strongest plants to continue growing. A few weeks after that, they’ll be ready for their grand debut in the outdoor garden bed or designated containers. Stay tuned for an upcoming post detailing our journey in building and designing our garden beds, and hopefully, more valuable lessons learned from our ongoing gardening adventure!
Valuable Resources for Aspiring Gardeners
Throughout this learning process, I’ve extensively consulted numerous gardening resources. The following have proven to be exceptionally helpful and insightful for a beginner like myself:
The Well Essentials Beginner Gardener Course
Garden Betty
Gardeners Supply Company – Garden Planner
Join the Conversation: Your Gardening Insights
Are you an experienced home gardener, or perhaps another beginner embarking on a similar journey? I’d love to hear from you! Do you have any essential tips, hard-won lessons, or encouraging words of wisdom to share with a budding gardener like me? Your insights are invaluable!