
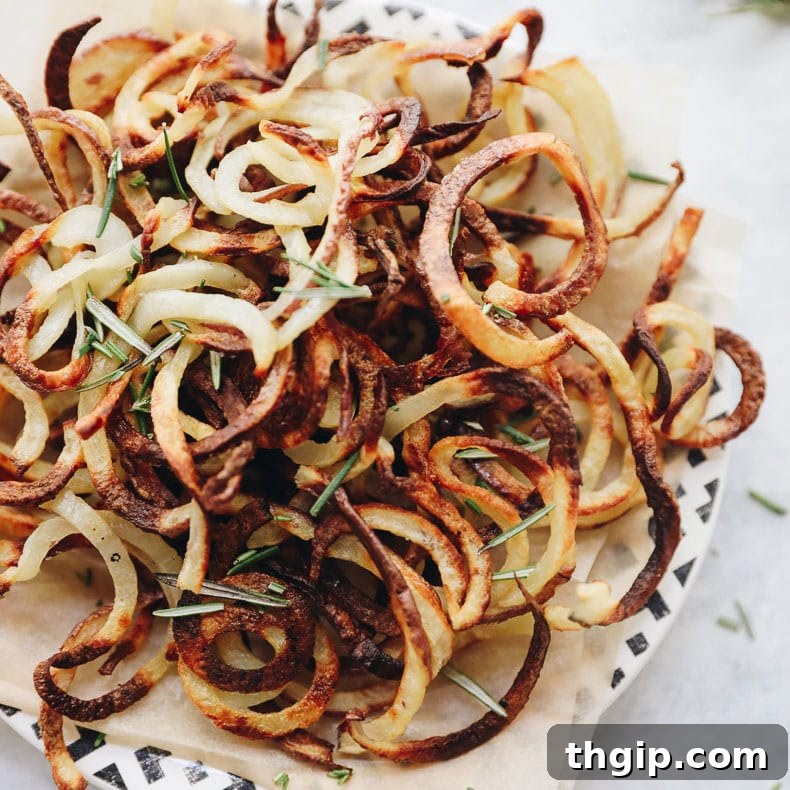
Crispy Baked Curly Fries: Your Ultimate Guide to Homemade Perfection
There’s something undeniably satisfying about a plate of perfectly crispy curly fries. That irresistible spiral shape, the golden-brown crunch, and the fluffy potato interior – it’s a culinary delight that transcends age and preference. While deep-fried versions are a classic, the pursuit of healthier, yet equally delicious, alternatives has led many home cooks to discover the magic of oven-baked curly fries. Imagine achieving that coveted crispiness right in your own kitchen, with minimal oil and a surprisingly simple process. This comprehensive guide will walk you through every step, from selecting the right potatoes to mastering the art of spiralizing and baking, ensuring you create the most delectable homemade crispy baked curly fries that will rival any restaurant.
The Secret to Unbeatable Crispy Baked Curly Fries
The journey to the perfect crispy baked curly fries begins with understanding the core elements that contribute to their texture and flavor. Forget soggy, limp fries; our goal is a golden, crunchy exterior that gives way to a tender, flavorful potato center. The key lies in a combination of proper potato selection, the right cutting tool, mindful seasoning, and precise baking techniques. This article is designed to demystify the process, turning what might seem like a gourmet endeavor into an achievable home cooking triumph. Whether you’re a seasoned chef or a kitchen novice, these simple steps will empower you to create a side dish or snack that will impress everyone.
My own journey with spiralizers has been quite an adventure! I vividly recall the excitement of acquiring mine years ago. I was living in Canada at the time, but in a stroke of what I thought was genius, I decided to ship the spiralizer to a friend in the U.S., planning to pick it up on my next visit. What I hadn’t fully considered was the challenge of transporting a collection of sharp blades in a carry-on bag through airport security! A huge shout-out to C’s mom, who ultimately came to my rescue and shipped my beloved spiralizer safely back home to me. Definitely not my most brilliant logistical planning, but a memorable story nonetheless.
Since then, my trusty spiralizer has traveled across borders and found its place in two different homes. I’ll admit, the initial craze for all things spiralized has settled down a bit, and I don’t use it quite as frequently as I once did. However, when I do pull it out, two things immediately come to mind: perfectly healthy zucchini noodles (zoodles) and, of course, these amazing, homemade curly fries. It truly is a versatile tool that continues to bring joy to my kitchen, especially when craving that unique spiral shape.
Mastering the Spiralizer: Your Key to Perfect Curls
Achieving those signature curly fries requires one essential kitchen gadget: a quality spiralizer. This tool is a game-changer for anyone looking to add fun, healthy, and visually appealing dishes to their repertoire. I’ve had mine for over five years, and it continues to perform flawlessly, making it one of my most cherished kitchen investments. To cut your potatoes into elegant spirals, begin by preparing your potatoes. You’ll want to trim both ends of each potato, creating flat, stable surfaces. This ensures the potato can be securely mounted between the two ends of the spiralizer, allowing for consistent rotation and even cutting.
Next, select the appropriate blade. Most spiralizers come with a variety of blade options, each designed for different thicknesses and noodle shapes. For curly fries, I highly recommend using the blade with the larger triangles. This particular blade creates thicker, more robust spirals that hold up beautifully during baking and result in that satisfying curly fry texture. Once the blade is in place and the potato is mounted, simply turn the handle, and watch as your potato transforms into long, continuous spirals. It’s an incredibly simple and satisfying process, making “easy peasy” an understatement. With a spiralizer, you’re not just making fries; you’re unlocking a world of creative vegetable preparation.
Selecting the Ideal Potato for Flawless Fries
The type of potato you choose plays a crucial role in the ultimate texture and crispiness of your baked curly fries. While many potato varieties exist, not all are created equal when it comes to frying or baking. For the absolute best results, I strongly recommend sticking to large white or Russet potatoes. These varieties are highly regarded for their high starch content and relatively low moisture. The starch is what helps achieve that desirable crispy exterior, while the lower moisture content prevents the fries from becoming soggy during baking.
Russet potatoes, in particular, are favored by chefs for their fluffy interior when cooked, which beautifully complements a crispy crust. Their robust shape also holds up exceptionally well during the spiralizing process, preventing breakage and ensuring long, uniform curls. Other starchy potatoes like Idaho potatoes are also great alternatives. Avoid waxy potatoes such as red potatoes or new potatoes, as their higher moisture content and lower starch levels tend to result in a softer, less crispy fry. By making the right choice of potato, you’re already halfway to achieving curly fry perfection.
Essential Ingredients for Flavorful Curly Fries
One of the beauties of these crispy baked curly fries is their simplicity. You don’t need a long list of exotic ingredients to create something truly delicious. The magic happens with just a few core components, allowing the natural flavor of the potato to shine through, enhanced by strategic seasonings. Here’s what you’ll need to gather:
- **Large Potatoes:** As discussed, white or Russet potatoes are your best bet for optimal results, ensuring starchiness and structural integrity.
- **Olive Oil or Avocado Oil:** These oils are fantastic for baking. Olive oil imparts a delicious, slightly fruity flavor, while avocado oil has a higher smoke point and a neutral taste, making it ideal for high-heat baking and letting your spices take center stage. Both help achieve that coveted golden crispiness.
- **Sea Salt:** A fundamental seasoning for any fry. Sea salt provides a clean, briny flavor that enhances the potato without being overpowering. Don’t be shy, but season to taste!
- **Fresh Herbs (Optional, but highly recommended):** My absolute go-to for adding an aromatic dimension is fresh rosemary. Its piney, citrusy notes pair exquisitely with potatoes. Other excellent choices include fresh thyme or a blend of Italian herbs. Herbs should be finely chopped to distribute their flavor evenly.
Beyond these basics, don’t hesitate to get creative with your spices! A dash of garlic powder, onion powder, smoked paprika, or even a pinch of cayenne pepper can elevate your curly fries to new heights, offering a personalized flavor profile that suits your palate. The versatility of these ingredients allows for endless customization.
Expert Tips for Achieving Golden, Crispy Perfection
To truly elevate your homemade curly fries from good to absolutely outstanding, pay attention to these crucial tips. These aren’t just suggestions; they are fundamental techniques that guarantee a superior outcome:
- **Use the Right Potatoes:** Reiterate that white or Russet potatoes are paramount due to their starch content, which is key for crispiness. Their texture also helps them hold shape during spiralizing and baking.
- **Pre-Soak for Extra Crispiness:** This is a professional chef’s secret! After spiralizing, place your potato curls in a large bowl of cold water for at least 30 minutes, or even up to an hour. This step helps to draw out excess starch from the potatoes. Removing this surface starch prevents the fries from sticking together and contributes significantly to a much crispier result.
- **Dry Thoroughly – No Moisture Allowed!** This step cannot be stressed enough. After soaking, drain the fries completely and then spread them out on clean kitchen towels or paper towels. Pat them absolutely dry. Any residual moisture will steam the fries instead of letting them crisp up, resulting in a soggy texture. This is a critical factor for achieving that sought-after crunch.
- **DO NOT OVERCROWD Your Baking Sheets:** This is perhaps the most important rule for oven-baked fries. You’ll want to split your curly fries onto at least two, possibly even three, parchment-lined baking trays. If the fries are too close together, they will steam rather than bake, preventing them from browning and crisping evenly. Ample space between each curl allows hot air to circulate freely around them, which is essential for uniform crispiness.
- **No Need to Peel:** Save yourself time and retain beneficial nutrients! The skin of white and Russet potatoes is thin and bakes beautifully. Just give your potatoes a good scrub, and you’re ready to chop and spiralize to perfection.
- **Monitor Carefully and Rotate:** Not all fries will cook at the exact same rate due to slight variations in thickness or oven hot spots. Keep a close eye on them, especially towards the end of the baking time. When you flip them halfway through, gently remove any pieces that have already reached your desired level of crispiness to prevent burning. Place the trays back in the oven, potentially rotating their positions, to allow the remaining fries to catch up. Patience and observation are key here for a perfectly golden batch.
Baked Curly Fries Recipe Card
Print
Crispy Baked Curly Fries
5 Stars 4 Stars 3 Stars 2 Stars 1 Star
5 from 4 reviews
Want to know the key to the perfect crispy baked curly fries? Just a few simple ingredients to make these spiralized potato fries that crisp up for the most delicious side dish or dinner party treat.
- Author: Davida Lederle
- Prep Time: 10 minutes
- Cook Time: 20 minutes
- Total Time: 30 minutes.
- Yield: 4 servings 1x
Ingredients
Scale
- 2 large white or russet potatoes, washed & dried
- 1 tbsp olive oil or avocado oil
- 1 tsp sea salt
- optional: 2 tbsp chopped, fresh herbs i.e. rosemary or thyme*
Instructions
- Preheat oven to 400 degrees F (200 degrees C).
- Spiralize both potatoes (I use this sprializer) using the blade with the larger triangles.
- Place spiralized potatoes in a large bowl of cold water for 30-60 minutes to remove excess starch, then drain thoroughly and pat completely dry with paper towels.
- Using scissors or a knife, cut the long potato “strings” into smaller, more manageable bite-sized fries.
- Add the dried, cut potato curls to a large bowl and coat evenly with olive oil or avocado oil. Toss well to ensure every fry is lightly oiled.
- Spread the curly fries out in a single layer over two parchment-lined baking sheets. You absolutely must use two trays and avoid overcrowding to ensure maximum crispiness.
- Sprinkle generously with sea salt.
- Place trays in the preheated oven and bake for 15 minutes.
- Remove from oven, carefully flip the fries as best as you can using a spatula. At this point, remove any fries that have already crisped up to your liking to prevent them from burning.
- *If adding fresh herbs, sprinkle them over the fries now, before placing them back in the oven. Bake for another 8-10 minutes, or until all fries are golden brown and crispy.
- Remove trays from the oven and serve hot immediately.
*If you would like to add fresh herbs, sprinkle over fries in between baking so before you place them back in the oven for 8-10 minutes.
Delicious Pairings and Serving Suggestions
These crispy baked curly fries are so versatile, they can elevate almost any meal! While they are fantastic on their own, perhaps with a simple dip, they truly shine when paired with complementary dishes. For a classic American diner experience at home, serve them alongside juicy burgers, whether they’re beef, turkey, or a delicious veggie patty. They’re also an ideal companion for sandwiches, wraps, or even a hearty salad, adding a satisfying crunch to your lunch or dinner.
Consider these fantastic main dishes that pair wonderfully with your homemade curly fries:
- Grilled Chicken Breast: A lean and flavorful protein that perfectly balances the rich potato.
- The Best Grain-Free Chicken Fingers: A healthier twist on a family favorite, these chicken fingers and curly fries are a match made in heaven.
- Fresh Salmon Burgers: For a lighter, yet equally satisfying option, salmon burgers offer a delicious contrast to the crispy fries.
Don’t forget the dipping sauces! Ketchup is always a timeless choice, but explore other options like a creamy aioli, spicy sriracha mayo, tangy ranch dressing, or even a homemade honey mustard. The possibilities are endless, allowing you to customize your curly fry experience every time. Get creative and enjoy!
Why Choose Baked Curly Fries?
Beyond their incredible taste and fun shape, opting for baked curly fries over their deep-fried counterparts offers several compelling advantages. Firstly, baking significantly reduces the amount of oil used, making them a much lighter and healthier alternative. You get all the flavor and crispiness without the excessive fat and calories associated with deep frying. This makes them a guilt-free indulgence that you can enjoy more frequently.
Secondly, baking is often less messy and safer than deep frying. There’s no hot oil to splatter, and cleanup is typically much easier, especially with parchment-lined baking sheets. Thirdly, making them at home gives you complete control over the ingredients, allowing you to choose organic potatoes, high-quality oils, and adjust seasonings to your exact preference. You avoid artificial flavors, preservatives, and excessive sodium found in many frozen or fast-food versions. Finally, the process of spiralizing and baking is a rewarding culinary experience in itself. There’s immense satisfaction in creating such a delicious and visually appealing dish from scratch. So, next time you’re craving fries, ditch the deep fryer and embrace the wholesome, crispy goodness of homemade baked curly fries – your taste buds and your body will thank you!