
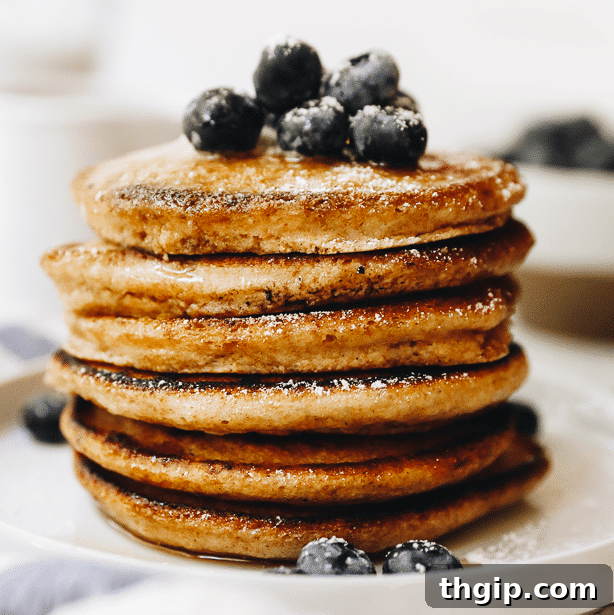
Have you ever wondered how to transform your breakfast routine with a healthier, yet equally delicious twist? Look no further than these incredible whole wheat pancakes! Packed with wholesome grains and offering both dairy-free and traditional options, this recipe elevates your morning meal into a nutritious and satisfying experience. Say goodbye to guilt and hello to truly delightful pancakes that fuel your day the right way.
Table of Contents
- Why Choose Whole Wheat for Your Pancakes?
- Key Ingredients for Perfect Whole Wheat Pancakes
- Mastering the Art of Fluffy Whole Wheat Pancakes
- Storage and Meal Prep: Freezing Whole Wheat Pancakes
- Versatile Batter: From Pancakes to Waffles!
- Serving Suggestions for a Delicious Breakfast
- Troubleshooting Common Pancake Problems
- More Pancake Recipes You’ll Love:
- Whole Wheat Pancakes Recipe
There’s a special kind of satisfaction that comes from creating a wholesome meal from scratch, especially when it turns out to be incredibly delicious. Lately, my kitchen adventures have revolved around a newfound love for whole wheat flour, sparked by discovering a forgotten bag tucked away in the back of my pantry. While my baking cupboard is usually meticulously organized, filled with jars and labels, every now and then, a forgotten treasure emerges. This time, it was that lone bag of whole wheat flour, a happy reminder of the whole wheat bread I’d been enjoying and perfecting.
Moving it to the forefront of my mind (and pantry!) led to a revelation: whole wheat pancakes. And honestly, I don’t think I’ll ever go back to using regular all-purpose flour for my pancake endeavors. The difference isn’t just in the subtle, nutty flavor, but in the incredible health benefits that whole wheat flour brings to the table. It’s a fantastic source of fiber, transforming a classic breakfast treat into something truly nourishing. The ultimate bonus? My toddler absolutely devours them!
Why Choose Whole Wheat for Your Pancakes?
Opting for whole wheat flour in your pancakes isn’t just a minor tweak; it’s a significant upgrade for your health and taste buds. Unlike refined white flour, which has been stripped of its bran and germ, whole wheat flour retains all three parts of the wheat kernel: the bran, germ, and endosperm. This means you’re getting a powerhouse of nutrition in every bite.
- Rich in Fiber: The most notable benefit is the high fiber content. Fiber is crucial for digestive health, helps regulate blood sugar levels, and keeps you feeling full and satisfied for longer. This sustained energy prevents those mid-morning crashes often associated with highly processed breakfasts.
- Packed with Nutrients: Whole wheat flour is a good source of essential vitamins and minerals, including B vitamins, iron, magnesium, and selenium. These nutrients play vital roles in energy production, immune function, and overall well-being.
- Heart Health Benefits: Regular consumption of whole grains has been linked to a reduced risk of heart disease, type 2 diabetes, and certain cancers. Making simple swaps like whole wheat pancakes can contribute significantly to a healthier diet.
- Nutty Flavor & Hearty Texture: Beyond the health benefits, whole wheat flour lends a wonderfully subtle, nutty flavor and a slightly more substantial texture to your pancakes. It’s a delightful departure from the often bland taste of traditional white flour pancakes, adding depth and character to your breakfast.
Embracing whole wheat pancakes means enjoying a hearty, flavorful breakfast that actively contributes to your health. It’s a delicious way to incorporate more whole grains into your diet without sacrificing taste or enjoyment.
Key Ingredients for Perfect Whole Wheat Pancakes
Crafting truly delicious and fluffy whole wheat pancakes starts with understanding the role of each ingredient. While the core components remain familiar, a few smart choices can elevate your pancakes from good to extraordinary. Here’s a breakdown of the essentials and some suggested swaps for dietary flexibility:
- Whole Wheat Flour: This is the star of our recipe. For maximum fiber and a robust, earthy flavor, opt for classic whole wheat flour. You might also encounter whole wheat pastry flour or white whole wheat flour; these are lighter in texture but offer slightly less fiber. While they work, sticking to traditional whole wheat flour ensures you reap the full health benefits and distinctive taste. Always measure flour by lightly spooning it into a measuring cup and leveling it off, rather than scooping directly, to avoid over-packing.
- Baking Powder: Absolutely essential for that coveted lift and fluffiness! Baking powder is a leavening agent that reacts with liquids and heat to create carbon dioxide bubbles, which are trapped in the batter, causing the pancakes to rise beautifully. Ensure your baking powder is fresh for optimal results; if it’s expired, your pancakes will be flat.
- Salt: A pinch of salt is crucial for balancing flavors and enhancing the sweetness of the maple syrup. It doesn’t make the pancakes salty but rather brings out the best in all the other ingredients. Only skip it if you are strictly monitoring your sodium intake.
- Maple Syrup: This natural sweetener adds a delicate hint of sweetness to the batter and contributes to the golden-brown color of your cooked pancakes. For the best flavor, use pure maple syrup. Of course, you’ll want extra for generous drizzling once your pancakes are cooked!
- Large Eggs: Eggs serve multiple purposes: they act as a binder, provide richness, and contribute significantly to the pancake’s structure and fluffiness. They emulsify the batter, creating a smoother texture. For an even fluffier pancake, make sure your eggs are at room temperature. This allows them to incorporate more evenly into the batter.
- Milk (Dairy or Non-Dairy): The choice of milk offers fantastic flexibility. Dairy milk will impart a more traditional, rich flavor and a slightly creamier texture. However, unsweetened almond milk, oat milk, or soy milk work beautifully for a dairy-free alternative, maintaining the desired consistency and moisture without compromising taste.
- Vanilla Extract: While optional, a dash of vanilla extract adds a warm, inviting aroma and a subtle depth of flavor that is truly delightful. It enhances the overall sweetness and complexity of the pancakes.
- Butter or Oil (for greasing the pan): For traditional flavor and a beautifully crisp edge, butter is a fantastic choice. If you’re opting for a dairy-free version, coconut oil or a neutral-flavored oil like canola or grapeseed oil are excellent alternatives for greasing your skillet or griddle.
- Optional Add-ins: Don’t limit yourself! Consider folding in or sprinkling on fresh blueberries, chocolate chips, sliced bananas, chopped nuts, or even a sprinkle of cinnamon for extra flavor and texture.
Mastering the Art of Fluffy Whole Wheat Pancakes
Achieving that perfect, cloud-like texture in whole wheat pancakes is simpler than you might think, but it does require attention to a few key details. Follow these tips to ensure your whole wheat pancake recipe yields the fluffiest results every time:
- Don’t Overmix the Batter – Seriously! This is perhaps the most critical rule for fluffy pancakes. Once your wet ingredients are added to the dry, whisk them together only until they are just combined. A few lumps are perfectly fine and even desirable! Overmixing develops the gluten in the whole wheat flour, which, while great for bread, makes for tough, dense, and bread-like pancakes rather than light and airy ones. Stop whisking the moment you no longer see streaks of dry flour.
- Bring Your Eggs (and other cold ingredients) to Room Temperature: This might seem like a small detail, but it makes a big difference. Room temperature eggs, and ideally milk, integrate much more smoothly and evenly into the batter. When cold ingredients are mixed into batter, they can seize up the other ingredients, creating a less uniform mixture and hindering the leavening agents’ ability to work effectively. To quickly bring eggs to room temperature, simply place them in a bowl of warm (not hot) water for 5-10 minutes before you start cooking.
- Sprinkle Your Add-ins, Don’t Stir Them In: If you’re adding delights like chocolate chips, fresh blueberries, or banana slices, resist the urge to stir them directly into the main batter. Doing so often leads to overmixing, which we now know is the enemy of fluffiness. Instead, pour your pancake batter onto the hot skillet, then immediately sprinkle your desired add-ins evenly over the top of each pancake before it starts to set. This ensures even distribution without compromising the batter’s delicate structure.
- Cook on Low-Medium Heat for Patience and Perfection: It’s tempting to crank up the heat to speed things along, but fluffy pancakes are a testament to slow, gentle cooking. High heat will quickly brown or even burn the outside of your pancakes before the inside has a chance to cook through and properly rise. Cooking on low-medium heat allows the leavening agents to work gradually, creating those beautiful air pockets that contribute to a soft, tender interior. Expect your pancakes to cook for 3-5 minutes on the first side. You’ll know they’re ready to flip when bubbles appear all over the surface, the edges look set, and the bubbles begin to pop. Flip them gently and cook for another 1-2 minutes on the second side until golden brown.
Storage and Meal Prep: Freezing Whole Wheat Pancakes
One of the best things about these whole wheat pancakes is how wonderfully they lend themselves to meal prepping. Imagine waking up to a healthy, ready-to-eat breakfast on a busy weekday morning! You can easily make a big batch and enjoy them throughout the week or even for months to come. Here’s how to ensure your whole wheat pancakes stay fresh and delicious when stored:
- Refrigeration: Cooked whole wheat pancakes can be stored in an airtight container in the refrigerator for up to 3 days. Simply stack them with parchment paper in between to prevent sticking.
- Freezing for Longer Storage: For longer-term storage (up to 3 months), freezing is your best friend. Proper freezing techniques prevent freezer burn and maintain texture and flavor.
- Flash Freeze (Recommended): Lay your cooled pancakes in a single layer on a baking sheet. Make sure they aren’t touching each other. Place the baking sheet in the freezer and allow the pancakes to freeze for about 1 hour, or until solid. This “flash freeze” step prevents them from sticking together once bagged.
- Pack and Store: Once flash-frozen, transfer the pancakes to a large ziplock freezer bag or an airtight freezer-safe container. Remove as much air as possible from the bag before sealing.
- Alternative Method: If you’re short on space, you can also wrap individual whole grain pancakes tightly in foil, then place the foil-wrapped pancakes into a larger freezer bag. This skips the flash-freezing step but ensures they are protected from freezer burn.
- Reheating Frozen Pancakes: When you’re ready to enjoy them, there are several convenient ways to reheat:
- Microwave: For a quick reheat, microwave individual pancakes for 30-60 seconds, or until warmed through.
- Toaster or Toaster Oven: For a slightly crispier edge, pop frozen pancakes directly into a toaster on a medium setting, or in a toaster oven at 350°F (175°C) for a few minutes until heated and lightly golden.
- Oven: If reheating a larger batch, place frozen pancakes in a single layer on a baking sheet and bake in a preheated oven at 375°F (190°C) for 5-10 minutes, or until warm and soft.
Having a stash of these healthy whole wheat pancakes in your freezer makes healthy eating incredibly easy and accessible, even on your busiest mornings!
Versatile Batter: From Pancakes to Waffles!
One of the fantastic features of this whole wheat pancake recipe is its incredible versatility. The same wholesome, fluffy batter that makes perfect pancakes can also be transformed into delicious whole grain waffles! There’s no need to adjust the recipe or add any extra ingredients; the consistency and composition are ideal for both.
To make them as waffles, simply preheat your waffle maker according to the manufacturer’s instructions, ensuring it’s lightly greased. Then, scoop about 1/3 to 1/2 cup of the batter into the center of the hot waffle iron. Close the lid and cook for the recommended time for your specific waffle maker, usually until golden brown and crispy, and the steam stops escaping. The result will be equally delightful: crispy on the outside, tender on the inside, and packed with all the goodness of whole grains. Enjoy them with your favorite waffle toppings!
Serving Suggestions for a Delicious Breakfast
Once your stack of fluffy whole wheat pancakes is ready, the fun truly begins with the toppings! These healthy pancakes serve as a perfect canvas for a wide array of flavors, allowing you to customize your breakfast experience every time. Here are some delicious serving suggestions:
- Classic Maple Syrup & Butter: You can’t go wrong with the timeless combination of warm, pure maple syrup and a dollop of butter (or a dairy-free alternative like coconut oil or vegan butter). The richness and sweetness are simply irresistible.
- Fresh Fruit Medley: Enhance the nutritional value and add vibrant color with an assortment of fresh berries (blueberries, raspberries, sliced strawberries), banana slices, or even a sprinkle of pomegranate seeds.
- Yogurt & Granola: For an extra boost of protein and crunch, top your pancakes with a spoonful of Greek yogurt (plain or flavored) and a sprinkle of your favorite granola.
- Nut Butters & Jams: Spread a layer of almond butter, peanut butter, or cashew butter for healthy fats and protein. Add a swirl of your favorite fruit jam or preserves for a touch of sweetness.
- Whipped Cream or Coconut Cream: Indulge a little with a generous dollop of homemade whipped cream or, for a dairy-free option, whipped coconut cream.
- Savory Pairings: Don’t limit pancakes to just sweet! Serve them alongside crispy bacon, scrambled eggs, or a savory sausage patty for a complete breakfast spread.
- Warm Fruit Compote: Make a quick fruit compote by simmering fresh or frozen berries or chopped apples with a little water, a squeeze of lemon juice, and a touch of sweetener until thickened.
- A Sprinkle of Spice: Finish your stack with a dusting of cinnamon, nutmeg, or even a hint of cardamom for an aromatic touch.
Mix and match these ideas to create your perfect breakfast. These whole wheat pancakes are hearty enough to stand on their own but truly shine with the right accompaniments!
Troubleshooting Common Pancake Problems
Even seasoned cooks can encounter a few bumps when making pancakes. If your whole wheat pancakes aren’t turning out quite right, here are some common issues and how to fix them:
- Flat or Dense Pancakes:
- Issue: Your pancakes aren’t rising, or they feel heavy.
- Solution: This is almost always due to overmixing the batter (developing gluten) or using old/inactive baking powder. Ensure you mix just until combined (lumps are fine!), and check the expiration date on your baking powder. If in doubt, test your baking powder by adding a teaspoon to a small bowl of hot water; it should bubble vigorously.
- Pancakes Sticking to the Pan:
- Issue: Pancakes are difficult to flip and leave bits behind.
- Solution: The pan likely isn’t properly greased or isn’t hot enough. Make sure to add a small amount of butter or oil between batches, and allow your skillet to heat up thoroughly before pouring the first pancake. A medium-low heat is often ideal for even cooking.
- Burnt Outside, Raw Inside:
- Issue: The exterior is dark brown or black, but the interior is still gooey.
- Solution: Your heat is too high! Turn the stove down to low-medium. Patience is key for whole wheat pancakes to cook through evenly and develop a beautiful golden crust without burning.
- Dry or Crumbly Pancakes:
- Issue: The pancakes lack moisture and fall apart easily.
- Solution: This could be a result of too much flour or not enough liquid. Ensure you’re measuring your flour correctly (spooned and leveled, not scooped) and that you’ve used the correct amount of milk. Whole wheat flour can absorb more liquid than white flour, so sometimes a tiny splash more milk can make a difference if your batter seems too thick.
- Uneven Cooking/Browning:
- Issue: Some parts of the pancake are darker than others.
- Solution: Your skillet might have hot spots. Ensure your pan is evenly heated by allowing it to warm up for a few minutes before adding batter. You might also need to adjust the heat slightly as you cook multiple batches.
With these tips, you’ll be well-equipped to tackle any pancake challenge and enjoy perfect whole wheat pancakes every time!
More Pancake Recipes You’ll Love:
- Sweet Potato Pancakes
- Banana Oatmeal Pancakes
- Banana Protein Pancakes
- Fluffiest Oatmeal Chocolate Chip Pancakes
- Apple Chai Pancakes
- Pumpkin Chocolate Chip Pancakes
- Vegan Corn Pancakes
- Baby Banana Pancakes
Print Recipe
Whole Wheat Pancakes Recipe

5 from 2 reviews
This whole wheat pancake recipe is packed full of whole grains with dairy-free or dairy-full options for a healthier twist on traditional pancakes. Enjoy fluffy, nutritious pancakes that are perfect for any breakfast or brunch!
- Author: Davida Lederle
- Prep Time: 10 minutes
- Cook Time: 10 minutes
- Total Time: 20 minutes
- Yield: 11–12 pancakes
- Category: Breakfast
- Method: Cook
- Diet: Vegetarian
Ingredients
- 1 1/2 cups whole wheat flour
- 2 1/2 tsp baking powder
- 1/4 tsp salt
- 1 tbsp maple syrup (plus more for drizzling)
- 2 large eggs
- 1 1/2 cups milk (dairy or non-dairy)
- 1 1/2 tsp vanilla extract
- oil for greasing pan (I like butter or coconut oil)
- optional add-ins: 1/2 cup blueberries, 1/4 cup chocolate chips, sliced banana etc…
Instructions
- Heat up a large skillet or griddle over low-medium heat. You want the pan to be evenly warm before you add the batter.
- In a large bowl, whisk together the whole wheat flour, baking powder, and salt.
- In a separate medium bowl, combine the maple syrup, milk, room temperature eggs, and vanilla extract. Whisk until well combined.
- Pour the wet ingredients into the dry ingredients. Stir slowly and gently until just incorporated. A few lumps are okay – do not overmix!
- Add 1 tablespoon of butter or oil to the preheated skillet and allow it to melt or warm.
- Using a 1/4 cup measuring scoop, pour batter onto the skillet, ensuring not to overcrowd the pan.
- Cook on low-medium heat for 3-5 minutes, or until bubbles appear all over the surface, the edges look set, and the bubbles begin to pop. If using add-ins, sprinkle them immediately after pouring the batter into the pan.
- Gently flip the pancakes and cook for another 1-2 minutes on the second side, or until golden brown and cooked through.
- Remove cooked pancakes from the skillet and keep them warm in a low oven (around 200°F / 95°C) while you cook the remaining batter. Be sure to add more butter or oil to the skillet between batches as needed.
- Serve warm with your favorite toppings and a generous drizzle of maple syrup.
- Store any leftover pancakes in an airtight container in the refrigerator for up to 3 days, or follow the freezing instructions above for longer storage.