
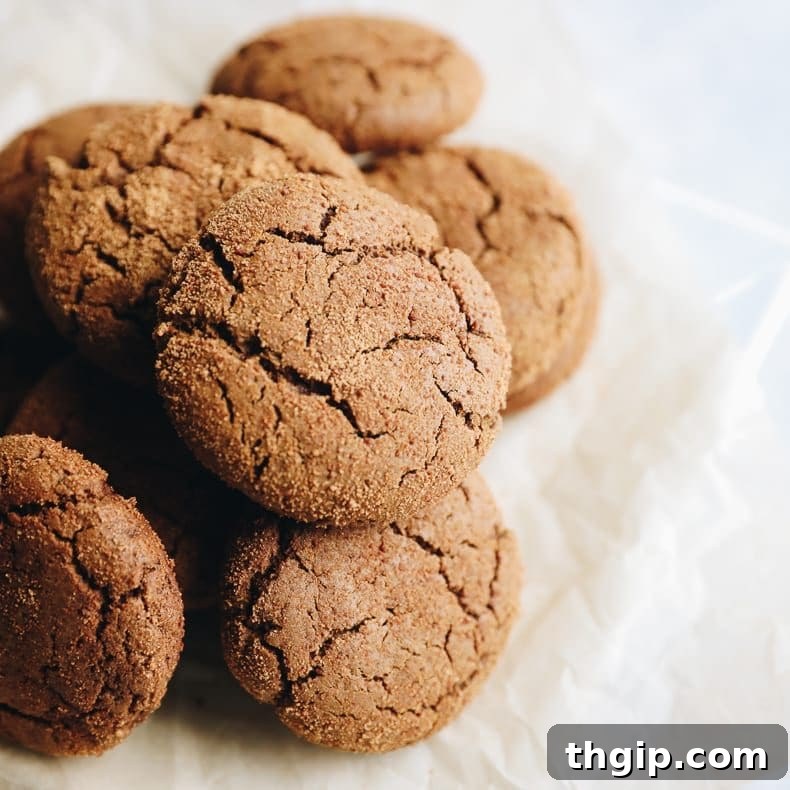
Irresistibly Delicious & Healthier Ginger Molasses Cookies
Craving the warm, spicy comfort of classic ginger molasses cookies but looking for a lighter touch? You’ve landed on the perfect recipe! This irresistible version takes everything you love about those chewy, crinkly holiday favorites and gives them a thoughtful, healthier makeover. We’ve managed to create ginger molasses cookies that are soft, perfectly spiced, and wonderfully satisfying, all while going easy on the butter and sugar, and using unrefined sweeteners. Whether you’re a seasoned baker or new to the kitchen, prepare to fall in love with these lightened-up treats!
As a professional food blogger with over a decade of experience crafting wholesome alternatives to beloved classics, I can confidently say these ginger molasses cookies have secured a spot as one of my all-time favorite Christmas cookie recipes. They capture that quintessential holiday spirit with their robust ginger and molasses flavors, complemented by a subtle blend of warming spices. Each cookie boasts a beautiful, crinkled top and a delightfully soft, chewy interior that melts in your mouth. Forget those overly sweet, heavy store-bought varieties; these homemade wonders allow you to control every ingredient, ensuring a treat that’s not only delicious but also genuinely better for you.
One of my absolute favorite cookies in the world has always been the Starbucks Ginger Molasses Cookie. Holy cow, those are good! The rich, spicy aroma, the soft chewiness, and that distinct molasses kick are truly addictive. While it’s tempting to grab one from time to time, I realized how simple it is to recreate that magic at home – and even better, to do it with healthier ingredients. This recipe is my answer to that craving, a homage to the classic, elevated with mindful swaps. Get ready to bake a batch that might just surpass your favorite coffee shop indulgence!
The Healthier Twist: Lightened-Up Ginger Molasses Cookies
Inspired by the incredibly addictive nature of Starbucks’ ginger molasses cookies, I embarked on a mission to create a version that delivers all the flavor and texture without the excessive indulgence. The goal was to lighten them up without sacrificing any of the deliciousness, and after extensive testing, I landed on a few key adjustments that make all the difference. These thoughtful swaps significantly improve the nutritional profile while ensuring every bite is still pure joy.
- Reduced Butter Content: Traditional cookie recipes often call for a generous amount of butter, contributing to a rich flavor but also a higher fat content. In this recipe, I’ve successfully cut the butter in half. You can absolutely achieve wonderfully tender and flavorful cookies using just 1/4 cup of butter instead of the typical 1/2 cup. This simple reduction dramatically lowers the saturated fat content without compromising the cookie’s texture or chewiness. For those following a dairy-free diet, feel free to substitute room-temperature coconut oil for the butter, ensuring your cookies are equally delightful and accessible to all.
- Less Added Sugar: Many classic cookie recipes overload on sugar, leading to an unnecessary sugar rush. Here, I’ve intentionally reduced the total sugar content by half. Instead of a full cup, we use just 1/2 cup of coconut sugar in the dough. A small amount of the reserved 1/4 cup coconut sugar is then used for rolling the cookie balls, which gives them that beautiful sparkling, crinkled finish. This thoughtful reduction not only makes the cookies less sweet but also reduces the overall calorie count, allowing the natural spice flavors to shine through more prominently.
- Unrefined Coconut Sugar Substitute: Beyond just reducing the sugar quantity, the type of sugar used also matters. I’ve opted for unrefined coconut sugar as a healthier alternative to conventional refined white or brown sugar. While coconut sugar is still sugar, it retains more of its natural nutrients and has a lower glycemic index compared to refined sugars. This means it causes a slower, steadier rise in blood sugar levels, helping to prevent the dreaded “sugar crash” often associated with highly processed sweets. It also lends a subtle caramel-like depth of flavor that beautifully complements the molasses and ginger.
- Gluten-Free Friendly Option: For those with gluten sensitivities or simply looking to reduce their gluten intake, this recipe is incredibly versatile. I’ve personally tested it with various gluten-free all-purpose flour blends, and the results are consistently fantastic. The cookies maintain their soft, chewy texture and rich flavor. However, a crucial tip for successful gluten-free baking with this recipe is to ensure your chosen gluten-free flour blend does not contain coconut flour. Coconut flour is highly absorbent and can lead to a very dry, crumbly dough if not carefully balanced, potentially ruining the texture of your cookies. Stick to blends designed for general baking for the best outcome.
Essential Ingredients for Perfect Ginger Molasses Cookies
Crafting these delectable ginger molasses cookies relies on a precise combination of readily available ingredients. Each component plays a vital role in achieving their characteristic flavor, texture, and delightful aroma. Here’s a detailed look at what you’ll need and some key tips for selecting the best quality ingredients:
- Unsalted Butter: This forms the rich base of our cookies. Always opt for unsalted butter as it gives you complete control over the salt content in your recipe. It’s absolutely crucial that your butter is softened to room temperature before you begin. Softened butter creams easily with sugar, creating a light and airy texture that is essential for a tender cookie. If your butter is too cold, it won’t incorporate properly, and if it’s melted, your cookies may spread excessively in the oven. For a dairy-free alternative, an equal amount of softened coconut oil works wonderfully.
- Coconut Sugar: Our chosen unrefined sweetener, coconut sugar offers a nuanced caramel-like flavor that pairs beautifully with molasses and ginger, and as mentioned, provides a lower glycemic impact than refined sugars. It’s a fantastic alternative to traditional brown sugar, contributing to both the taste and the healthier profile of these cookies.
- Molasses: The star ingredient that gives these cookies their distinctive deep flavor, color, and chewiness. When selecting molasses, always make sure to choose unsulphured molasses. Some varieties are processed with sulphur dioxide as a preservative, which can leave an unpleasant chemical-like aftertaste. Unsulphured molasses provides a cleaner, richer, and more authentic flavor that is paramount to this recipe’s success. It’s the secret to that classic, slightly bitter, yet sweet complexity.
- Egg: A single large egg acts as a crucial binder in this recipe, helping to bring all the ingredients together and providing structure and moisture to the cookies. I have not personally tested this recipe with flax eggs or chia eggs as a vegan substitute. If you’re experimenting with egg alternatives, please be aware that the final texture and rise may vary.
- Flour: The primary dry ingredient, providing the structural backbone of the cookies. I’ve personally achieved excellent results using a quality gluten-free all-purpose flour blend (one without coconut flour). However, if you don’t have dietary restrictions, traditional all-purpose white flour works perfectly fine and will yield equally delicious results. Ensure you measure your flour accurately, preferably by weight, or by spooning it into a measuring cup and leveling it off, to avoid a dense cookie.
- Baking Soda: This essential leavening agent is responsible for the cookies’ rise and contributes to their characteristic crinkled tops. Baking soda reacts with the molasses (which is acidic) to create carbon dioxide gas, producing a light and airy texture. Do not skip or substitute baking soda in this recipe.
- Seasonings and Spices: This is where the magic truly happens, creating that signature zesty and warm ginger molasses flavor. You’ll need:
- Sea Salt: Balances the sweetness and enhances all the other flavors.
- Ground Cinnamon: Adds warmth and aromatic complexity.
- Ground Allspice: Contributes a unique blend of cinnamon, clove, and nutmeg notes.
- Ground Ginger: The primary spice, delivering that signature pungent, warm, and slightly peppery kick. Ensure your ginger is fresh and potent for the best flavor.
- Cracked Black Pepper: A small pinch of black pepper might seem unusual, but it’s a brilliant addition that elevates the ginger flavor, adding a subtle, sophisticated zest and warmth that makes these cookies truly stand out. Don’t worry, it won’t make them taste peppery, just more vibrant!
How to Make Perfect Lightened-Up Ginger Molasses Cookies: A Step-by-Step Guide
Baking these ginger molasses cookies is a straightforward and rewarding process. Follow these simple steps to ensure a batch of perfectly soft, chewy, and wonderfully spiced treats every time.
Preparation:
- Preheat your oven to 350 degrees F (175 degrees C). Proper oven temperature is crucial for even baking and achieving those perfect crinkled tops.
- Line a baking sheet with parchment paper or a silicone mat. This prevents sticking and ensures easy removal of your baked cookies, as well as promoting even browning.
STEP 1: Cream Wet Ingredients
In a large mixing bowl, either by hand with a sturdy whisk or using a stand mixer fitted with the paddle attachment, combine the softened butter and 1/2 cup of coconut sugar. Beat them together until the mixture is light, fluffy, and well combined. This process, known as creaming, incorporates air into the butter and sugar, which is essential for a tender cookie texture. Next, add the unsulphured molasses and the large egg. Continue to mix until all the wet ingredients are thoroughly incorporated and smooth. Scrape down the sides of the bowl as needed to ensure everything is evenly blended.
STEP 2: Combine Dry Ingredients & Mix with Wet
In a separate medium-sized bowl, whisk together all the dry ingredients: your chosen flour (gluten-free or all-purpose), baking soda, sea salt, ground cinnamon, ground allspice, ground ginger, and that special pinch of cracked black pepper. Whisk them well to ensure the leavening agent and spices are evenly distributed throughout the flour. This prevents clumps of spices and ensures a consistent flavor in every cookie. Gradually add the combined dry ingredients to the wet ingredients. Mix on low speed or by hand until just combined. Be careful not to overmix the dough once the flour has been added, as overmixing can lead to tough cookies.
STEP 3: Roll Dough Balls in Coconut Sugar
Pour the remaining 1/4 cup of coconut sugar into a shallow bowl. Take approximately 1-2 tablespoons of cookie dough for each cookie and roll it into a smooth ball between your palms. Aim for roughly 12 uniformly sized balls for even baking. Once rolled, gently drop each dough ball into the bowl of coconut sugar and roll it around until it’s generously coated on all sides. This sugar coating not only adds a lovely sparkle and extra hint of sweetness but also contributes to the beautiful crinkled texture once baked. Place the sugar-coated dough balls onto your prepared baking sheet, spacing them a few inches apart. Finally, use the palm of your hand or the bottom of a glass to firmly flatten each dough ball. This helps them spread evenly and contributes to the iconic crackled appearance.
STEP 4: Bake to Perfection
Carefully transfer the baking sheet to your preheated oven. Bake the cookies for 14-16 minutes. The exact baking time will depend on your oven and your preferred cookie texture. For softer, chewier cookies with slightly gooey centers, aim for the shorter end of the baking time (around 14 minutes). If you prefer a crispier cookie with firmer edges, extend the baking time to 16 minutes. The cookies will look slightly puffed and set around the edges, but the centers may still appear soft. This is normal! Once baked, remove the baking sheet from the oven and allow the cookies to cool on the sheet for about 5 minutes. This crucial resting period allows them to set up properly and prevents them from breaking when you move them. After 5 minutes, carefully transfer the cooled cookies to a wire rack to cool completely. Cooling on a wire rack ensures air circulation around all sides, preventing them from becoming soggy.
Cookie Troubleshooting & Expert Tips
Even seasoned bakers encounter challenges. Here are some common cookie problems and how to avoid or fix them, along with extra tips to ensure your ginger molasses cookies turn out perfectly every time.
Are your cookies spreading too much during baking?
Excessive spreading is a common issue, and there are a few usual culprits. First, ensure your butter is genuinely softened to room temperature, not melted. If you used a microwave to soften it too much, or if it was liquid, it can cause the cookies to spread. Secondly, your dough might have too much liquid, or an incorrect ratio of fat to flour. Make sure you’re measuring your flour accurately (spoon and level, or even better, weigh it if you have a kitchen scale) to ensure there’s enough dry ingredient to absorb the fat. Rest assured, I’ve rigorously tested and perfected all the ratios in this specific recipe to minimize spreading, so stick to the exact measurements! It’s tempting to tweak, but for these, precision is key. If your kitchen is very warm, consider chilling the dough for 15-30 minutes before baking to firm up the butter.
Are your cookies cracking too much? Or not cracking enough?
The perfectly cracked top is an iconic feature of ginger molasses cookies, indicating their soft, chewy interior. This recipe aims for that ideal crackle. If yours aren’t cracking, or cracking excessively, it could be a sign of minor issues. Insufficient cracking might mean your oven isn’t hot enough, preventing the rapid expansion that causes the cracks, or your dough might have been overmixed. Over-cracking can sometimes occur if there’s too much flour in the dough or if the dough was mixed too much, developing too much gluten. Again, the baking temperatures and times provided in this recipe are carefully calibrated to achieve those desirable cracks. Ensure your oven is preheated accurately and use an oven thermometer if you suspect your oven runs hot or cold.
Can I freeze these ginger cookies?
Absolutely! These ginger molasses cookies are excellent for freezing, making them perfect for meal prep or enjoying freshly baked treats at a moment’s notice.
For baked cookies: Once completely cooled, place the cookies in an airtight container or a heavy-duty ziplock freezer bag. They can be frozen for up to 3 months. To serve, simply allow them to thaw on the countertop for several hours, or gently warm them in the microwave for a few seconds for that fresh-from-the-oven feel.
For unbaked cookie dough: Freezing the dough is a fantastic way to have fresh cookies on demand. Simply scoop the dough into individual balls (as if you were going to bake them) and place them on a parchment-lined cookie sheet. Pop the sheet into the freezer for about 1 hour, or until the dough balls are firm. Once firm, transfer the frozen dough balls into a ziplock bag and freeze for up to 3 months. When you’re ready to bake, place the frozen dough balls directly onto a prepared baking sheet and bake as directed. You may need to add an extra minute or two to the baking time to account for the fact that they are starting from frozen.
Additional Expert Tips:
- Don’t Overmix: Once you add the dry ingredients to the wet, mix only until just combined. Overmixing develops gluten, leading to tougher cookies.
- Uniformity is Key: Use a cookie scoop or your hands to ensure all dough balls are roughly the same size. This promotes even baking, so all your cookies are done at the same time.
- Room Temperature Ingredients: Ensure butter and egg are at room temperature. This allows them to emulsify better, creating a smoother dough and a more consistent cookie texture.
- Fresh Spices: Use fresh, high-quality spices. Old spices lose their potency, and your cookies won’t have that vibrant, zesty ginger flavor.
- Parchment Paper or Silicone Mats: Always use parchment paper or silicone baking mats. They prevent sticking, ensure even heat distribution, and make cleanup a breeze.
- Don’t Crowd the Pan: Leave enough space between cookies on the baking sheet to allow for spreading and even airflow. Bake in batches if necessary.
More Holiday Cookie Recipes You’ll Love:
If you’re embracing the spirit of healthier holiday baking, or simply love a good cookie, explore these other fantastic recipes from my kitchen:
- Grain-Free Double Chocolate Cookies
- Peppermint Chocolate Cookies
- Chocolate Chip Cookie Cake
- Healthy Peanut Butter Cookies
- Chocolate Espresso Cookies
Ginger Molasses Cookies [Lightened-Up]

4.7 from 6 reviews
A recipe for ginger molasses cookies, made with unrefined coconut sugar, light on the butter and a zesty spice mix. Sub gluten-free flour for a gluten-free alternative or keep regular for an equally delicious cookie recipe, lightened-up!
- Author: Davida Lederle
- Prep Time: 10 minutes
- Cook Time: 20 minutes
- Total Time: 30 minutes
- Yield: 1 dozen cookies
- Category: Dessert
- Method: Bake
- Diet: Low Calorie
Ingredients
Scale
- 1/4 cup unsalted butter, softened
- 3/4 cup coconut sugar (reserve 1/4 cup for rolling)
- 1/4 cup unsulfured molasses
- 1 large egg
- 1 3/4 cups regular white flour*
- 1 1/2 teaspoons baking soda
- 1/2 teaspoon sea salt
- 1 teaspoon ground cinnamon
- 1/2 teaspoon ground allspice
- 2 teaspoons ground ginger
- pinch of cracked black pepper
*feel free to sub gluten-free flour blend without coconut flour in it- they’ve been tested and work
Instructions
- Preheat oven to 350 degrees F (175 C).
- Line a baking sheet with parchment paper or a silicone mat.
- Combine softened butter and 1/2 cup coconut sugar in a large bowl, creaming by hand or with a mixer until light and fluffy.
- Add in molasses and egg; stir until well combined and smooth.
- In a separate bowl, whisk together flour, baking soda, sea salt, cinnamon, allspice, ginger, and cracked black pepper.
- Gradually add the dry ingredients to the wet ingredients, mixing until just combined. Be careful not to overmix.
- Pour the remaining 1/4 cup coconut sugar into a shallow bowl for rolling.
- Roll dough into 12 uniform balls, then roll each ball generously in the coconut sugar.
- Place the sugar-coated dough balls onto the prepared baking sheet, spacing them apart. Flatten each ball firmly with the palm of your hand.
- Bake for 14-16 minutes (14 minutes for softer cookies, 16 minutes for crispier).
- Let cool on the baking sheet for 5 minutes before transferring to a wire rack to cool completely.
- Store cooled cookies in an airtight container for up to 5 days.