
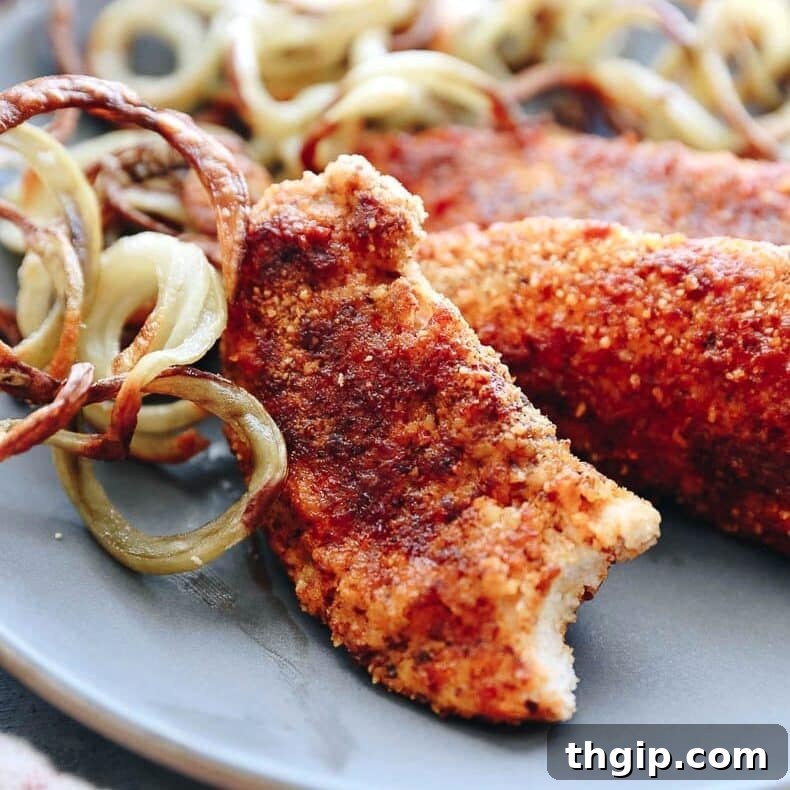
Rediscover the joy of your childhood favorites with a healthy, spicy twist! These Baked Buffalo Chicken Tenders are a game-changer for anyone craving that classic crispy chicken finger experience without the guilt of deep-frying. Crafted with wholesome ingredients like almond meal, a zesty egg and hot sauce blend, and flavorful spices, this recipe transforms a simple dish into a culinary delight. Perfect for busy weeknight dinners, a crowd-pleasing party appetizer, or a nourishing meal for the kids (with adjustable heat, of course!), these tenders are designed to satisfy both your taste buds and your commitment to healthy eating. Get ready to bake up a batch of crunchy, flavor-packed chicken that will become a staple in your kitchen!
Achieve Perfect Baked Buffalo Chicken Tenders Every Time
Gone are the days when ‘baked’ meant dry or bland. Our recipe for buffalo chicken tenders elevates the standard, delivering tenders that are not only incredibly flavorful but also boast a perfectly crunchy, irresistible coating. What’s the secret to this mouthwatering magic? It’s all about layering flavor at every single step, ensuring each bite is bursting with taste and texture.
The Flavor Infusion Strategy
Unlike many recipes that treat the dredging process as a mere means to an end, we see it as an opportunity to build deep, rich flavors. Instead of dipping your chicken breasts in a plain, unseasoned egg wash, we kick things up a notch by mixing hot sauce directly into the egg. This ingenious step ensures that every fiber of the chicken begins absorbing that tangy, spicy goodness even before it hits the oven. This initial layer of flavor creates a robust foundation that plain egg simply can’t match.
The Ultimate Crunchy Coating
The crunch factor is paramount for truly satisfying chicken tenders, and we achieve this with a meticulously seasoned coating. Forget bland almond meal; we transform it by mixing in a vibrant blend of spices. This seasoned almond meal adheres beautifully to the hot-sauce-infused chicken, creating a crispy exterior that seals in moisture while providing an explosion of savory heat. The result is a tender interior encased in a golden, perfectly spiced crust that rivals any fried version.
Baking for Health and Convenience
Beyond flavor, our method prioritizes health and convenience. Traditional chicken tenders often involve messy, unhealthy deep-frying. Our buffalo chicken tenders are expertly baked to golden perfection, significantly reducing fat content without sacrificing crispiness. After baking, they are generously coated in even more hot sauce, providing that signature buffalo kick. This multi-layered approach ensures not just a healthier meal, but also easier cleanup and consistent, delicious results every time. Prepare for layers upon layers of yummy goodness packed into each tender, making them ideal for a healthier lifestyle or anyone seeking a simpler cooking process.
Essential Ingredients for Delicious Baked Buffalo Chicken Tenders
Creating these sensational baked buffalo chicken tenders requires a selection of quality ingredients, each playing a crucial role in developing their exceptional flavor and texture. Here’s a detailed look at what you’ll need and why:
- Chicken Breasts: Opt for boneless and skinless chicken breasts for ease of preparation and a lean protein base. Cutting them into uniform tenders or strips is key for even cooking. You can either buy pre-cut chicken tenders to save time or slice full breasts yourself. Uniformity ensures that all pieces cook through at the same rate, preventing some from drying out while others are still cooking.
- 1 Large Egg: This acts as the vital binding agent, creating a sticky surface for the almond meal coating to adhere to. When whisked, the egg creates a liquid bridge between the chicken and the dry mixture, ensuring a complete and even crust.
- Hot Sauce of Choice: The star of the show! This ingredient brings the iconic “buffalo” flavor. You can use your favorite brand of classic hot sauce, or specifically choose a pre-made buffalo sauce for a milder, butterier finish. The beauty of choosing your own hot sauce is the ability to customize the heat level and flavor profile to your preference, from mild to extra spicy.
- Almond Meal: This is the secret to our gluten-free, low-carb, and incredibly crispy coating. It’s crucial to use almond meal, not almond flour. Almond meal has a coarser texture, which contributes to a more pronounced crunch when baked. Almond flour is much finer and can result in a softer, less crispy coating. For those with nut allergies or who prefer other options, you can substitute with regular all-purpose flour or a gluten-free flour blend, though the texture and nutritional profile will vary slightly.
- Spices (Garlic Powder, Chili Powder, Cumin, Sea Salt + Pepper): This thoughtfully curated blend infuses the almond meal coating with savory depth and a subtle warmth that complements the hot sauce beautifully.
- Garlic Powder: Provides a foundational savory aroma and taste.
- Chili Powder: Adds a mild, smoky heat and vibrant color.
- Cumin: Introduces an earthy, slightly smoky note that enhances the overall spice profile.
- Sea Salt + Pepper: Essential for bringing out and balancing all the other flavors.
- Butter (or Ghee): Used to create the luscious, final buffalo sauce coating. Butter adds a rich, creamy dimension that mellows the heat of the hot sauce and gives it that classic restaurant-quality finish. If you’re looking for a dairy-free alternative or a higher smoke point, ghee (clarified butter) is an excellent substitute, offering a similar rich flavor.
With these ingredients at hand, you’re well on your way to crafting a batch of baked buffalo chicken tenders that are both healthy and incredibly satisfying!
Step-by-Step Guide: How to Make Irresistible Baked Buffalo Chicken Tenders
Crafting these perfectly baked buffalo chicken tenders is a straightforward process, broken down into three simple yet crucial steps. Follow these instructions closely to achieve maximum flavor and an unbeatable crispy texture.
Preparation is Key
Before you begin, ensure your workspace is organized (mise en place). Preheat your oven to the specified temperature (400°F / 200°C) so it’s ready when your tenders are prepped. Line a large baking sheet with parchment paper or a silicone baking mat. This not only prevents sticking but also makes cleanup a breeze. Having all your ingredients measured and bowls ready will ensure a smooth cooking experience.
STEP 1: WHISK EGG + MIX SPICES
In a large, shallow bowl, beat the large egg until thoroughly whisked. Incorporate 1 1/2 tablespoons of your chosen hot sauce into the egg mixture. Whisk vigorously to ensure the hot sauce is evenly distributed, creating a flavorful liquid that will adhere beautifully to the chicken. In a separate, equally shallow bowl, combine the almond meal with the garlic powder, chili powder, cumin, sea salt, and a pinch of black pepper. Mix these dry ingredients thoroughly with a fork or spoon, ensuring the spices are well integrated into the almond meal. This creates a uniform, seasoned coating.
STEP 2: DREDGE + BAKE TO CRISPY PERFECTION
This step requires a little technique to keep things tidy and ensure an even coating. Using one hand (your “wet” hand), dip a chicken strip into the egg and hot sauce mixture, allowing any excess liquid to drip off. Immediately transfer the chicken strip to the bowl with the seasoned almond meal. Using your other hand (your “dry” hand), gently toss and press the almond meal mixture onto the chicken, ensuring it’s completely coated on all sides. Place the coated chicken tender onto your prepared parchment or silicone-lined baking sheet, leaving a small space between each piece to allow for even air circulation. Repeat this process with the remaining chicken strips until all are coated and arranged on the baking sheet. Avoid overcrowding the pan; if necessary, use a second baking sheet or bake in batches. Bake the chicken tenders in the preheated oven for 20 minutes. The internal temperature of the chicken should reach 165°F (74°C). Once baked, remove the tray from the oven and let the chicken tenders cool directly on the tray for 20 minutes. This resting period is crucial as it allows the coating to crisp up further and the chicken to redistribute its juices, resulting in a more tender and flavorful interior.
STEP 3: DIP IN SAUCE FOR THE AUTHENTIC BUFFALO KICK
While the chicken tenders are cooling, prepare your buffalo sauce. In a large, shallow pan (a sauté pan or wide skillet works best for easy dipping), combine the butter (or ghee) with the remaining 3 tablespoons of hot sauce. Place the pan over low heat and gently warm the mixture, stirring occasionally, until the butter is completely melted and thoroughly combined with the hot sauce. Ensure the sauce is warm but not simmering vigorously, as you want it to coat the chicken, not cook it further. Using tongs or a fork, carefully dip each cooled chicken tender into the warm buffalo sauce. Flip each tender to ensure both sides are completely coated in the rich, spicy mixture. Return the sauced chicken fingers to the baking tray (or a clean plate) and let them rest and soak in the delicious sauce for at least 10 minutes. This final soak allows the flavors to meld beautifully and ensures every tender is infused with that authentic buffalo tang. Serve warm and enjoy!
Easy Swaps & Substitutions to Customize Your Tenders
One of the best things about this baked buffalo chicken tenders recipe is its versatility. Feel free to experiment with these simple swaps and substitutions to cater to different dietary needs, preferences, or simply to add a new twist to your meal.
- Make in the Air Fryer for Extra Convenience: If you own an air fryer, it’s a fantastic tool for achieving even crisper results with minimal oil. After dredging your chicken tenders, arrange them in a single layer in your air fryer basket. Air fry in batches at about 375°F (190°C) for approximately 7-8 minutes, flipping them halfway through to ensure even browning. The exact time may vary depending on your air fryer model, so keep an eye on them until they are golden and cooked through. Once air-fried, coat them in the warm buffalo sauce as directed in Step 3.
- Use Regular Flour if Nuts Aren’t an Option: If you don’t have almond meal on hand, or if you or your guests have nut allergies, you can easily replace the almond meal with regular all-purpose flour or a gluten-free all-purpose flour blend. While the texture might be slightly different (almond meal provides a unique crispness and flavor), the tenders will still be delicious. Ensure you season your chosen flour blend generously with the specified spices.
- Elevate with a Dipping Sauce: While these buffalo chicken tenders are fantastic on their own, a creamy dipping sauce can take them to the next level. A classic store-bought ranch dressing or a tangy blue cheese dressing are traditional pairings that offer a cooling contrast to the spicy tenders. For a homemade touch, consider whisking together Greek yogurt, a squeeze of lemon juice, fresh herbs like dill or chives, and a touch of garlic powder for a lighter ranch-style dip. Other great options include honey mustard, BBQ sauce, or a spicy sriracha mayo.
- Make Them Extra Crispy: If you’re a fan of maximum crunch, here’s a pro tip: bake your chicken tenders on a wire rack placed directly onto your baking sheet. This ingenious method allows air to circulate all around the chicken tenders as they cook, preventing the bottoms from becoming soggy and promoting an even, extra-crispy crust on all sides. You can also finish them under the broiler for 1-2 minutes at the very end (watch carefully to prevent burning).
- Experiment with Different Proteins: While chicken is traditional, this coating and sauce combination works wonderfully with other proteins. Consider trying this recipe with firm white fish fillets (like cod or tilapia), pork loin strips, or even plant-based options like firm tofu slices or thick-cut cauliflower florets for a vegetarian twist. Adjust baking times as needed for different ingredients.
- Vary the Spice Profile: Don’t limit yourself to the suggested spice blend! For extra heat, add a pinch of cayenne pepper or a dash of smoked paprika for a deeper, earthier flavor. Italian seasoning, a sprinkle of dried oregano, or even a touch of onion powder can introduce new dimensions to the coating. Feel free to adjust to your personal preference!
Storing & Reheating Leftover Baked Buffalo Chicken Tenders
These baked buffalo chicken tenders are so delicious, you might not have many leftovers! But if you do, proper storage and reheating will ensure they remain enjoyable for days to come.
Refrigeration
Allow any leftover chicken tenders to cool completely to room temperature before storing. Place them in an airtight container and store them in the refrigerator for up to 5 days. Keeping them in an airtight container helps maintain their freshness and prevents them from absorbing other odors in your fridge.
Reheating for Best Results
To reheat, for the best crispness, we recommend using an oven or air fryer. Preheat your oven to 350°F (175°C) or your air fryer to 375°F (190°C). Place the tenders in a single layer on a baking sheet (or in the air fryer basket) and heat for 8-12 minutes in the oven, or 5-7 minutes in the air fryer, until thoroughly warmed through and crispy again. If using a microwave, heat in 30-second intervals until warm; however, be aware that the microwave will soften the coating rather than crisp it.
Freezing for Longer Storage
These buffalo chicken tenders also freeze beautifully, making them excellent for meal prep! To freeze, arrange the cooked and cooled tenders in a single layer on a baking sheet and place them in the freezer for about 2-3 hours, or until solid. This “flash freezing” step prevents them from sticking together. Once frozen solid, transfer the tenders to a freezer-safe ziploc bag or an airtight container. They can be stored in the freezer for up to 3 months. When you’re ready to enjoy them, remove them from the freezer a few hours before you plan to serve, or reheat directly from frozen in the oven or air fryer, adding a few extra minutes to the cooking time until they are hot and crispy.
Perfect Pairings: What to Serve With Baked Buffalo Chicken Tenders
When it comes to pairing, my mind instantly goes to fries – a classic for a reason! However, these versatile baked buffalo chicken tenders can be served with a wide array of side dishes, from traditional comfort foods to lighter, healthier options. Here are a few suggestions to complete your meal:
- Crispy Baked French Fries: A timeless companion! Our healthy baked version gives you all the crunch without the deep-fried guilt.
- The Crispiest Sweet Potato Fries: For a slightly sweeter, nutrient-packed alternative, sweet potato fries are a fantastic choice. Their natural sweetness beautifully balances the spicy kick of the buffalo chicken.
- Homemade Curly Fries: Add a fun, playful twist to your meal with homemade curly fries. Their unique shape offers a delightful texture.
- Baked Yucca Fries: Explore something different with baked yucca fries. They offer a wonderfully starchy, slightly nutty flavor and a satisfying texture.
- Wanna get crazy? Try Asparagus Fries: A surprisingly delicious and healthy green veggie option, these “fries” add a gourmet touch.
- Fresh Green Salad: A simple garden salad with a light vinaigrette provides a refreshing contrast to the richness of the chicken.
- Creamy Coleslaw: The cool, crisp texture and creamy dressing of coleslaw are perfect for cutting through the heat of the buffalo sauce.
- Corn on the Cob: Sweet, juicy corn on the cob is a seasonal favorite that pairs wonderfully with chicken tenders.
- Steamed or Roasted Vegetables: Broccoli, green beans, or carrots lightly steamed or roasted with a touch of garlic are excellent healthy sides.
- Quinoa or Rice Pilaf: For a more substantial meal, a side of fluffy quinoa or a flavorful rice pilaf can absorb some of that delicious buffalo sauce.
No matter your preference, there’s a perfect side dish to make your baked buffalo chicken tenders meal complete and satisfying!
Baked Buffalo Chicken Fingers

5 Stars
4 Stars
3 Stars
2 Stars
1 Star
5 from 1 review
Celebrate your inner child with these Baked Buffalo Chicken Tenders. Made with almond meal, egg and hot sauce, this is a simple recipe for chicken fingers that you can serve for weeknight dinners or for a healthy kids meal.
- Author: Davida Lederle
- Prep Time: 10 minutes
- Cook Time: 20 minutes
- Total Time: 30 minutes
- Yield: 4 servings 1x
- Category: Dinner
- Method: Bake
- Diet: Gluten Free
Ingredients
Scale
- 1 1/2 lbs boneless, skinless chicken breasts, sliced into strips (or buy pre-sliced chicken tenders)
- 1 large egg
- 4 1/2 tbsp hot sauce of choice (reserve 3 tbsp for sauce)
- 2/3 cup almond meal (NOT almond flour)
- 1 tsp garlic powder
- 1/2 tsp chili powder
- 1/4 tsp cumin
- 1/2 tsp sea salt
- pinch of black pepper
- 1 1/2 tbsp butter (or ghee)
Instructions
- Preheat oven to 400 degrees F (200°C).
- Beat egg in a large bowl and combine with 1 1/2 tbsp hot sauce. Whisk well.
- In a separate bowl, combine almond meal and all listed spices. Mix thoroughly.
- Dip one chicken strip into the egg mixture (using a “wet” hand) and then transfer it to the almond-spice mixture (using a “dry” hand) to coat completely.
- Place the coated strip onto a parchment or silicone-lined baking sheet, ensuring pieces are not touching.
- Repeat with remaining chicken strips.
- Bake for 20 minutes, or until cooked through and golden.
- Let cool on the tray for 20 minutes to crisp up.
- In a large shallow pan, combine butter (or ghee) and the reserved 3 tbsp of hot sauce. Heat gently until melted and combined.
- Using tongs or a fork, dip each chicken tender into the warm sauce, flipping to coat both sides completely.
- Place the sauced tenders back onto the tray and let them soak in the mixture for 10 minutes before serving.