
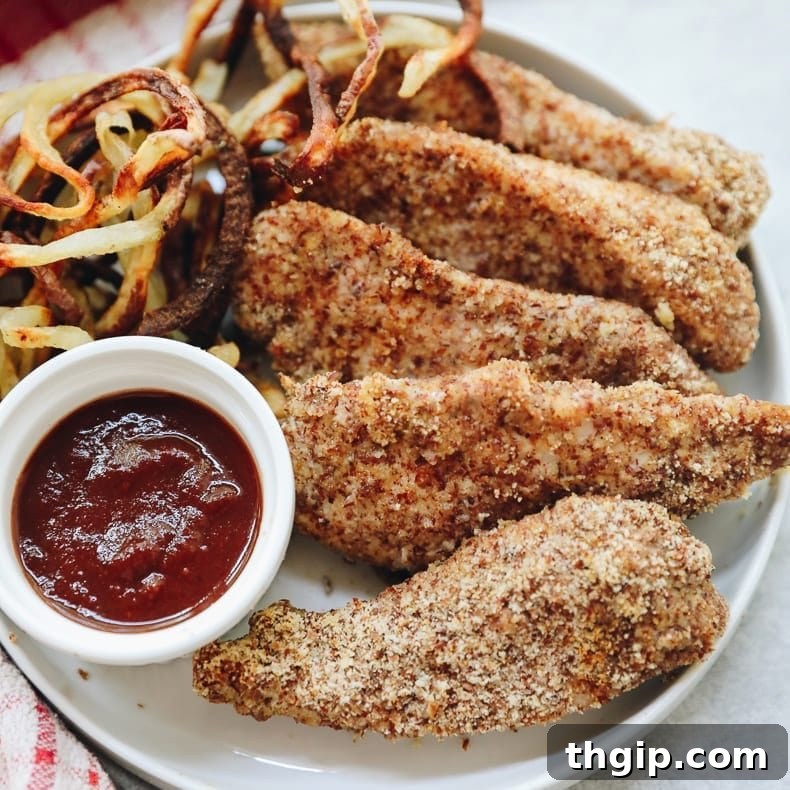
Tired of bland, store-bought chicken fingers laden with questionable ingredients? It’s time to elevate your family’s favorite meal with these incredibly easy and healthy grain-free chicken fingers. Perfectly baked to golden, crispy perfection, they offer all the satisfying crunch without the messy frying or the guilt. Ideal for busy weeknights, these homemade baked chicken tenders are guaranteed to be a hit with both kids and adults, proving that wholesome food can be utterly delicious!
Table of Contents
- Why These Grain-Free Chicken Fingers Are a Game Changer
- Essential Ingredients for Your Grain-Free Chicken Fingers
- Mastering the Art of Baking Crispy Chicken Fingers
- The Secret to Extra Crispy Results
- Meal Prep Made Easy: Storing and Reheating
- Complete the Meal: Healthy Sides and Dips
- Grain-Free Chicken Fingers Recipe Card
- More Healthy Chicken and Side Recipes to Love
How many incredible chicken finger recipes can one person have on their website? As a self-proclaimed chicken finger enthusiast, I say, “as many as my heart desires!” These grain-free chicken fingers are not just simple to prepare; they’re unbelievably crispy, flavorful, and quickly became a new favorite in my kitchen. In fact, this was one of the very first recipes I tested in our new home, putting our oven through its paces with a dish that truly delivers on taste and texture!
For those familiar with my cashew-crusted chicken fingers, consider this a fantastic, equally delicious spin. Many of you reached out, eager to know if almond meal could be used as a substitute for ground cashews in the breading. My answer? A resounding YES! Using almond meal works beautifully, offering a slightly different, yet equally delightful, crispy coating that makes these baked chicken tenders irresistible. So, if you’re ready for a healthier, grain-free alternative to classic chicken fingers that doesn’t compromise on flavor or crunch, let’s dive into this must-try recipe!
Why These Grain-Free Chicken Fingers Are a Game Changer
In a world full of processed foods, finding genuinely healthy and satisfying options can be a challenge, especially when it comes to comfort food classics. These grain-free chicken fingers address that perfectly. By ditching traditional flour-based breading, we utilize nutrient-dense almond meal, making this recipe suitable for those following gluten-free, grain-free, or low-carb diets. But it’s not just about dietary preferences; it’s about taste! The almond meal creates an incredibly light and crispy crust that stands up wonderfully to baking, eliminating the need for deep frying and the excess oil that comes with it. This means less mess in the kitchen and a significantly lighter meal without sacrificing that beloved chicken finger experience. Whether you’re looking for a quick weeknight dinner, a healthy appetizer, or a kid-friendly meal that secretly packs a nutritional punch, these baked chicken fingers tick all the boxes. They’re quick, easy, and undeniably delicious!
Essential Ingredients for Your Grain-Free Chicken Fingers
Crafting these delectable chicken fingers requires just a handful of simple ingredients, emphasizing quality and flavor. Here’s a closer look at what you’ll need to create this family favorite:
- Chicken Breasts: Opt for boneless, skinless chicken breasts for ease and lean protein. If you’re short on time or prefer the classic shape, pre-cut chicken tenderloins are a fantastic shortcut. Otherwise, slicing full chicken breasts into uniform strips (about 1 inch thick) takes mere moments and ensures even cooking. The quality of your chicken makes a difference, so choose fresh, high-quality poultry for the best results.
- Egg: A single large egg is crucial for this recipe. It acts as the binder, creating the perfect sticky surface for the almond meal coating to adhere to. This ensures your grain-free breading stays put and achieves maximum crispiness.
- Almond Meal: This is the star of our grain-free breading! It’s essential to use almond meal, not almond flour. Almond meal is typically made from unblanched almonds (skin on) and has a coarser, more textured grind than the very fine, blanched almond flour. This coarser texture is key to achieving that perfectly crispy, golden crust on your chicken fingers, mimicking traditional breadcrumbs but in a grain-free fashion.
- Spices and Seasoning: Our carefully selected blend of spices provides a warm, savory, and slightly smoky flavor profile that beautifully complements the chicken. You’ll need:
- Garlic Powder: Adds an aromatic depth that’s universally loved.
- Chili Powder: Contributes a mild warmth and earthy notes, without making it overtly spicy.
- Cumin: Enhances the savory profile with its distinctive, slightly smoky flavor.
- Sea Salt: Essential for bringing out all the flavors and ensuring the chicken is perfectly seasoned.
Feel free to experiment with additional spices like onion powder, smoked paprika, or a pinch of cayenne pepper if you enjoy a little heat!
Mastering the Art of Baking Crispy Chicken Fingers
Achieving perfectly coated and crispy baked chicken fingers is simpler than you might think. The key lies in a smart dredging technique and optimal baking conditions. Here are my top tips for success:
- Prepare Your Breading Station: Before you even touch the chicken, set up your workspace. You’ll need three separate, shallow bowls. In the first, whisk your large egg until thoroughly beaten. In the second, combine all your dry ingredients – the almond meal, garlic powder, chili powder, cumin, and sea salt. Make sure to mix them really well so the spices are evenly distributed throughout the breading. The third bowl or a plate can be used for your finished, breaded chicken strips.
- The Two-Hand Method is Your Friend: This is a game-changer for keeping your hands clean and your breading consistent!
- Using one hand (let’s call it the “wet hand”), dip a chicken strip into the beaten egg, ensuring it’s fully coated. Let any excess egg drip back into the bowl.
- Now, transfer that egg-coated chicken strip directly into the almond meal mixture.
- Switch hands! Use your other hand (the “dry hand”) to roll and press the chicken finger into the almond meal mixture. This allows you to coat the chicken thoroughly without getting your “wet hand” covered in breading, which prevents a gloopy, messy coating.
- Once evenly coated, transfer the breaded chicken finger to your prepared baking sheet using your “dry hand.”
- Repeat this process with the remaining chicken strips. This systematic approach ensures all your chicken fingers are beautifully coated and your hands stay (mostly) clean!
- Prepare Your Baking Sheet: Line your baking sheet with parchment paper or a silicone baking mat to prevent sticking and make cleanup a breeze. If you’re aiming for next-level crispiness (and I highly recommend it!), proceed to the next tip.
Following these steps will lay the foundation for incredibly flavorful and perfectly baked grain-free chicken fingers that you’ll want to make again and again!
The Secret to Extra Crispy Results
While baking your chicken fingers directly on a baking sheet will yield a satisfying crispiness, for those who crave maximum crunch – the kind that rivals fried chicken without the oil – there’s a simple trick. Place a wire cooling rack directly on top of your parchment-lined baking sheet and arrange your breaded chicken fingers on the rack. Why does this make such a difference?
When chicken fingers bake directly on a solid surface, the side touching the pan can steam slightly, leading to a softer, sometimes mushy texture. By elevating the chicken on a wire rack, you allow hot air to circulate completely around each strip, from top to bottom. This 360-degree air exposure ensures that every inch of your grain-free breading gets evenly crisped, resulting in gloriously golden and crunchier baked chicken tenders. It’s a small extra step that makes a huge impact on the final texture!
Meal Prep Made Easy: Storing and Reheating
For ardent chicken finger lovers like myself, the idea of leftovers might seem laughable. However, if you’re a savvy meal prepper or simply cooking a larger batch for the family, these grain-free chicken fingers are wonderfully freezer-friendly and reheat beautifully. Here’s how to ensure they stay delicious:
- Storing in the Fridge: Once cooled completely, place your chicken fingers in an airtight container. They will maintain their quality and flavor for 3-5 days in the refrigerator.
- Freezing for Later: For longer storage, flash freeze the baked chicken fingers first by spreading them in a single layer on a baking sheet. Once frozen solid (about 1-2 hours), transfer them to a freezer-safe bag or airtight container. This prevents them from sticking together. They can be stored in the freezer for up to 3 months. Thaw them in the fridge overnight before reheating, or reheat from frozen at a slightly lower temperature for a longer time.
- Reheating for Optimal Crispiness: The key to enjoying crispy leftovers is to avoid the microwave. Microwaving will steam the breading, turning your once-crispy chicken fingers soft and unappetizing. Instead, I highly recommend reheating them in:
- A Toaster Oven: Preheat to 350°F (175°C) and bake for 5-10 minutes, or until heated through and re-crisped.
- A Traditional Oven: Preheat to 375°F (190°C). Place chicken fingers on a wire rack set over a baking sheet and bake for 10-15 minutes, or until hot and crispy.
- An Air Fryer: For the ultimate re-crisp, an air fryer is fantastic! Air fry at 375°F (190°C) for 5-7 minutes, shaking the basket halfway, until heated through and perfectly crunchy.
With these storage and reheating tips, you can always have a batch of healthy, homemade grain-free chicken fingers ready to go!
Complete the Meal: Healthy Sides and Dips
These versatile grain-free chicken fingers pair wonderfully with a variety of healthy and flavorful side dishes and dipping sauces. Turn them into a complete and satisfying meal with some of these delicious options:
- Crispy Baked Curly Fries: A playful and healthier alternative to classic fries, offering a fun texture that kids adore.
- Crispy Baked Sweet Potato Fries: A nutrient-rich and naturally sweet option that complements the savory chicken perfectly.
- Maple Roasted Brussels Sprouts: For a touch of green and sophisticated flavor, these tender-crisp sprouts are an excellent choice.
- Charred Green Beans: Simple, vibrant, and packed with nutrients, a fantastic light side.
Don’t forget the dipping sauces! Classic ketchup is always a hit, but consider homemade honey mustard, a creamy avocado ranch, or a sugar-free BBQ sauce for extra flavor. A fresh green salad with a light vinaigrette also makes a fantastic accompaniment, balancing the richness of the chicken.
Grain-Free Chicken Fingers Recipe Card
5 out of 5 stars from 1 review
Ditch the store-bought chicken fingers and whip up these healthy grain-free chicken fingers at home. They’re easy and baked so no messy frying or clean-up! A perfect meal kids and adults alike will love.
- Author: Davida Lederle
- Prep Time: 10 minutes
- Cook Time: 20 minutes
- Total Time: 30 minutes
- Yield: 8–10 chicken fingers
- Category: Dinner, Appetizer
- Method: Bake
- Cuisine: American
- Diet: Gluten Free, Grain Free, Low Carb
Ingredients
- 2 large boneless, skinless chicken breasts (at least 1 pound)
- 1 large egg
- 2/3 cup almond meal*
- 1 tsp garlic powder
- 1/2 tsp chili powder
- 1/4 tsp cumin
- 1/2 tsp sea salt
Instructions
- Preheat oven to 400 degrees F (200°C). Prepare a baking sheet by lining it with parchment paper. For extra crispiness, place a wire rack on top of the parchment-lined sheet.
- Chop chicken breasts into uniform strips, approximately 1 inch wide and 3-4 inches long. This size ensures even cooking and a classic “finger” shape.
- In a medium, shallow bowl, thoroughly beat the large egg until slightly frothy.
- In a separate medium, shallow bowl, combine the almond meal, garlic powder, chili powder, cumin, and sea salt. Mix well with a fork to ensure all spices are evenly distributed.
- Using the “wet hand/dry hand” method: Dip one chicken strip into the beaten egg with one hand, letting any excess egg drip off.
- Transfer the egg-coated strip to the almond meal mixture. Using your other, dry hand, thoroughly coat the chicken strip by rolling and gently pressing it into the breading mixture until all sides are covered.
- Place the breaded chicken finger onto the prepared baking sheet (or wire rack). Ensure there is a little space between each chicken finger for proper air circulation.
- Repeat this dipping and coating process with all remaining chicken strips until they are all breaded and arranged on the baking sheet.
- Bake for 20 minutes, or until the chicken fingers are beautifully golden brown, crispy, and cooked through to an internal temperature of 165°F (74°C). Cooking time may vary slightly depending on the thickness of your chicken strips.
*Important Note: This recipe specifically calls for almond meal, which has a coarser texture and is made from unblanched almonds, creating a superior crispy coating. Almond flour is much finer and can result in a less crunchy texture.
More Healthy Chicken and Side Recipes to Love
If you loved these healthy and crispy grain-free chicken fingers, you’re in for a treat! Explore more delicious and wholesome recipes designed to nourish your body and delight your taste buds. From other chicken variations to fantastic side dishes, there’s something here for everyone:
- Buffalo Baked Chicken Tenders: For those who love a kick, these spicy baked tenders deliver all the flavor of buffalo wings in a healthier format.
- Cashew-Crusted Chicken Fingers: The inspiration behind this recipe, offering a different nutty crunch for your chicken finger cravings.
- The Perfect Stovetop Chicken: Master the art of cooking juicy, tender chicken breasts every time with this essential guide.
- Crispy Sweet Potato Fries: A delightful and nutritious side that pairs wonderfully with almost any meal.
Happy cooking, and enjoy these wholesome, homemade delights!