
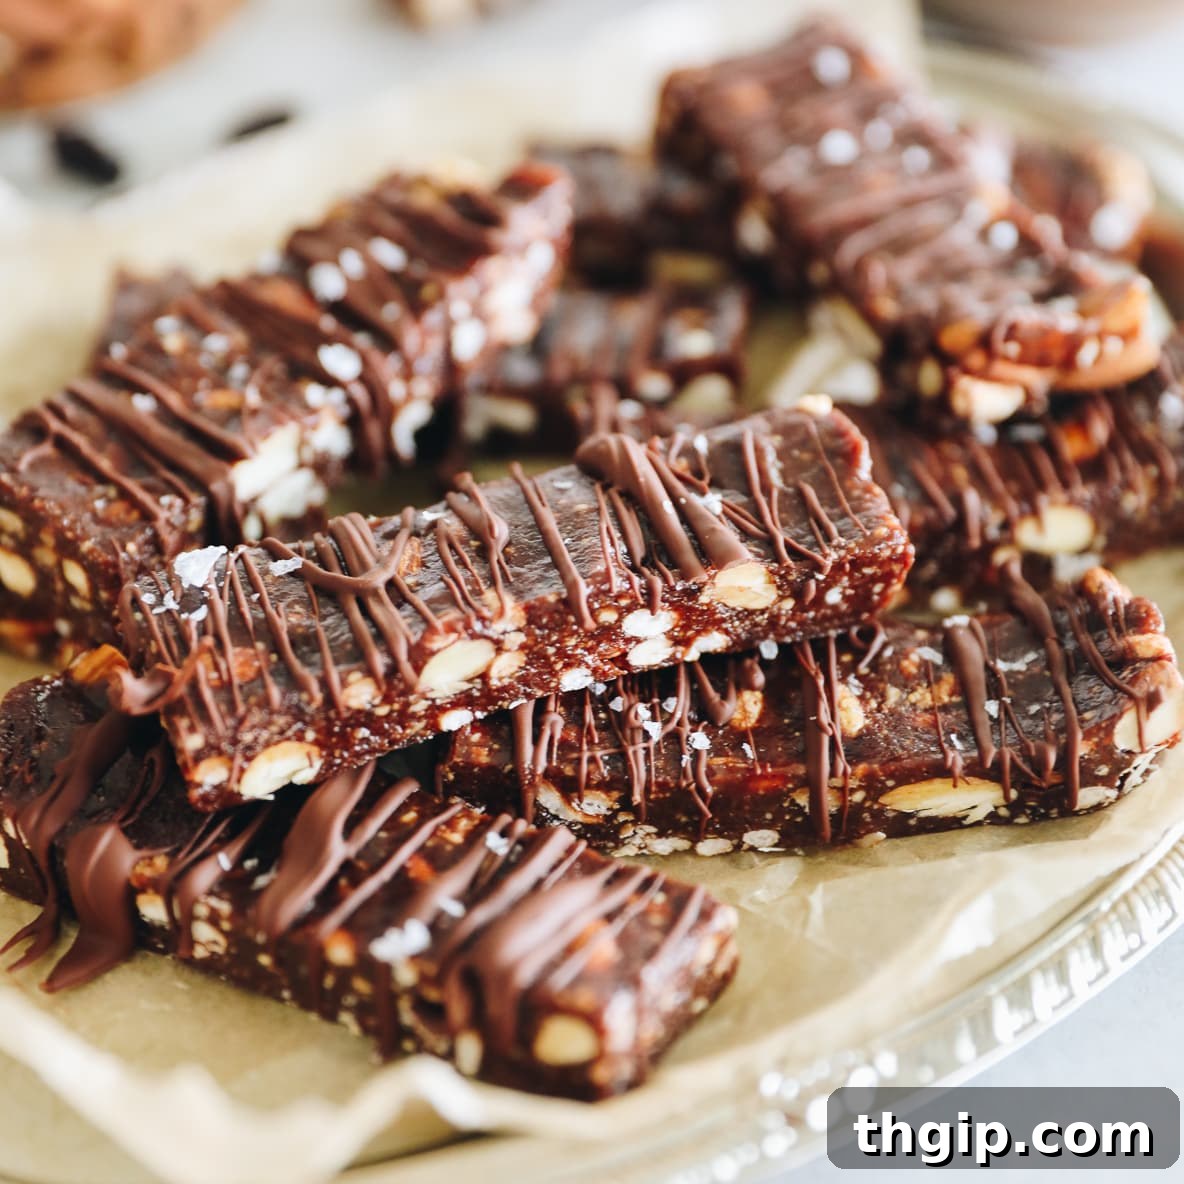
Indulge in the rich, wholesome goodness of homemade Dark Chocolate Cherry Bars, a healthier and more affordable take on your favorite KIND bars. Crafted with raw cacao and succulent tart dried cherries, each bar is a symphony of flavor, delicately drizzled with dark chocolate and finished with a sprinkle of sea salt. Get ready to transform your snack game with this easy, no-bake recipe!
Unlock the Secret to Delicious & Healthy Homemade Dark Chocolate Cherry Bars
If you've ever savored the delightful combination of nuts, chocolate, and fruit in a Dark Chocolate Cherry Cashew KIND bar, you know just how irresistible they are. They're a beloved treat for a reason—convenient, satisfying, and bursting with flavor. However, the pleasure often comes with a hefty price tag and a list of ingredients that, while better than many conventional granola bars, can still be improved upon. But what if you could enjoy that same incredible taste, elevate the nutritional profile, and save a significant amount of money all at once? Prepare to be amazed, because I’ve mastered the art of crafting these delectable bars right in your own kitchen.
This recipe isn't just a copycat; it's an enhancement. It transforms a store-bought favorite into a truly wholesome and customizable snack that you’ll feel great about eating and sharing. Forget compromising on taste or ingredients; with these homemade dark chocolate cherry bars, you get the best of both worlds. They're so good, they've even become a personal favorite of my dad's, making them a treat that's close to my heart.
Save Big with Homemade Granola Bars: Your Wallet Will Thank You!
One of the most compelling reasons to make your own granola bars is the undeniable cost savings. A single KIND bar typically retails for around $2.00, which quickly adds up if you, like many of us, enjoy them regularly. Imagine spending $24 or more for just a dozen bars! With this homemade recipe, I can confidently tell you that an entire batch of 12 bars can be made for significantly less than that, especially if you’re a savvy shopper who loves the value found in bulk stores.
By purchasing ingredients like nuts, dried fruit, and cacao powder in larger quantities, the per-bar cost dramatically decreases. These staple ingredients often have a long shelf life, making bulk purchases a smart investment for consistent snack preparation. Over time, the cumulative savings from opting for homemade over store-bought can be substantial, freeing up your budget for other essentials while still enjoying premium, healthy snacks. It’s a win-win situation for both your taste buds and your finances.
Wholesome Ingredients, Uncompromised Flavor: Why Homemade is Better
While KIND bars are often marketed as a healthier choice due to their exclusion of chemical additives, high fructose corn syrup, and hydrogenated oils, their ingredient list still includes items like added sugar, palm kernel oil, and glucose. My homemade dark chocolate cherry bars offer a superior alternative, tasting almost identical to the original while boasting an even cleaner, more natural ingredient profile. You gain complete control over what goes into your body, ensuring every bite is packed with pure goodness.
Here’s why embracing the homemade approach to granola bars is a game-changer for your health and satisfaction:
- Unbeatable Savings: As mentioned, crafting a full batch of these delicious bars at home costs a mere fraction of what you'd spend on an equivalent quantity of store-bought alternatives. Your budget will undoubtedly appreciate it!
- Ingredient Transparency and Choice: When you make snacks at home, you have the ultimate power to select each ingredient. This means opting for wholesome, minimally processed components and avoiding unnecessary additives like refined sugars, unhealthy oils, and artificial flavors often found in commercial bars. You know exactly what you’re fueling your body with.
- Nutritional Superiority: By using real, whole ingredients like raw nuts, naturally sweetened dates, and nutrient-dense cacao, you create a snack that is not only delicious but also rich in fiber, healthy fats, and antioxidants. It's truly a bar that supports your well-being.
- Versatility for All Occasions: These dark chocolate cherry bars strike the perfect balance between healthy and indulgent. They're robust enough to kickstart your day as a nutritious breakfast, yet sweet and satisfying enough to serve as a guilt-free dessert or an energy-boosting afternoon snack.
Essential Ingredients for Your Perfect Dark Chocolate Cherry Bars
The beauty of these no-bake dark chocolate cherry bars lies in their simple yet powerful ingredient list. Each component plays a crucial role in achieving the ideal texture, sweetness, and flavor that rivals the commercial versions. Sourcing quality ingredients is key to the best results.
- Cashews and Almonds: These nuts form the hearty, wholesome base of our bars. I prefer using raw nuts for a cleaner flavor profile and to retain their maximum nutritional value, but you could experiment with lightly roasted unsalted nuts for a deeper, toastier note. Both cashews and almonds contribute healthy fats, protein, and satisfying crunch, making them excellent sources of sustained energy.
- Dried Cherries: The star of the show, these tart little gems provide a burst of fruity flavor and a chewy texture that complements the nuts perfectly. Whenever possible, seek out dried cherries without any added sugar to keep the bars as naturally sweet and healthy as possible. They’re also packed with antioxidants! If dried cherries are hard to find, cranberries or even finely chopped apricots could be interesting alternatives, though the flavor profile would shift.
- Dates: Medjool dates are nature's candy and the unsung hero of this recipe. Their natural sweetness and incredibly sticky texture act as the perfect binder, holding all the ingredients together without the need for artificial syrups or refined sugars. Make sure your dates are pitted before adding them to the food processor. If they seem a bit dry, a quick soak in warm water for 10 minutes can help soften them, just be sure to drain them thoroughly before use.
- Raw Cacao Powder: For that intense, rich chocolate flavor, raw cacao powder is my go-to. Raw cacao is less processed than cocoa powder, retaining more of its beneficial antioxidants and minerals. If raw cacao isn't available, unsweetened cocoa powder works wonderfully as well, delivering that classic chocolatey depth.
- Puffed Rice or Millet: This ingredient adds a delightful lightness and subtle crispness to the bars, breaking up the density of the nuts and dates. It's optional, so don't worry if you can't find it; the bars will still be delicious without it. If you're looking for alternatives, puffed quinoa or even a small amount of rolled oats could be experimented with for similar textural effects.
- Dark Chocolate: A generous drizzle of melted dark chocolate elevates these bars from great to extraordinary. For the best flavor and health benefits, I recommend choosing dark chocolate with at least 70% cacao content. The higher cacao percentage offers a richer taste and less sugar. Quality dark chocolate melts beautifully and sets firm, providing a satisfying crackle with every bite.
- Sea Salt: A delicate sprinkle of flaky sea salt on top of the melted chocolate isn't just for decoration; it's a flavor enhancer. The salt beautifully contrasts and brightens the sweetness of the chocolate and cherries, creating a perfectly balanced sweet and salty experience. Don't skip this final touch!
Crafting Your Dark Chocolate Cherry Bars: A Simple Step-by-Step Guide
Making these no-bake dark chocolate cherry bars is surprisingly simple, requiring minimal effort and no oven. Follow these easy steps to create your own batch of delicious and healthy snacks.
- STEP 1: Combine Core Ingredients. In the bowl of a high-speed food processor or a powerful blender, combine the raw cashews, dried cherries (ensure they are pitted and, if dry, briefly soaked), and pitted Medjool dates. Add the raw cacao powder. Process on high until the mixture starts to come together and forms a large, sticky ball. This might take a few minutes, scraping down the sides as needed, until a uniform, dough-like consistency is achieved.
- STEP 2: Incorporate Texture. Transfer the sticky mixture from the food processor to a large mixing bowl. Add the raw almonds and the puffed rice or millet. These additions will provide a lovely crunch and texture contrast to the soft date-nut base.
- STEP 3: Mix and Prepare for Pressing. Using a sturdy spatula or your hands (lightly dampened to prevent sticking), thoroughly mix all the ingredients together in the bowl. Ensure the almonds and puffed grains are evenly distributed throughout the sticky base. The mixture should be very cohesive and sticky.
- STEP 4: Press into Bars. Line a 9x9 inch baking dish with parchment paper, leaving a generous overhang on all sides. This makes lifting the set bars out of the dish incredibly easy. Transfer the sticky mixture into the lined dish and press down very firmly and evenly with your fingers or the back of a spoon. You want a compact, flat layer. If the mixture starts to stick to your hands, lightly wet them with water.
- STEP 5: Chill to Set. Once the mixture is evenly pressed, place the entire baking dish into the freezer for at least 15 minutes. This chilling period is crucial for the bars to firm up, making them much easier to cut and handle without falling apart.
- STEP 6: Melt the Dark Chocolate. While the bars are chilling, prepare your dark chocolate. You can melt the dark chocolate chips or chopped dark chocolate either in a microwave-safe bowl (heating in 30-second intervals, stirring well after each, until smooth and fully melted) or using a double boiler on the stovetop over low heat, stirring constantly until glossy.
- STEP 7: Cut and Drizzle. Remove the chilled bars from the freezer. Using the parchment paper overhang, carefully lift the entire slab of mixture out of the baking dish and place it on a cutting board. With a sharp knife, cut the slab into 12 equally sized bars, or adjust the size to your preference. Arrange the cut bars on a clean plate or tray, ideally lined with fresh parchment paper.
- STEP 8: Finish with Salt. Using a spoon, artfully drizzle the melted dark chocolate over the top of each bar. While the chocolate is still wet and glistening, immediately sprinkle a pinch of flaky sea salt over each bar. This adds a beautiful visual appeal and a fantastic flavor contrast.
- STEP 9: Final Set and Store. Once drizzled and salted, return the bars to the refrigerator for an additional 15 minutes to allow the dark chocolate to fully set and harden.
- STEP 10: Storage. Store your finished Dark Chocolate Cherry Bars in an airtight container in the refrigerator for up to 2 weeks. They will maintain their perfect texture and flavor.
Storing Your Homemade Granola Bars for Lasting Freshness
Proper storage is essential to keep your homemade Dark Chocolate Cherry Bars fresh, chewy, and delicious for as long as possible. Since these bars are made with natural, whole ingredients and contain no preservatives, refrigeration is key.
Store your bars in an airtight container in the refrigerator for up to two weeks. This keeps the nuts and dates from drying out and prevents the chocolate from becoming too soft. For longer storage, these bars freeze beautifully. Simply wrap individual bars tightly in plastic wrap or place them in a freezer-safe bag or container, separating layers with parchment paper to prevent sticking. They can be frozen for up to six months. When you're ready for a snack, simply grab one from the freezer and let it thaw at room temperature for a few minutes, or enjoy it chilled directly from the fridge. Fair warning, though: in my house, these delicious treats rarely last long enough to even make it to the freezer!
Frequently Asked Questions About Homemade Granola Bars
Can I substitute other nuts or dried fruits in this recipe?
Absolutely! This recipe is incredibly versatile. You can easily swap cashews or almonds for walnuts, pecans, or a mix of your favorite nuts. For dried fruits, while cherries offer a unique tartness, you could experiment with dried cranberries, blueberries, or even finely chopped dried apricots. Just be mindful of the moisture content of the dried fruit; if using a drier fruit, you might need to briefly soak your dates in warm water before processing to ensure a sticky consistency.
Are these Dark Chocolate Cherry Bars gluten-free and vegan?
Yes, this recipe is naturally both gluten-free and vegan! It relies on whole, plant-based ingredients like nuts, dates, dried fruit, and cacao. As long as you ensure your puffed rice or millet is certified gluten-free (some manufacturing processes can introduce cross-contamination) and your dark chocolate does not contain any dairy, these bars fit perfectly into a gluten-free and vegan lifestyle. Always check ingredient labels for peace of mind.
How can I make these bars even richer in chocolate flavor?
If you're a true chocolate lover, there are a few ways to amp up the richness! You could slightly increase the amount of raw cacao powder in the base mixture for a more intense chocolate core. Additionally, consider folding in some extra dark chocolate chips or finely chopped dark chocolate into the mixture after the initial processing step, before pressing it into the dish. This will give you lovely pockets of melted chocolate throughout the bar.
What if my mixture is too dry or too sticky?
The consistency of your mixture largely depends on the moisture content of your dates and dried cherries. If your mixture seems too dry and isn't forming a cohesive ball, try adding a tablespoon of water or a neutral liquid like maple syrup or agave nectar, one teaspoon at a time, and process again until it reaches the desired stickiness. If it's too sticky to handle, you can add a small amount of extra puffed rice, finely ground oats, or even a bit more cacao powder to absorb excess moisture.
Can I add protein powder to these bars?
Yes, you can! If you're looking to boost the protein content, you can gently fold in a scoop or two of your favorite protein powder (vegan protein powders work well here) after the main mixture has formed into a ball and before adding the almonds and puffed rice. Keep in mind that protein powder can absorb moisture, so you might need to add a tiny bit more liquid (like water or almond milk) to maintain the desired sticky consistency.
Dark Chocolate Cherry Bars
5 from 1 review
A delicious and healthy take on Kind Bar’s Dark Chocolate Cherry Bars made with raw cacao and tart dried cherries drizzled with dark chocolate and sprinkled with sea salt.
- Author: Davida Lederle
- Prep Time: 35 minutes
- Cook Time: 0 minutes
- Total Time: 35 minutes
- Yield: 12 Bars 1x
- Category: Snack
- Method: Blend
- Diet: Vegan
Ingredients
- 1/2 cup raw cashews
- 1 1/4 cups dried cherries
- 1 cup medjool dates, pitted
- 1/2 tbsp raw cacao powder
- 1/2 cup raw almonds
- 1/2 cup puffed rice or millet
- 1/4 cup dark chocolate chips (or chopped dark chocolate)
- sprinkle of sea salt
Instructions
- In a food processor or blender, combine cashews, dried cherries, pitted Medjool dates, and raw cacao powder. Process until the mixture comes together to form a large, sticky ball.
- Transfer the sticky ball mixture to a large mixing bowl. Add the raw almonds and puffed rice or millet.
- Using a sturdy spatula, mix all ingredients thoroughly until they are well combined and the mixture remains very sticky.
- Line a 9x9 inch baking dish with parchment paper, leaving an overhang on the sides for easy removal. Transfer the mixture to the dish and press down firmly and evenly with your fingers until it forms a flattened, compact layer. If the mixture sticks to your hands, lightly wet them.
- Place the prepared dish in the freezer for at least 15 minutes to allow the bars to set and firm up.
- While the bars are chilling, melt the dark chocolate. You can do this in a microwave in 30-second intervals, stirring after each, or by using a double boiler on the stovetop until smooth.
- Once set, remove the bars from the freezer and lift them out of the dish using the parchment paper overhang. Carefully cut the slab into 12 even bars, or your preferred size.
- Arrange the cut bars on a plate or tray lined with parchment paper. Drizzle the melted dark chocolate evenly over the top of each bar using a spoon. Immediately sprinkle with sea salt for a perfect sweet and salty finish.
- Return the bars to the fridge for an additional 15 minutes to allow the chocolate drizzle to set.
- Store the finished Dark Chocolate Cherry Bars in an airtight container in the refrigerator for up to 2 weeks.
More Delicious & Healthy Granola Bar Recipes to Explore
If you loved crafting and savoring these Dark Chocolate Cherry Bars, you're in for a treat! The world of homemade granola bars is vast and exciting, offering endless possibilities for healthy and delicious snacks. Be sure to explore these other fantastic recipes to keep your snack drawer stocked with nutritious options:
- Cinnamon Roll Protein Bars
- Matcha Protein Bars
- Peanut Butter Protein Bars
- Mint Chocolate Protein Bars
- Mocha Protein Bars