
Before diving into the creative world of DIY wedding details, catch up on our previous journey:
Part #1: The Welcome Dinner – Setting the Stage
Part #2: Getting Ready, The First Look & The Ceremony – Our Vows
Part #3: The Reception – Celebrating Our Union
Crafting Our Dream Day: A Deep Dive into DIY Wedding Details and Our Farewell Brunch
We’ve reached the fourth and final chapter of our wedding recap series! To be honest, there’s a certain sense of relief in bringing these recaps to a close. Not because our wedding wasn’t everything we dreamed of, but because it feels like time to gently shut this beautiful chapter and eagerly anticipate what new adventures await. After a year of meticulous planning, I am more than ready to embrace the next phase of life. Through this journey, I’ve not only collected invaluable memories, which I adore revisiting in these posts, but also gathered a wealth of insights. For those currently navigating the exciting, sometimes overwhelming, season of wedding planning, I’m thrilled to share some of the knowledge we gained.
This desire to share is particularly strong as my husband, C, and I find ourselves amidst a new wave of wedding seasons, now with the wonderful honor of supporting our friends as they embark on their own marital journeys. If my extensive list-making and newfound passion for “Do It Yourself” (DIY) wedding details can serve as a helpful guide for even one couple, then I consider my mission accomplished!
The Post-Wedding Farewell Brunch: A Perfect Send-Off
Before we delve into the intricate world of DIY wedding planning, let’s first recount the delightful post-wedding brunch. As previously mentioned in our welcome dinner post, with 120 out of 135 guests traveling from out of town, our wedding celebration was far more than just a single evening affair. We extended our hospitality, welcoming everyone on Saturday night, celebrating the wedding on Sunday, and then, on Monday morning of Memorial Day Weekend, hosting a special brunch. This event served as a heartfelt thank you and a final farewell before guests journeyed home, and we embarked on our honeymoon.
The morning after our magical wedding day, C and I, despite the joyful exhaustion, rallied ourselves to the Marriott Marquis for the Goodbye Brunch. This entire event owes its tremendous success to Mama Maven, whose incredible dedication and hard work made it a reality. The brunch was entirely her initiative and would not have been possible without her tireless efforts. One of Mama Maven’s first brilliant moves, as soon as our wedding date was confirmed, was to secure room blocks at several hotels in San Francisco. While not all guests chose to stay at these hotels, we wanted to ensure convenient options were available. True to her negotiating prowess, Mama Maven secured an incredible deal, proving yet again she is simply the best!
Considering the majority of our guests were staying at the Marriott Marquis, hosting the brunch there was an ideal choice. Its central location also offered easy accessibility for everyone. Anyone who has experienced a Marriott breakfast buffet knows its reputation for excellence. We essentially provided our guests with access to this fantastic buffet, while the Marriott thoughtfully reserved their “Chill Lounge” (yes, that’s its actual name!) exclusively for our party. They meticulously arranged tables and chairs, set up coffee and orange juice stations, and ensured every guest felt comfortable and accommodated. As an added bonus, we cleverly repurposed the beautiful flowers from the wedding, which Mama Maven had thoughtfully dropped off the night before – a true win-win for sustainability and aesthetics.
Overall, it was a perfectly orchestrated conclusion to our wedding weekend, providing a relaxed and intimate setting to bid farewell to all our loved ones before they headed home and we departed for our honeymoon. A colossal thank you to Mama Maven for orchestrating such a memorable event!
* * * * *
Embracing the DIY Wedding Journey: Our Creative & Cost-Saving Solutions
Now, let’s transition to the exciting world of DIY wedding details, hoping that our experiences can offer valuable insights as you plan your own special day. We opted not to hire a wedding planner and certainly did not have an extravagant budget, making the “do it yourself” approach absolutely essential. While I generally enjoy small DIY projects, the scope of wedding DIY was significantly larger than anything I had tackled before. Fortunately, I was blessed with an incredible support system. To effectively manage costs without compromising on personal touches, here are the key elements we chose to DIY for our wedding:
- Event Signage: Including welcome signs, seating cards, table numbers, guestbook prompts, and our unique hashtag signs.
- Floral Arrangements: Crafting bouquets, boutonnieres, table centerpieces, aisle decor, and even the brunch flowers.
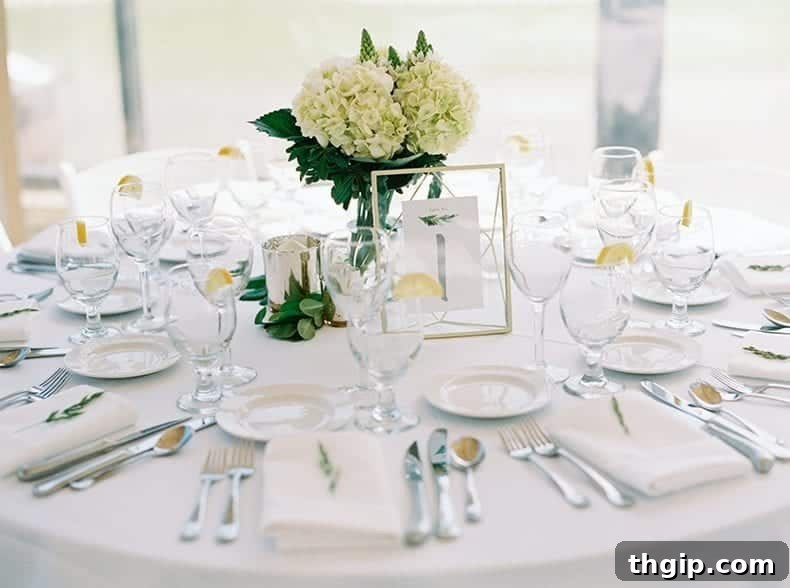
- Table Design & Decor: Conceptualizing and executing the overall aesthetic for our reception tables.
- Chuppah Construction: Building our traditional wedding canopy.
It’s truly difficult to quantify the immense financial savings we achieved by undertaking these projects ourselves. Naturally, they required a substantial investment of time and effort, but the thousands of dollars saved undoubtedly made every moment worthwhile and added a deeply personal touch to our celebration.
Essential Tips for a Successful DIY Wedding Project
Before you embark on your own DIY wedding adventure, here are a few fundamental tips we learned along the way:
- Define Your Wedding Theme Early: Even if it’s as simple as a color palette, establishing a clear theme acts as your guiding star, helping to filter ideas and maintain cohesion. For our wedding, we chose an elegant and understated theme of green, white, and gold, complemented by lush greenery. This clarity made every design decision significantly easier, ensuring a unified aesthetic across all elements.
- Leverage Pinterest Effectively: Pinterest is an invaluable resource for wedding planning, truly your best friend throughout the process. I created a dedicated “secret board” where I meticulously pinned all inspirations. Crucially, I made a conscious effort to only pin ideas that were realistically achievable within our budget, our skill sets, and our chosen venue’s constraints. Avoid falling into the trap of pinning aspirational, yet impractical, concepts that might lead to frustration. Use it to gather ideas, then refine and adapt them to your specific circumstances.
- Allocate Ample Time for Every Project: This is perhaps the most critical piece of advice. Everything, from designing signs to arranging flowers, consistently takes far longer than anticipated. Proactive planning and generous time allocation are paramount to mitigate stress and ensure high-quality results. Start early, break projects into smaller, manageable tasks, and build in buffer time for unexpected delays or learning curves.
Crafting Personalized Wedding Signs with Photoshop & Budget-Friendly Finds
One of our most impactful DIY projects involved creating all the wedding signage ourselves. I personally designed each sign using Adobe Photoshop. Adhering strictly to our green, white, gold, and greenery theme, I ensured a consistent visual language across all pieces. The signs I meticulously crafted included:
- Two prominent welcome signs, strategically placed at both venue entrances.
- A gentle reminder sign for guests to sign our guestbook.
- Three charming signs encouraging guests to use our unique wedding hashtag.
- A comprehensive seating chart to guide guests to their tables.
- Fourteen distinct table signs, identifying each table with a specific design element.
- Signs we designed but ultimately didn’t use: Menu cards (we simply ran out of time!), and a gift sign (forgot to make this in the final rush!).
After perfecting each design in Photoshop, we took the files to Fedex for printing. They were able to print all our signs to the exact desired sizes, and the total cost was surprisingly affordable at just $100. To display them elegantly, we housed all our signs, with the exception of the large welcome signs, in these beautiful 5 x 7 Umbra frames. These frames proved to be absolute lifesavers – their aesthetic perfectly matched our theme, and they provided a cohesive, polished look across all our signage. Umbra truly came to the rescue for so many decor elements!
For the larger welcome signs, after printing them at Fedex, we mounted them onto two sturdy sheets of wood. We purchased these wood sheets from Home Depot and then stained them ourselves to achieve a rustic yet refined look. This DIY approach saved us a significant amount, costing only $60 in total compared to similar pre-made signs on Etsy priced at $80 each. This was a project we felt particularly proud of!
The hashtag reminder signs found their home in these equally charming picture holders, also from Umbra. As I mentioned, when it comes to stylish and affordable decor, Umbra truly feels like a wedding mecca.
The Daring DIY Wedding Flowers: From Mart to Masterpiece
Undoubtedly, the floral arrangements were the most ambitious and daring DIY undertaking of our wedding. The intense timeline required all arrangements to be completed the day before the wedding, adding an extra layer of pressure. Fortunately, we were well-prepared, and I had the incredible luck of having a team of women with prior experience in DIY wedding flowers. C’s sister, Lauren, had done her own wedding flowers in Carmel a few years prior, so her expertise and that of her crew were invaluable. However, I truly believe that with sufficient preparation and a willingness to learn, anyone can tackle this project. So, let’s talk about how we approached our DIY wedding flowers.
The San Francisco Flower Mart, a vast warehouse nestled in SOMA, is the primary hub where most florists in the city source their blooms. After 10:00 AM, it opens its doors to the public, allowing anyone to purchase flowers in bulk. It truly offers everything imaginable! The key to navigating this vibrant market successfully is to arrive with a clear plan, yet maintain an open mind to adapt based on availability.
We ventured to the Flower Mart on Friday morning with the intention of assembling all the arrangements on Saturday morning, ready for drop-off at the venue on Sunday. We had pre-ordered all our vases and buckets, giving us a precise idea of the quantity of flowers required. That said, it’s impossible to know with 100% certainty what specific flowers will be in stock, so we went in armed with our theme (green and white) but remained flexible about particular types of flowers. I had several inspirational pictures pinned, but we ultimately interpreted those ideas based on the beautiful selection we discovered at the mart. Pro tip for keeping flowers fresh: Purchase large buckets from Home Depot or a similar store, and ask the vendors at the flower mart to add water directly to them for immediate hydration and transport.
After acquiring all our chosen blooms, we carefully packed them into our cars and transported them to Lauren’s house for storage. The following morning, I rallied our incredible “troops”—C’s cousins—and we transformed Lauren’s space into an efficient assembly line. Together, we crafted all the floral arrangements for the tables and filled the aisle buckets. My personal bouquet and my niece’s flower girl bouquet were true team efforts. C’s mom, with her artistic touch, did an absolutely amazing job creating the boutonnieres, incorporating fresh succulent clippings from Lauren’s garden for a unique and memorable detail. Undertaking your own wedding flowers requires a leap of faith and a good deal of courage, but honestly, these moments of shared creativity and teamwork are among my most cherished memories from the entire wedding weekend. A heartfelt thank you to everyone who lent their hands and hearts to this beautiful project!
Designing Our Dream Tables: Harmonizing Aesthetics and Comfort
Unsurprisingly, having a clearly defined wedding theme significantly streamlined the process of table design. We approached this with several key considerations in mind. Firstly, the height of the floral centerpieces was crucial; we wanted to ensure guests could easily converse across the table without obstructions. Secondly, we aimed to create a warm and inviting atmosphere, which we achieved through the strategic placement of candles. Lastly, we sought to seamlessly blend the beauty of the outdoors with our indoor reception space by incorporating natural greenery directly onto the tables. Crucially, I also wanted to avoid a cluttered look and minimize accumulating an abundance of single-use items that would never be used again after the wedding.
Our stunning floral arrangements served as the primary centerpieces, and all other elements were designed to complement them. Being a highly visual person, I even created a detailed mock-up of the table design in Photoshop to visualize everything before actual implementation. The table signs, as mentioned earlier, were designed in Photoshop, printed at Fedex, and then elegantly displayed in our beloved Umbra frames. We then ordered a selection of simple yet elegant candle holders from Amazon and utilized additional greenery sourced from the Flower Mart to complete the tablescape. The overall design wasn’t overly extravagant, but it perfectly reflected our personalities – understated, elegant, and authentic. We were truly delighted with the final result, which perfectly captured the natural and sophisticated ambiance we envisioned.
The DIY Chuppah: A Symbol of Our Future Home
I must confess, I shouldn’t be the primary narrator for this particular section, as my direct involvement in the chuppah’s design was minimal. For those unfamiliar, a chuppah is a traditional Jewish wedding canopy, deeply symbolic of the new home a couple builds together. Its open sides are a beautiful reminder that their home will always be welcoming and open to friends and family. The actual construction of our chuppah was a remarkable feat undertaken by C and his uncle, who crafted it from durable Douglas fir wood. Beyond that, my knowledge is limited to observing their incredible skills. I provided them with inspirational pictures, and they brilliantly leveraged their engineering and architectural expertise to bring it to life. Given that our wedding day was marked by surprisingly strong, almost hurricane-force winds, and the chuppah remained perfectly steadfast, I can confidently say they did an absolutely epic job!
We adorned the top of the chuppah with significant family heirlooms: tallit (Jewish prayer shawls) belonging to the women of my family, adding a layer of spiritual and familial connection. We stood beneath this sacred canopy on a beautiful rug, a cherished gift from C’s parents from one of their trips to Pakistan, further weaving our family histories into the ceremony. Despite the challenging winds, C’s uncle ingeniously managed to secure fresh plants and greenery to the chuppah, an impressive feat that added a natural touch. We intentionally kept the chuppah’s design relatively simple, allowing the breathtaking outdoor surroundings of our venue to speak for themselves and provide a natural, grand backdrop.
* * * * *
Embracing Authenticity: Your Wedding, Your Way
Weddings are, at their core, a profoundly individualized experience. There’s a good chance that as you read this recap, our specific design choices might not align with your personal taste, and that is absolutely, perfectly fine! Every couple possesses unique preferences, and the true essence of wedding planning is not about trying to please every possible aesthetic – that would be an impossible and ultimately unsatisfying endeavor. C and I gravitate towards classic, timeless aesthetics. While I recognize that in 30 years, I might look back and find certain elements a bit dated, I consciously strove to avoid anything overtly trendy that I knew I would genuinely dislike in the distant future (yes, I’m looking at you, flower crowns!). However, if mid-century modern, moody vibes, or elaborate flower crowns are entirely “your jam,” then by all means, embrace them wholeheartedly – DO IT! Your wedding should be an authentic reflection of who you are as a couple right now, a joyous celebration that encapsulates your current style and love story, even if it brings a nostalgic chuckle years down the road.
While we didn’t DIY every single aspect of our wedding – some things simply weren’t practical or worth the effort to do ourselves – I have absolutely no regrets about the parts we chose to tackle. They weren’t all flawless, perhaps, but they undeniably created some of the most cherished memories that C and I will treasure for a lifetime. And as someone who thoroughly enjoys saving money, the significant financial benefits of our DIY approach also bring a great deal of satisfaction!
This officially concludes our wedding recap series, but stay tuned! Next week, I’ll be sharing our incredible honeymoon adventure to Napa and Sonoma – quite possibly one of the best weeks of my life and a post I’m particularly excited to write. Keep an eye out for it!
Our Wedding Dream Team & Resources:
Photography: Sierra Ashleigh Photography (digital + film)
Invites: Minted
Dress: Blush by Hayley Paige
Shoes: Raye Laurel Heel (unfortunately sold out)
Venue + Catering: Presidio Golf Course Clubhouse
Dessert: Marla Bakery
Flowers: Proudly DIYed by us!
Hair: Sarah Jordan from Harper Paige Salon
Makeup: Nikol Elaine
DJ: Fox Sounds
Brunch Venue: Marriott Marquis
Share Your Story: What Were Your Favorite Wedding DIY Projects?
Did you incorporate any DIY projects into your wedding celebration? What invaluable advice would you offer to someone considering the DIY route for their special day? We’d love to hear your experiences and tips in the comments below!