
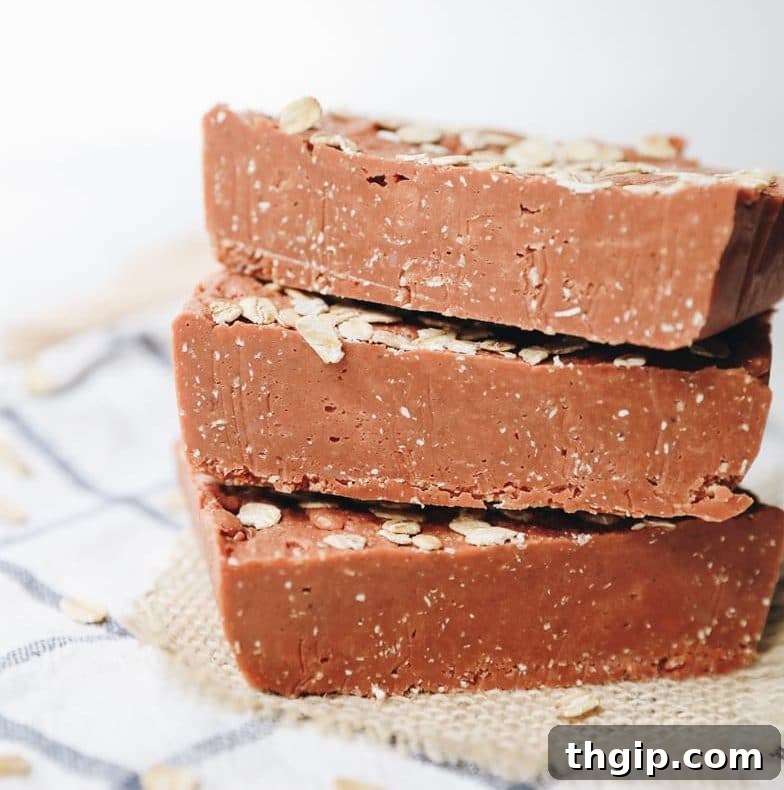
Welcome to the world of homemade bar soap! If you’ve ever thought creating your own soap was a complex task, prepare to be pleasantly surprised. This comprehensive, step-by-step guide will demystify the process, showing you how to craft beautiful, beneficial bar soap using the remarkably simple melt-and-pour method. We’ll focus on ingredients that are not only nourishing for all skin types but are especially gentle and soothing for sensitive skin, transforming your daily cleansing routine into a luxurious, natural experience.
For many years, like countless others, my bathroom routine revolved around liquid body washes. However, a growing commitment to more sustainable, natural, and cost-effective lifestyle choices led me down a fascinating path: soapmaking. This seemingly complex endeavor quickly revealed itself to be incredibly accessible and rewarding. Switching from plastic-bottled liquid wash to solid bar soap was a small change with a significant environmental impact, reducing plastic waste and often saving money in the long run. Moreover, crafting my own soap offered complete control over ingredients, ensuring only the purest, most beneficial elements touched my skin.
My journey into soapmaking actually began years ago as a creative outlet and a clever way to save money. Some may recall my previous DIY blog, where I frequently shared various bar soap recipes. The common misconception is that making soap from scratch is difficult, but the truth is, with the right approach and a key ingredient, it’s remarkably simple. That secret ingredient? Melt and pour soap base.
The Simple Secret: Melt and Pour Soap Base
While the traditional cold process soap-making method, which involves working with lye, is fascinating in its chemistry, it can be quite intimidating for beginners. The idea of handling caustic chemicals that require strict safety measures—like wearing goggles, rubber gloves, and ensuring proper ventilation to avoid fumes—isn’t appealing to everyone. For those seeking a more approachable, safer, and quicker route to handmade soap, melt and pour soap is an absolute game-changer. It eliminates the need for handling lye directly, making the entire process far less daunting and much more enjoyable.
So, what exactly is melt and pour soap? It’s a pre-made soap base, already saponified and hardened into a block. Essentially, all the hard chemical work has been done for you. This base is ready to use as is, but its true magic lies in its versatility: you can easily melt it down, incorporate your desired additives, and then pour it into molds to create personalized soaps. This flexibility makes it ideal for beginners and allows for endless customization. In this guide, we’ll focus on adding ingredients specifically chosen for their nourishing and moisturizing properties, making them perfect for even the most sensitive skin.
Choosing Your Melt and Pour Soap Base: Essential Considerations
The market offers a wide variety of melt and pour soap bases, each with unique characteristics. To ensure you select the best base, especially for sensitive skin, keep the following in mind:
- Paraben, Preservative, and PEG-Free: These chemicals can be irritating to sensitive skin and are best avoided in natural skincare products. Parabens are commonly used as preservatives but have raised health concerns, while PEGs (Polyethylene Glycols) can sometimes act as penetration enhancers, potentially carrying other undesirable chemicals into the skin.
- SLS-Free (Sodium Lauryl Sulfate): SLS is a common foaming agent found in many cleansing products, but it is a known skin irritant for sensitive individuals. Opting for an SLS-free base significantly reduces the risk of dryness and irritation.
- No Added Coloring: Artificial dyes can often trigger allergic reactions or sensitivities. Stick to bases that are naturally colored or uncolored, and use natural colorants (like clays) if you wish to add color.
- Fragrance-Free or with Natural Essential Oils (with caution): Added synthetic fragrance oils are a frequent culprit for skin irritation. While pure essential oils can be a natural alternative, even they can cause reactions in very sensitive individuals. Always perform a patch test if using essential oils, or choose to omit them entirely for the safest option.
Look for Bases Enriched with Skin-Loving Ingredients:
For an extra boost of hydration and soothing benefits, consider melt and pour bases that already contain:
- Shea Butter: Renowned for its rich moisturizing and emollient properties, shea butter helps condition and soothe dry, irritated skin.
- Goat’s Milk: A fantastic choice for sensitive skin, goat’s milk is packed with vitamins and minerals, and its lactic acid content provides gentle exfoliation while maintaining skin’s natural pH.
- Cocoa Butter: A deeply moisturizing fat, cocoa butter forms a protective barrier on the skin, helping to lock in moisture and improve elasticity.
- Coconut Oil: While generally beneficial for its moisturizing qualities, some individuals with very sensitive skin can still react to coconut oil. Always test a small area first.
Gather Your Essentials: What You Need to Make Bar Soap
Crafting your own homemade bar soap doesn’t require an extensive arsenal of specialized equipment. Many items you likely already have in your kitchen can be repurposed for this fun DIY project. Here’s a detailed look at what you’ll need to create this nourishing bar soap:
- Melt and Pour Soap Base: As discussed, choose a high-quality, sensitive-skin-friendly base. For this recipe, I highly recommend a goat milk soap base for its incredible nourishing properties, offering a creamy lather and extra hydration.
- Oat Flour (Colloidal Oatmeal): This ingredient is a hero for sensitive and irritated skin. Colloidal oatmeal is finely ground oats that, when dispersed in water, form a protective barrier on the skin, locking in moisture and easing inflammation, itching, and redness. You can buy pre-made oat flour or simply blend regular rolled oats in a high-speed blender or food processor until a very fine, powdery texture is achieved.
- Pink Clay: Also known as French Pink Clay or Rose Clay, this gentle clay is fantastic for sensitive and mature skin. It helps to lightly exfoliate, detoxify, and absorb impurities without stripping the skin’s natural oils. It’s known to reduce inflammation and irritation, and its mild nature makes it suitable even for acne-prone sensitive skin types. It also imparts a beautiful, natural pale pink hue to your soap.
- Raw Honey: A true marvel from nature, raw honey is a natural humectant, meaning it draws moisture from the air into the skin, providing deep hydration. It’s also a mild exfoliator, thanks to its natural alpha hydroxy acids, and boasts potent antibacterial and antiseptic properties, making it excellent for preventing acne and soothing troubled skin. Honey soap has been cherished for centuries for its benefits for sensitive complexions.
- Jojoba Oil: Technologically a liquid wax rather than an oil, jojoba oil is remarkably similar to the natural sebum produced by our skin. This makes it incredibly well-tolerated by all skin types, especially sensitive and oily skin, as it’s non-comedogenic (won’t clog pores). It provides deep hydration, balances oil production, and helps to reduce inflammation. If jojoba oil isn’t readily available, high-quality olive oil or almond oil make excellent substitutes, offering similar moisturizing benefits.
Beyond the core ingredients, you’ll need a way to mold your soap. While a dedicated silicone soap mold makes the process incredibly easy and allows for beautifully shaped bars, a standard loaf pan works perfectly well if you don’t have one. Simply line your loaf pan with parchment paper to prevent the soap from sticking and ensure easy removal once hardened.
Your Guide to Homemade Bar Soap: Step-By-Step
If this is your first foray into soap making, you’re in for a treat! I’m going to walk you through each step with clear instructions, ensuring a smooth and successful experience. You’ll quickly see that it’s far simpler than you might have imagined.
STEP 1: PREP YOUR INGREDIENTS AND EQUIPMENT
Begin by gathering all your chosen ingredients and measuring them accurately. Take your melt and pour soap base (for this recipe, we’re using 1 lb, which is typically half of a standard 2 lb block) and cut it into uniform small cubes. Smaller cubes melt more evenly and quickly. There’s no need for precise measurement here; a good estimate of half the block is fine. If you don’t own a silicone soap mold, prepare your loaf pan by lining it completely with parchment paper. This creates a non-stick surface, making it easy to release your finished soap block later.
STEP 2: GENTLY MELT THE SOAP BASE
Now it’s time to melt your soap. You have two primary options: the microwave or a double boiler. For microwave melting, place the soap cubes in a microwave-safe bowl and heat them in 30-second intervals, stirring thoroughly after each interval. This prevents scorching and ensures even melting. Alternatively, the double boiler method is a gentler approach that gives you more control, though it takes a little longer. Set a heat-safe bowl (like stainless steel) over a pot of simmering water on your stovetop, ensuring the bowl doesn’t touch the water. Stir occasionally as the steam gently melts the soap. This method typically takes about 10 minutes for the soap to fully liquefy. Whichever method you choose, vigilance is key to prevent overheating or burning the soap base, which can affect its quality and scent.
STEP 3: INCORPORATE ALL THE BENEFICIAL INGREDIENTS
Once your soap base is completely melted and smooth, remove it from the heat source. This is the exciting part where you add all the nourishing extras! Carefully stir in the oat flour, pink clay, raw honey, and jojoba oil. Using a spoon or spatula, mix the soap mixture thoroughly until all the ingredients are well combined and evenly distributed. Ensure there are no clumps of clay or oats, and the honey and oil are fully integrated into the melted soap base. Work relatively quickly, as the soap will start to cool and thicken.
STEP 4: POUR INTO MOLD AND ALLOW TO HARDEN
Immediately after mixing, carefully pour your liquid soap “batter” into your prepared mold (either the silicone mold or the parchment-lined loaf pan). Once poured, gently tap the mold against your counter a couple of times. This helps to release any trapped air bubbles, ensuring a smooth, aesthetically pleasing finish for your bar soap. If desired, you can sprinkle a small amount of rolled oats on top for a rustic look and extra gentle exfoliation. Now comes the waiting game: allow your soap to sit undisturbed for a few hours at room temperature until it has fully hardened. If you’re in a hurry, you can speed up the process by placing the mold in the refrigerator for about 1 hour.
STEP 5: CUT AND STORE YOUR HOMEMADE SOAP BARS
Once the soap is completely firm and cooled, carefully unmold it. If using a loaf pan, gently lift the parchment paper to release the block. Now, using a sharp, non-serrated knife, cut your large soap block into individual bars of your desired size and shape. A typical silicone soap mold will yield around 6-8 smaller, perfectly shaped pieces. If you used a loaf pan, you’ll likely get about 3-4 larger, rustic bars. To store your newly crafted soaps, wrap them individually or place them in a breathable paper bag. Store them in a cool, dark place away from direct sunlight and humidity. Unlike cold process soap which requires a lengthy curing time, melt and pour soaps are ready to use as soon as they’ve hardened, and they will last indefinitely when stored properly.
How Long Will Your Homemade Bar Soap Last?
One of the fantastic benefits of making your own soap is its impressive longevity. A single bar of this homemade soap can last surprisingly long, often several months for one person with regular use, or even for two people sharing a shower. Given that this recipe yields between 4 to 8 bars, you could potentially have enough handmade soap to last at least a year, depending on usage habits. To maximize the life of your bar soap, always allow it to dry out completely between uses. Use a well-draining soap dish that prevents water from pooling underneath the bar, as prolonged exposure to water can soften the soap and shorten its lifespan.
Is This Homemade Soap Antibacterial?
Yes, the ingredients in this recipe contribute to its antibacterial properties. Raw honey, in particular, is well-known for its natural antibacterial and antiseptic qualities. The melt and pour soap base itself is a saponified product, which is inherently cleansing. However, it’s important to clarify the distinction between soap for body washing and hand washing recommendations. While this bar soap is excellent for lathering your body in the shower, providing a gentle yet effective cleanse in place of liquid body wash or store-bought bar soaps, the CDC still generally recommends liquid pump soap for handwashing, especially in public settings, due to concerns about cross-contamination with shared bar soaps. For personal use at home, this natural, antibacterial bar soap is perfectly suitable and highly beneficial for your skin.
Hopefully, this guide has illuminated just how simple, rewarding, and beneficial making your own homemade bar soap can be. It’s an easy, economical, and highly customizable way to care for your skin and reduce your environmental footprint. Dive in, experiment with your own favorite ingredients, and enjoy the satisfaction of using a product you’ve created yourself. I can’t wait to hear about your first successful batch!
More Delightful Homemade DIYs You Might Enjoy:
- How to Make Homemade Rosewater
- DIY Salt Scrub Recipe
- How to Make Aromatherapy Candles
- How to Make Homemade Deodorant That Actually Works
- DIY Lip Scrub Recipe
- Moisturizing Avocado Face Mask
- Homemade Bath Salts
How To Make Bar Soap
Learn how to make homemade bar soap using a simple melt and pour method, with nourishing ingredients perfect for sensitive skin.
- Author: Davida Lederle
- Prep Time: 2 minutes
- Cook Time: 10 minutes
- Total Time: 12 minutes
- Yield: 4–8 bars of soap
Ingredients
- 1 lb melt and pour soap (cut into small cubes)
- 1/2 cup of oat flour
- 2 tbsp pink clay
- 1 tbsp raw honey
- 2 tbsp jojoba oil (olive oil will work too)
Instructions
- Gather and measure out all of your ingredients. If you don’t have a silicone soap mold, line a loaf pan with parchment paper.
- Melt your soap in the microwave in 30-second intervals, stirring in between, OR make a double boiler on the stove top. If using the double boiler method, it will take about 10 minutes for your soap to melt. It is much faster in the microwave but make sure you don’t burn it.
- Once soap is fully melted, stir in all of the ingredients (oats, clay, honey, and jojoba oil) until well combined.
- Pour your soap batter into your mold and gently tap against the counter a couple of times to release any air bubbles. Top with rolled oats, if desired. Allow to sit for a few hours to harden (or place in the refrigerator for 1 hour if in a rush).
- Cut your soap into desired pieces. A soap mold can usually yield about 6-8 small pieces, or in a loaf pan, you can usually get about 3-4 bigger pieces.
- Store your soap in a paper bag in a dark place indefinitely. They will not go bad.