
Welcome back to the second installment of my gardening diaries! If you missed the beginning of this exciting (and sometimes bewildering) journey, I highly recommend checking out Part 1: Seedlings. There, I shared our initial motivations for starting a vegetable garden, the very first steps of sowing seeds indoors, and my candid admission of knowing absolutely nothing about gardening. It’s been quite the learning curve, and I’m thrilled to share our progress and lessons learned along the way.
When we last spoke, I had just planted a variety of seeds into our miniature indoor greenhouse, and to our delight, tiny green seedlings had begun to emerge. This entire endeavor, as I emphasized, is a grand experiment, and witnessing those first sprouts felt like a major success. We knew we had a few weeks before these precious seedlings would be ready for their outdoor debut. However, the urge to get our hands dirty (quite literally) was strong, so we decided to get a head start. This impulse led us down the path of directly sowing some seeds outdoors and, more significantly, delving into the world of raised garden beds.
Establishing Your Garden: Site Selection and Light Assessment
Before we dive into the construction of our raised beds, it’s crucial to discuss one of the most fundamental aspects of successful gardening: selecting the right location. Our new home, which we absolutely adore for its spaciousness and charming neighborhood, presented a unique challenge in this regard. One detail we hadn’t fully appreciated upon moving in was the limited sunlight exposure across the property. Mature trees beautifully frame our yard, but they also cast significant shadows, blocking much of the direct sun essential for most edible plants.
While this is certainly something we can happily live with as homeowners, it’s far from ideal for an aspiring gardener. We quickly learned that “winging it” with plant placement wouldn’t cut it. So, we embarked on a mini research project – which, in practical terms, involved diligently observing and mapping the sunlight patterns across our property over several days. This sun-mapping exercise was invaluable in identifying the most promising spots.
Our conclusion was clear: the back deck and a cozy patio off one of the bedrooms offered the most consistent and prolonged sunlight. As renters, we also had reservations about directly altering the landscape by digging up large sections of the yard. The thought of extensive soil testing and amendment also felt like a significant undertaking we weren’t prepared for. Considering these factors, raised beds and container gardening emerged as the most practical and effective solutions for our specific situation. It’s a powerful lesson I’ve learned early on: there are countless ways to garden, but choosing the method best suited to your environment and resources is key to success.
Building a Solid Foundation: Constructing Your Own Raised Beds
With our prime sunniest spots identified – a spacious section on our back deck for a large raised bed and a couple of spots on our bedroom patio for large tomato pots – it was time to bring our vision to life. Fortunately, I married an engineer who possesses a natural talent and passion for building things. Assembling a raised bed became a fun, hands-on project for him. While I’ll share the detailed specifications of his custom build, I want to emphasize that there are many simpler options available for those who might not be as “handy.”
For instance, your local home improvement store, like Home Depot, offers clever planter cinderblocks designed with slots for lumber. These make assembly incredibly straightforward. For a basic garden bed, you would typically need four cinderblocks and four pieces of untreated wood (cedar or redwood are excellent choices for their rot resistance). To achieve a taller bed, simply double your materials to eight cinderblocks and eight wood pieces, stacking them securely. If even this level of DIY feels daunting, the market is rich with pre-built garden beds that require minimal assembly, allowing you to jump straight into planting.
Our Custom Raised Bed: An Engineer’s Approach
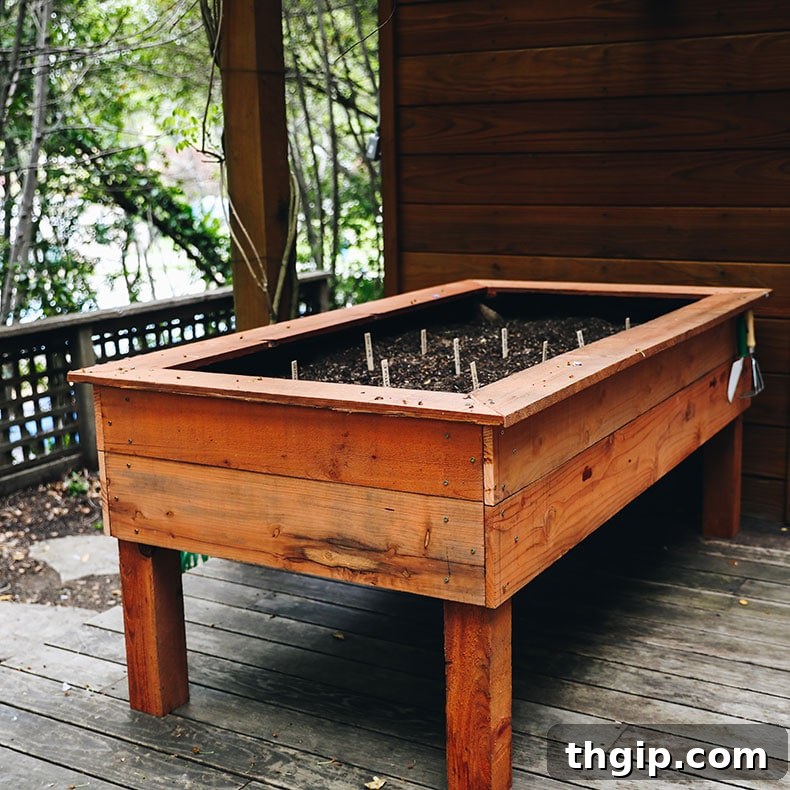
For those interested in a more robust, custom-built option, here’s a detailed look at the 3-foot by 6-foot garden bed my husband, C, constructed. This particular design stands approximately 12 inches deep, with a significant 16-inch clearance from the bottom of the bed to the deck below. This extra height was a deliberate design choice, primarily to deter our curious dog from investigating the nascent plants!
MATERIALS LIST:
LUMBER (Ensure all wood is untreated for safe edible gardening)
- Base: 1 x [3 ft x 6 ft] cut of 3/4” thick plywood (for the bottom of the bed)
- Corner Posts: 4 x [4 in x 4in] posts, cut to 30” long (these provide structural integrity and height)
- Side Boards (Bottom Layer):
- 2 x [1 in x 8 in] long side boards, cut to 74.5”
- 2 x [1 in x 8 in] short side boards, cut to 36”
- Side Boards (Top Layer):
- 2 x [1 in x 6 in] long side boards, cut to 74.5”
- 2 x [1 in x 6 in] short side boards, cut to 36”
- Picture Frame Edging (Optional, for a finished look):
- 2 x [1 in x 6 in] short edge pieces, cut to 37.5”
- 2 x [1 in x 6 in] long edge pieces, cut to 74.5”
HARDWARE:
- 50 Cabinet screws (3” long, for securing major components)
- 10 metal L-brackets (can have 2 or 3 holes/screws per flange, for reinforcing the base)
- 40 Screws for brackets (often sold with brackets, ensure appropriate length)
- 4 x Flat brackets (optional – used to secure side boards together in pre-assembly for easier handling)
TOOLS:
- Power drill (essential for driving screws)
- Appropriate drill bits (likely Phillips and star bits, match screw types)
- Saw (a jigsaw is recommended for precision cuts, a hand saw works but requires more effort)
- Clamps (optional, but highly recommended for holding pieces in place during assembly)
CONSTRUCTION DIRECTIONS:
For the easiest build, consider having all lumber cut to size at the lumberyard or hardware store. It’s wise to call ahead to confirm their cutting services and current availability.
Steps for Assembly:
- Pre-Assembly (Optional, but recommended for ease):
If opting for pre-assembly, fasten the bottom and top side boards together in the middle using flat brackets. This creates larger, more manageable sections for the main frame.
- Frame Assembly – First Long Side:
Lay two of the corner posts on a flat, level surface, roughly 6 feet apart. If you pre-assembled the long side boards, arrange one connected long side section on top of these posts, ensuring it lies flush with the top ends of the posts. Make sure the long side boards overhang the corner posts by 3/4” on each end. Securely screw the side boards into the posts. If you skipped pre-assembly, first attach the top long side board to the posts, ensuring the 3/4″ overhang, then repeat immediately below with the bottom long side board.
- Prepare the Plywood Base: Bottom Corner Notches:
Carefully cut out square notches from each corner of the plywood base. These notches are crucial to accommodate the corner posts. Remember, while often called 4”x4” posts, their actual dimensions are typically 3.5”x3.5”, so cut your notches accordingly.
- Connect Base to Frame – Long Side 1:
Lay the assembled long side (posts and boards) ‘face down’ on the ground. Carefully slip the notched plywood base into place. It should rest approximately 1 inch above the bottom edge of the lower long side board, fitting snugly around the corner posts thanks to your notches. Install three L-brackets evenly spaced along the bottom of the long side board to securely connect it to the plywood base.
- Connect the Short Sides:
With your current setup, position the short side boards vertically between the corner posts. They should fit precisely into the gaps created by the overhang you designed earlier. Screw these short side boards into the corner posts, ensuring the edges are flush for a clean finish.
- Connect the Other Long Side and Remaining Posts:
Now, place the remaining long side board section (attached to its two posts) on top of the open side of your partially assembled frame. The corner cuts on the plywood should guide it into position. Screw the side boards into the posts to secure this final side. Reinforce the connection of the base by installing three L-brackets along the bottom of this newly attached long side and two brackets along the bottom of each short side.
- Drainage Holes:
Drill approximately five drainage holes, evenly spaced, across the plywood base. Proper drainage is vital to prevent waterlogging and root rot, ensuring healthy plant growth.
- Optional: Picture Frame Edge:
For a refined finish, miter cut the optional picture frame edging pieces at 45-degree angles for each corner. Place these on top of the assembled frame and screw them into the top of the corner posts.
- Linings (Optional):
Lay down any desired linings. We opted for a weed-blocker liner to cover the drainage holes and a loose netting for additional support, though these are not strictly required.
- Finishing Touches and Reinforcement:
Consider drilling a few extra screws into the side boards to create convenient hooks for hanging small gardening tools. If, once filled with soil, the plywood base shows any signs of bending under the weight, reinforce it. We simply added some scrap plywood pieces to the underside of the base and screwed them into the existing plywood for added stability.
…Davida here again… reading through those steps still gives me a headache! But C assures me it’s quite manageable with the right tools and patience. And the result is truly a sturdy, beautiful raised bed!
Next Steps: The Crucial Choice of Soil
I must confess, before embarking on this gardening adventure, I had a rather simplistic view of soil. My naive assumption was that one simply “dumped dirt into a box and hoped for the best.” Oh, how wrong I was! I quickly learned that the world of soil is far more nuanced and specific than I could have imagined. There’s a genuine science behind crafting the perfect growing medium for your produce, and it’s a topic on which everyone and their mother seems to have a strong, often differing, opinion.
After immersing myself in countless articles, forums, and expert advice, I synthesized the information to determine what I believe to be the optimal soil ratios for our raised beds. You might encounter other recommendations, but based on extensive research, here’s the formula we decided on:
- 60% Organic Topsoil: Provides the bulk of the growing medium, rich in essential nutrients and natural structure.
- 30% Organic Compost: A powerhouse of organic matter, compost improves soil structure, drainage, aeration, and nutrient content, feeding your plants over time.
- 10% Organic Potting Soil: Adds lightness and helps with moisture retention, especially beneficial for young plants and container gardening.
To accurately determine the exact quantities of each soil type needed for our specific raised bed dimensions, we found this fantastic online soil calculator to be incredibly helpful. You simply input the dimensions of your garden bed, and it calculates the total volume of soil required. From there, we applied our chosen percentages to ascertain precisely how much of each component we needed to purchase. This eliminated guesswork and ensured we had the right balance.
You’ll notice a recurring theme here: all of our selected soils are organic. As many of you know from my previous posts, I make a concerted effort to choose organic products whenever possible. Beyond the obvious health benefits for ourselves, organic gardening practices are significantly better for the environment. They promote biodiversity, reduce exposure to harmful chemicals, and contribute to a healthier ecosystem. If your budget and local availability allow, I wholeheartedly encourage you to go organic!
Planting Seeds: Indoor Starts vs. Direct Sowing
As detailed in Part 1, we initiated our gardening journey by starting a variety of vegetable seedlings indoors. This method offers several advantages, especially for plants that require a longer growing season or are delicate in their early stages. These indoor seedlings are thriving, and in just a few more weeks, they will be robust enough for transplanting into our newly constructed raised bed and outdoor containers.
However, we also wanted to experiment with the practice of direct sowing – planting seeds directly into the outdoor soil. This method can be simpler for certain crops and eliminates the transplant shock associated with moving seedlings. At this point, we’ve carefully planted a selection of seeds directly into our raised bed and are eagerly awaiting their germination. Our indoor tomato seedlings, in particular, are looking exceptionally strong and healthy. Once they’re ready for their permanent outdoor home, we’ll fill our patio containers with our carefully prepared organic soil mixture and install supportive trellises to guide their vigorous growth.
Maintaining consistent moisture is paramount for newly planted seeds and young seedlings. Each morning, I make it a ritual to lightly mist the surface of the garden bed using a gentle spray from our hose. The goal is to keep the soil consistently damp, but never waterlogged. I received valuable advice to water in the mornings, as this minimizes evaporation during the hotter parts of the day, ensuring more moisture reaches the plant roots. So far, this routine seems to be working well, though the ultimate success will, of course, be measured by the emergence and growth of our precious plants.
Our hope is that by the time of my next update, we’ll be celebrating either the exciting appearance of tiny baby plants sprouting directly in our outdoor garden, or we’ll be in the midst of transplanting our thriving indoor seedlings to their new, larger outdoor homes. The anticipation is truly part of the joy of gardening!
Important Climate Considerations for Gardeners:
A crucial point I want to emphasize is that every gardener’s experience will be uniquely shaped by their local climate, available space, and sunlight conditions. We are fortunate to be gardening in a relatively mild climate, which has allowed us to begin planting quite early in the season. However, many of you might need to exercise patience and wait until the weather consistently warms up and the risk of frost has passed before beginning your planting efforts.
Understanding your specific climate region is vital for successful gardening. I highly recommend utilizing a reliable resource like this gardening zone guide (or this USDA Plant Hardiness Zone Map for those in the US) to determine your hardiness zone. This will provide invaluable information on what plants thrive best under your particular conditions and when the optimal planting times are for your area. Don’t underestimate the power of local knowledge and tailored advice!
Valuable Gardening Resources
Throughout this burgeoning gardening journey, I’ve consulted a myriad of resources, and while many offered helpful tidbits, a few truly stood out for their comprehensive guidance and practical advice:
- The Well Essentials Beginner Gardener Course: An excellent starting point for new gardeners.
- Garden Betty: A fantastic blog offering a wealth of practical tips and creative gardening ideas.
- Gardeners Supply Company – Garden Planner: A useful tool for visualizing and planning your garden layout.
Are you an experienced home gardener, or perhaps just starting like us? I’d love to hear about your experiences, challenges, and most importantly, any valuable lessons or tips you have for a budding gardener like me! Share your wisdom in the comments below!