
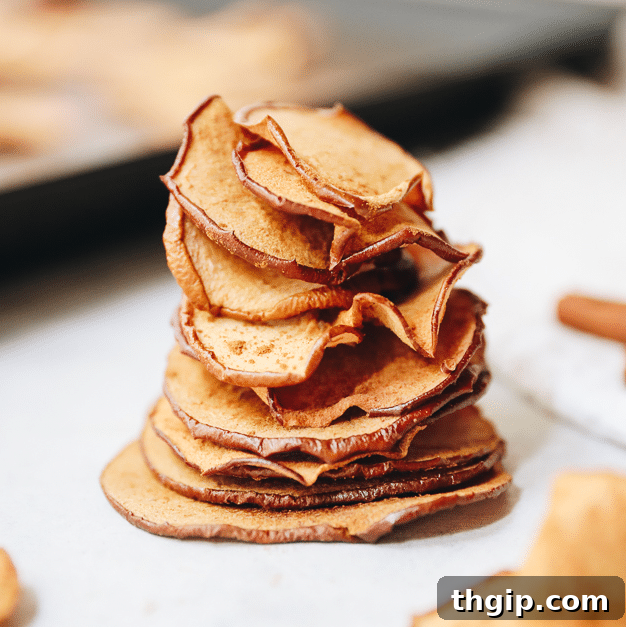
Welcome to the ultimate guide for crafting your own batch of incredibly easy and utterly delicious baked apple chips! Imagine a healthy snack that’s perfectly crisp, naturally sweet, and infused with warm cinnamon – all made with just two simple ingredients and your trusty oven. Forget the expensive store-bought versions or the need for fancy dehydrators. This tutorial will walk you through creating a satisfying, guilt-free treat that’s perfect for any time of year, especially during apple harvest season.
Remember when apple chips first burst onto the healthy eating scene? I was absolutely hooked on the popular store-bought brands, often spending a little too much on bags that seemed to vanish in mere minutes. It was a delicious habit, but not the most budget-friendly! That’s when I decided to take matters into my own hands and perfect my very own homemade version. The result? These baked cinnamon apple chips are not only a fraction of the cost but also incredibly simple to make, giving you complete control over the ingredients and flavor.
Fall has always been synonymous with apple picking for me. There’s something truly special about visiting local apple orchards, breathing in the crisp autumn air, and hand-selecting fresh, vibrant apples directly from the trees. While the past few years might have changed how we experience these traditions, supporting local farmers by stocking up on their delicious apples remains a wonderful way to enjoy the season’s bounty. Even if a trip to the orchard isn’t possible, a visit to your local market will yield plenty of fresh apples perfect for this recipe.
In my humble opinion, you can never have too many apples. They are a staple in our home, constantly being transformed into raw snacks, starring roles in baked goods, and of course, becoming these irresistible apple chips! This recipe stands out for its incredible simplicity. All you really need is your oven and a bit of patience for the baking process. Thankfully, it’s largely hands-off, meaning you won’t need to spend three hours glued to your oven door. There’s no need for any specialized equipment either – I certainly don’t have the counter space for a dehydrator or a mandoline, and you don’t need them for these perfect chips!
Minimal Ingredients, Maximum Flavor: What You’ll Need
The beauty of this recipe lies in its sheer simplicity. You only need two core ingredients, making it an accessible and budget-friendly snack option for everyone.
- Fresh Apples: The star of our show! Any apple variety will work, but specific types can offer different flavor profiles, as we’ll discuss below.
- Cinnamon: This warm, aromatic spice is optional but highly recommended. It complements the natural sweetness of apples beautifully and adds that classic “apple pie” flavor.
That’s it! No added sugars, no preservatives, just pure, wholesome goodness.
No Fancy Equipment Required: Just Your Oven!
As I mentioned, my kitchen isn’t equipped for elaborate gadgets, and I tend to gravitate towards recipes that don’t demand them (the Instant Pot being my one beloved exception!). The great news is, you absolutely do NOT need a dehydrator to achieve perfectly crispy apple chips. Your conventional oven will do the job beautifully, and the process is just as hands-off. This makes homemade apple chips accessible to virtually anyone with a kitchen.
While a mandoline might seem like a tool for achieving uniform slices, I actually wouldn’t recommend using one for apple chips. In my experience, mandolines tend to cut apples too thinly, resulting in slices that are more fragile and less “chip-like.” For the best texture, a slightly thicker, yet still delicate, slice works best. Don’t stress too much about perfectly identical slices; a sharp knife and a steady hand are all you need. The slices will crisp up wonderfully in the oven, regardless of minor variations.
Tips for Slicing Your Apples:
- Use a sharp chef’s knife or a serrated knife for clean cuts.
- Aim for slices approximately 1/16 to 1/8 inch thick. Thinner slices will be crunchier, while slightly thicker ones will offer a chewier texture.
- No need to peel or core! The skin adds a lovely color and extra fiber, and the core can be easily removed as you slice, or simply avoided.
Choosing the Best Apples for Your Chips
One of the most delightful aspects of making apple chips at home is the freedom to experiment with different apple varieties. You truly can’t go wrong with your choice, as almost any apple will yield delicious results. However, selecting specific types can influence the final taste and texture of your chips.
- For a Sweeter Chip: If you prefer your apple chips to be on the naturally sweet side, opt for varieties known for their high sugar content and crisp texture. Excellent choices include Fuji, Gala, Honeycrisp, or Golden Delicious. These apples caramelize beautifully in the oven, enhancing their inherent sweetness.
- For a Tart or Neutral Chip: If you favor a slightly tart flavor that balances the sweetness or a more neutral taste, consider Granny Smith, Pink Lady (Cripps Pink), or McIntosh apples. Granny Smiths, in particular, offer a wonderful tangy contrast, while Pink Lady apples provide a pleasant sweet-tart balance.
- Feeling Adventurous? Why not mix and match? Cutting up a variety of apple types can lead to a fascinating medley of flavors and textures in your batch of chips. Imagine the combination of a sweet Honeycrisp with a tangy Granny Smith – a true taste adventure!
The key takeaway is that all apples work! Don’t let apple choice deter you from trying this recipe. Use whatever you have on hand or what looks freshest at the market.
How to Make Perfectly Crispy Baked Apple Chips [In Your Oven]
The process for creating these delightful apple chips is incredibly straightforward, though it does require a bit of time for baking and cooling. Follow these steps for consistently crispy results:
STEP 1: Preheat Your Oven. Begin by preheating your oven to a low temperature of 230ºF (110ºC). The key to dehydrating apples in a conventional oven is a low, slow bake, which gradually removes moisture without burning the fruit.
STEP 2: Prepare Your Apples. Carefully cut your apples into thin slices. As mentioned, aim for about 1/16 to 1/8 inch thick. Remove any visible seeds, but there’s no need to peel or core the apples beforehand. The skin adds flavor, nutrients, and a rustic appeal. Arrange the thinly sliced apple pieces in a single layer on two baking sheets. It’s crucial to line your baking sheets with parchment paper or a silicone mat to prevent sticking and make cleanup a breeze. Once arranged, generously sprinkle one side of the apple slices with cinnamon.
STEP 3: First Bake and Flip. Place the baking sheets in your preheated oven and bake for one hour. After the first hour, carefully remove the baking sheets from the oven. Using tongs or a spatula, gently flip each apple slice to its other side. This ensures even drying and crisping. Sprinkle the newly exposed side with more cinnamon, if desired.
STEP 4: Second Bake and Crucial Cooling. Return the baking sheets to the oven and bake for another hour. After this second hour, a crucial step for achieving ultimate crispness begins: leave the apples in the oven, but turn the oven off completely. Allow the apples to cool down gradually inside the oven as it comes back to room temperature. This process typically takes an additional 1-2 hours. Do NOT skip this step! This slow cooling is when the remaining moisture evaporates, and the apple slices transform into perfectly crisp chips. Resist the urge to open the oven door during this time. You’ll be amazed at how much crisper they become!
Tips for the Perfect Batch of Apple Chips Every Time
- Uniform Slicing is Key: While perfection isn’t required, trying to keep your slices as consistent in thickness as possible will ensure they all crisp up at roughly the same rate. This prevents some chips from being burnt while others are still soft.
- Don’t Overcrowd the Pan: Give your apple slices space to breathe! Arrange them in a single layer without overlapping. This allows for proper air circulation, which is essential for even dehydration and crisping.
- Adjust Baking Time: Ovens vary, and so does the water content in different apples. Keep an eye on your chips, especially during the second hour. If they look like they’re browning too quickly, you can slightly lower the temperature. Some batches might need an extra 30 minutes in the oven.
- Storage: Once completely cooled and crispy, store your homemade apple chips in an airtight container at room temperature. This will help maintain their crispness. They typically stay fresh and crunchy for up to 5-7 days, though they rarely last that long in my house!
- Experiment with Spices: While cinnamon is a classic, don’t hesitate to get creative. A pinch of nutmeg, a dash of pumpkin pie spice, or even a light sprinkle of ginger could add a delightful twist to your chips. For a touch of extra sweetness without refined sugar, try a tiny dusting of powdered erythritol or stevia.
Healthy & Delicious: The Benefits of Apple Chips
Beyond their delightful taste and satisfying crunch, homemade baked apple chips offer a wealth of health benefits, making them a truly guilt-free snack:
- Rich in Fiber: Apples are well-known for their high fiber content, particularly pectin, which supports digestive health and can help regulate blood sugar levels. Eating the skin on your chips maximizes this benefit.
- Packed with Antioxidants: Apples are loaded with antioxidants like flavonoids and polyphenols, which help protect your cells from damage caused by free radicals, potentially reducing the risk of chronic diseases.
- Naturally Sweet: By using just apples and cinnamon, you avoid the added sugars and artificial ingredients often found in commercially prepared snacks. This makes them an excellent choice for managing sugar intake.
- Vitamin C Boost: While some Vitamin C is lost during baking, apples still contribute to your daily intake, supporting your immune system.
- Hydrating: Apples have a high water content, and even after dehydration, they offer some hydration, along with essential electrolytes.
- Satiating: The fiber and natural sugars in apple chips make them a satisfying snack that can help curb hunger between meals, aiding in weight management.
Choosing homemade apple chips is not just about flavor; it’s about choosing a wholesome, nutritious alternative that fuels your body with goodness.
Creative Ways to Enjoy Your Baked Apple Chips
While this section could easily be dedicated to “how not to devour an entire batch of apple chips in one sitting,” I’ll instead share some fun and delicious ways to enjoy your freshly baked creations!
- By the Handful! The most obvious and often irresistible way. Perfect for an afternoon pick-me-up or a movie night snack.
- Dipped in Nut Butter: Pair them with a spoonful of creamy peanut butter, cashew butter, or almond butter for a protein-packed, satisfying treat.
- Crumbled Over Breakfast: Add a delightful crunch and hint of cinnamon to your morning yogurt, oatmeal, or smoothie bowl.
- Mixed with Granola: Enhance your homemade or store-bought granola with these crispy apple bits for an extra layer of flavor and texture.
- On a Charcuterie Board: Elevate your cheese or charcuterie platter with these elegant and flavorful chips, offering a sweet counterpoint to savory meats and cheeses.
- As a Dessert Topping: Crumble them over ice cream, a fruit crisp, or even a simple baked sweet potato for an unexpected crunch.
Print Recipe
Baked Cinnamon Apple Chips

5 Stars
4 Stars
3 Stars
2 Stars
1 Star
5 from 1 review
A tutorial for an easy, delicious, 2-ingredient snack idea – baked apple chips. Just slice and bake, no dehydrator required!
- Author: Davida Lederle
- Prep Time: 5 minutes
- Cook Time: 3 hours
- Total Time: 3 hours
- Yield: 2-4 servings
- Category: Snack
- Method: Bake
- Cuisine: American
- Diet: Vegan
Ingredients
- 2 large apples OR 3 small apples (see apple types above)
- Cinnamon (if desired)
Instructions
- Preheat oven to 230 degrees F (110°C).
- Slice apples thinly, about 1/16 to 1/8 inch thick. Remove any seeds. No need to peel or core.
- Place thinly sliced apples on 2 baking sheets lined with parchment paper or a silicone mat, ensuring they are in a single layer without overlapping.
- Sprinkle the top side of the apple slices with cinnamon.
- Bake apples for 1 hour.
- Remove from oven, carefully flip each apple slice, and sprinkle the other side with cinnamon.
- Bake for another hour.
- After the second hour of baking, turn the oven off. Leave the apples inside the oven with the door closed and allow them to cool completely. This crucial step takes at least 30 minutes to 2 hours, during which the residual heat will continue to dehydrate and crisp up the chips.
- Once completely cooled and crispy, store your homemade apple chips in an airtight container at room temperature.
Like this post? Here are more apple recipes you might enjoy:
- Apple Cinnamon Granola
- Peach and Apple Crisp
- Apple Pie Energy Balls
- Spiralized Apple Crumble